
Welcome to RackAI (Console)
Prefer the API or CLI?This guide walks through the RackAI web console. To deploy and manage
models with therackaictlCLI and REST API instead, see the
RackAI User Guide.
1. Core concepts
Organizations
Everything in RackAI is scoped to an organization, your top-level workspace.
A single user can belong to multiple organizations, and everything you see —
deployed models, datasets, fine-tuning jobs, and adapters — belongs to the
organization you are currently in. Resources are isolated per organization: a
model or dataset created in one organization is visible only there.
You can find and switch organizations from the menu under your initial in the
top-right corner of the UI.
Navigation overview
The left sidebar is grouped into three areas:
- Inference — Model Deployments and AI Studio (serving and testing models)
- Fine Tuning — Jobs, Datasets, and LoRA Adapters (adapting models to your data)
- Resources — Models and Registry Credentials (the model catalog and the credentials needed to fetch weights)
2. Logging in
RackAI does not have self-service signup. Rackspace provisions your account and
login details for you and adds you to the correct organization behind the scenes
(via the identity provider, Auth0). If you need access — or need someone else
added to an organization — request it from the Rackspace team rather than
creating an account yourself.
Once your account is set up, go to the RackAI login page:
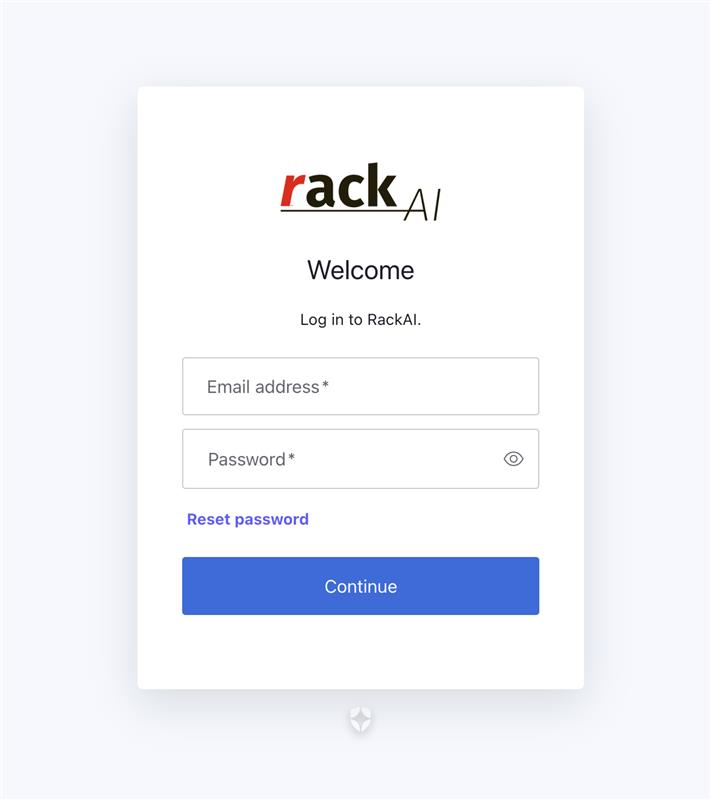
- Enter the Email address Rackspace provided.
- Enter your Password (use the eye icon to reveal it). If you've forgotten
it, use Reset password. - Click Continue.
The organization name shown at the top of the login card (for example, your
company's workspace) confirms which tenant you're signing into. After logging in
you land on the Home dashboard.
3. Home
The Home dashboard is your landing page. It shows Your Deployed Models at the
top and the Model Catalog below.
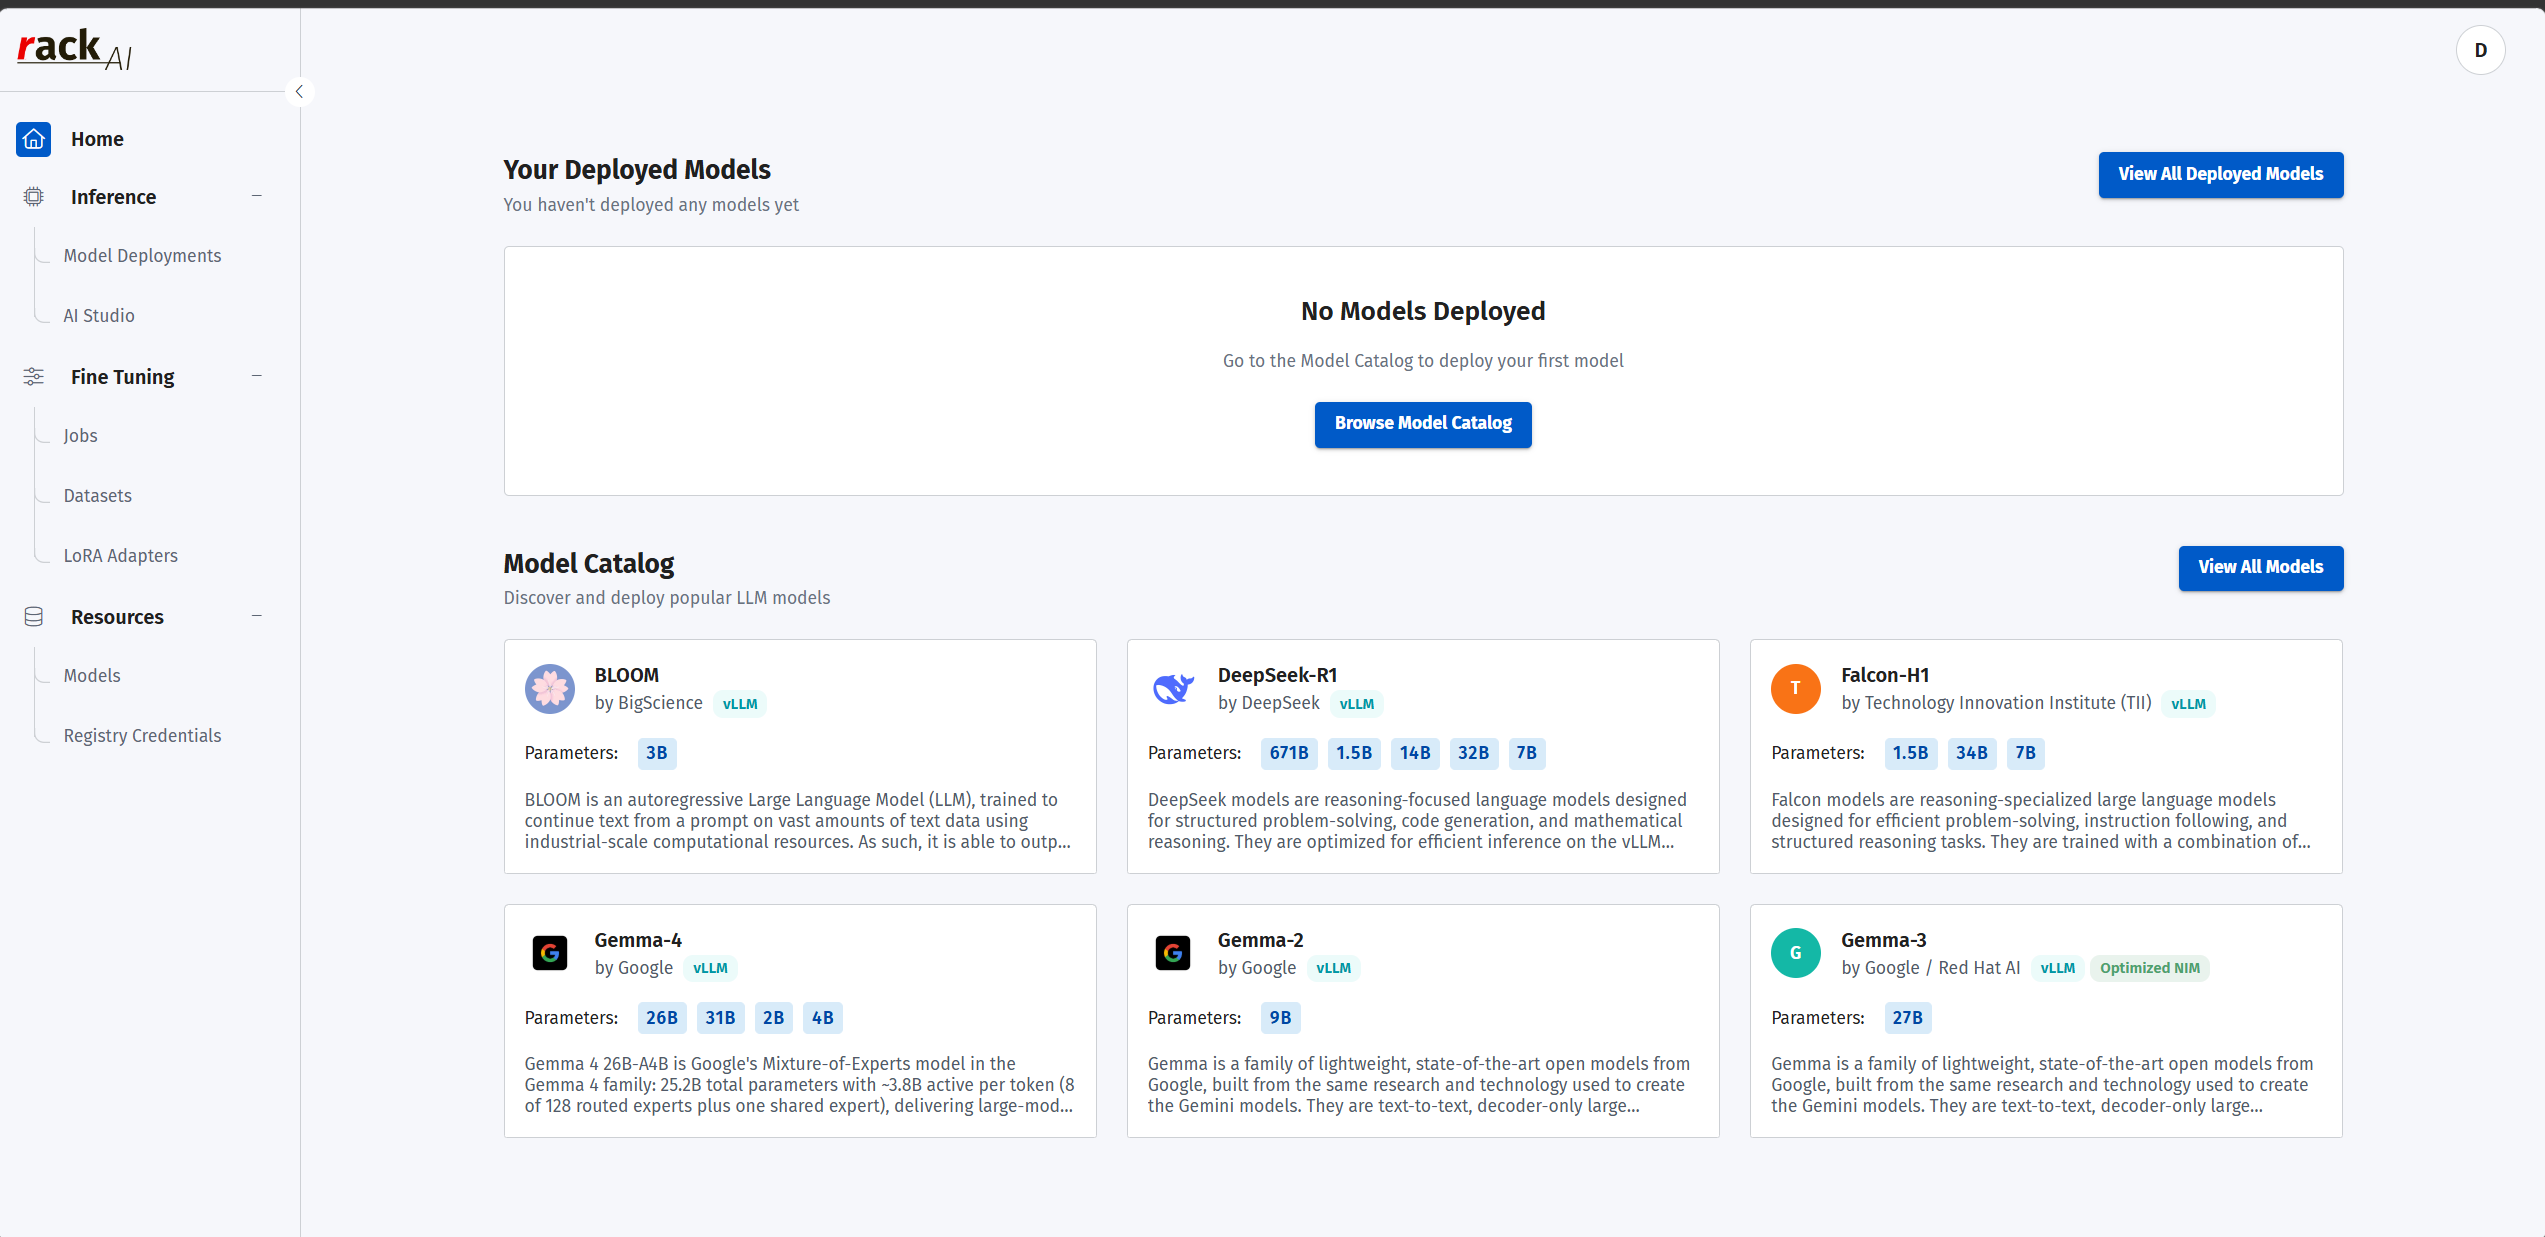
A new organization starts with no models deployed — you'll see a No Models
Deployed panel with a Browse Model Catalog button. Use View All Deployed
Models to see your deployments once you have them, or View All Models to
open the full catalog.
The Model Catalog previews popular LLMs you can deploy, each card showing the
provider (e.g. BigScience, DeepSeek, Google, Meta, Mistral AI, Alibaba), the
serving runtime tag (vLLM, and Optimized NIM where available), and the available
parameter sizes.
4. Inference
4.1 Model Deployments
Open Inference → Model Deployments to view deployed models and browse the
full catalog. The page has two tabs: Deployed Models and Models Catalog.
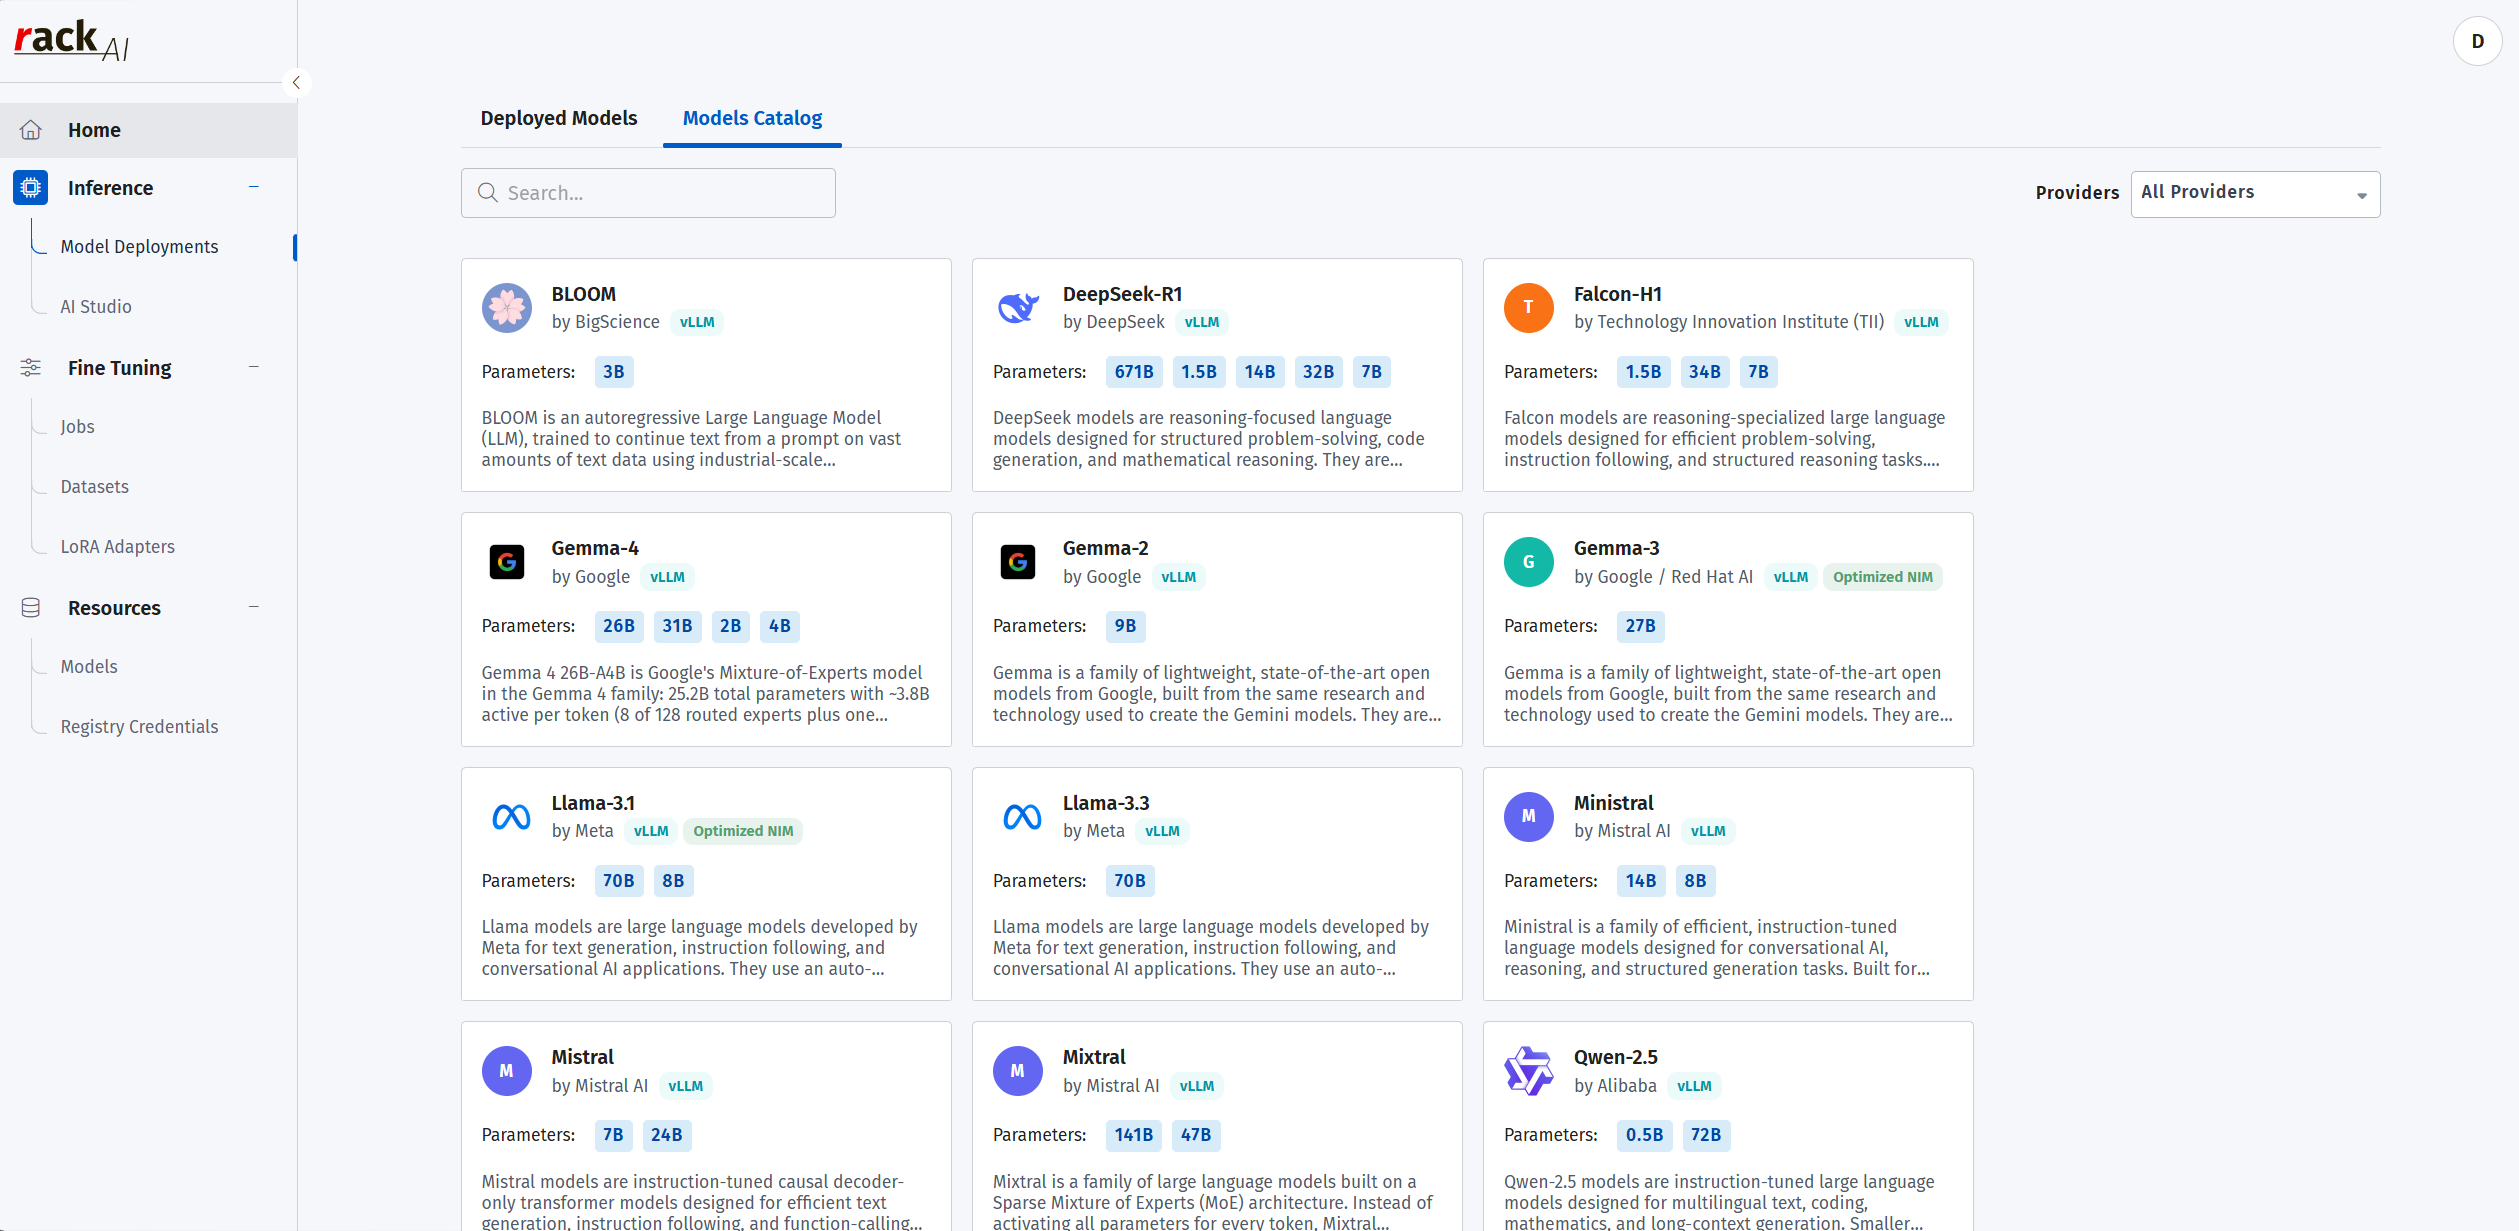
On the Models Catalog tab you can search by name and filter by Providers.
Each model card lists its provider, runtime, and selectable parameter sizes (for
example DeepSeek-R1 offers 671B / 1.5B / 14B / 32B / 7B; Llama-3.1 offers
70B / 8B). Pick a model and parameter size to start a deployment.
4.2 AI Studio
Open Inference → AI Studio to test a deployed model interactively in a chat
interface.
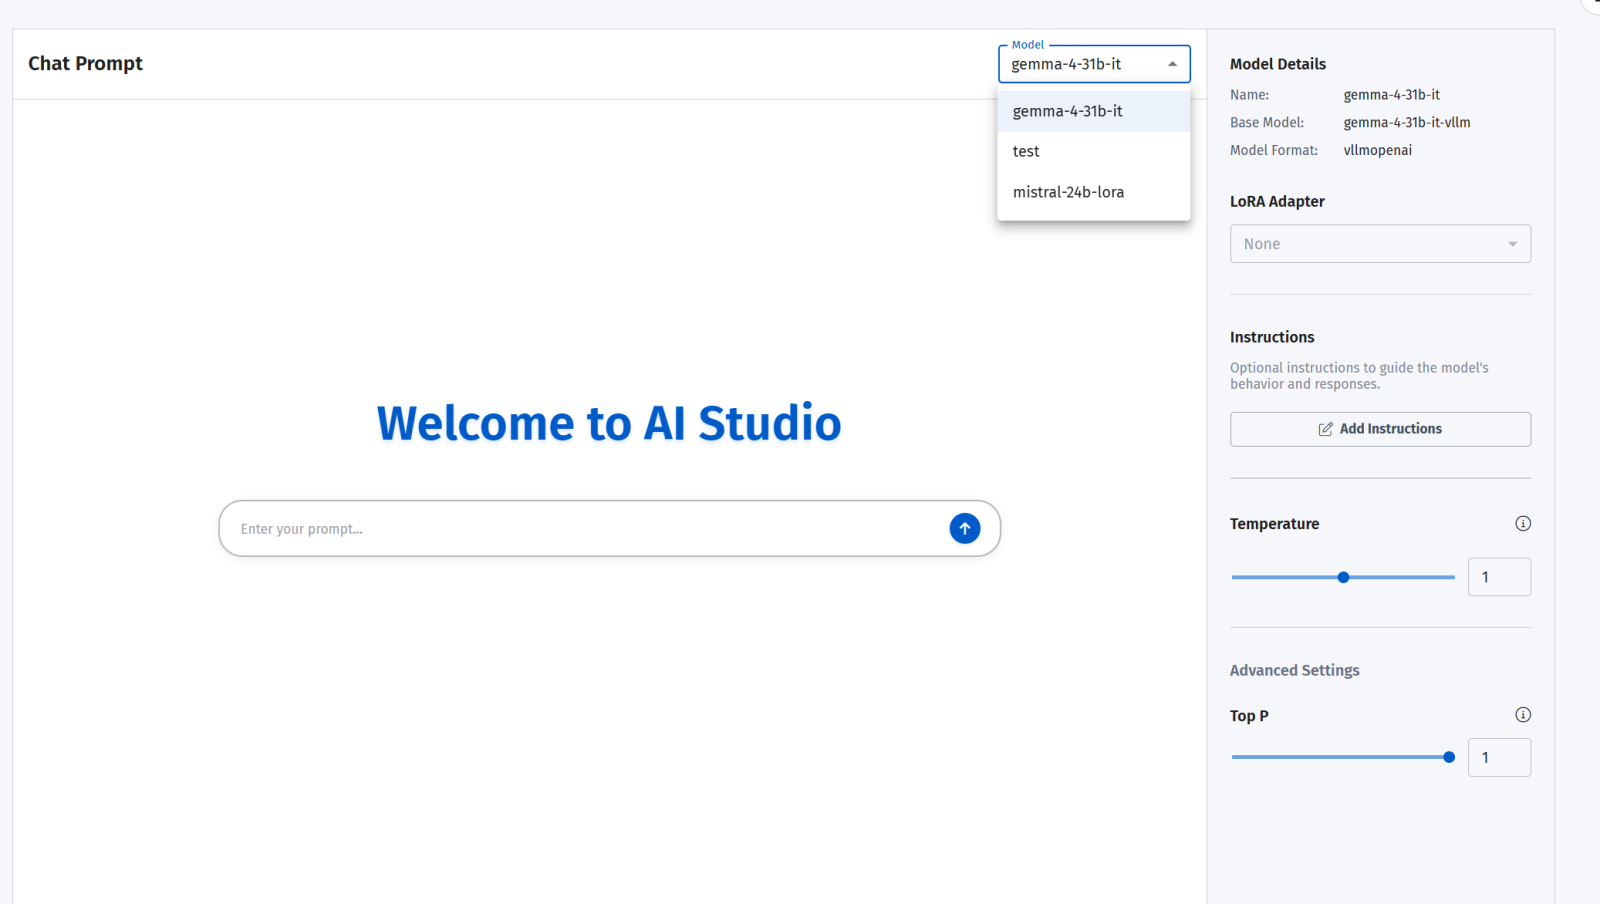
To use AI Studio:
- Pick a model from the Model dropdown at the top (it lists your deployed
models, e.g.gemma-4-31b-it,test,mistral-24b-lora). - The Model Details panel on the right shows the Name, Base Model, and Model
Format (e.g.vllmopenai). - Optionally choose a LoRA Adapter to apply on top of the base model.
- Optionally click Add Instructions to set a system prompt that guides the
model's behavior. - Adjust generation settings — Temperature and, under Advanced Settings,
Top P. - Type into Enter your prompt… and send.
5. Fine Tuning
Fine-tuning adapts a base model to your own data. The typical flow is: upload a
Dataset → create a Fine-tuning Job → the job produces a LoRA Adapter
→ apply that adapter in AI Studio or a deployment.
5.1 Datasets
Open Fine Tuning → Datasets to manage training datasets.
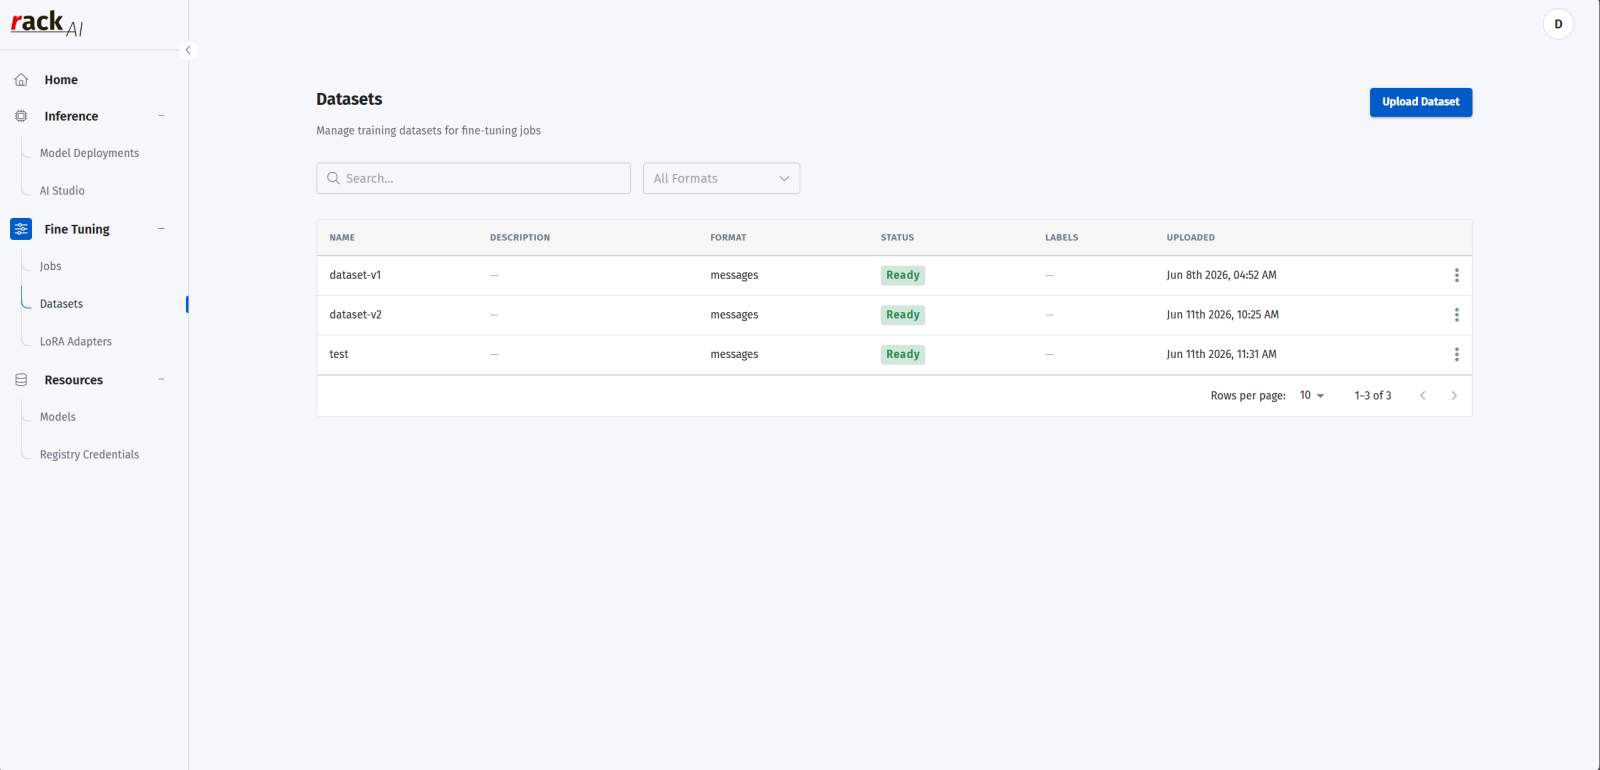
The list shows each dataset's Name, Description, Format (e.g. messages), Status
(e.g. Ready), Labels, and Uploaded time. You can search and filter by format.
To add one, click Upload Dataset:
- Dataset Name — lowercase letters, numbers, and hyphens only.
- Format — select the dataset format (e.g. Messages).
- Training File — drag & drop or browse for a
.jsonlfile (max 1 GB). - Additional Details (Optional) — description and key-value Labels.
- Click Upload to finish.
5.2 Fine Tuning Jobs
Open Fine Tuning → Jobs to create and monitor fine-tuning runs.
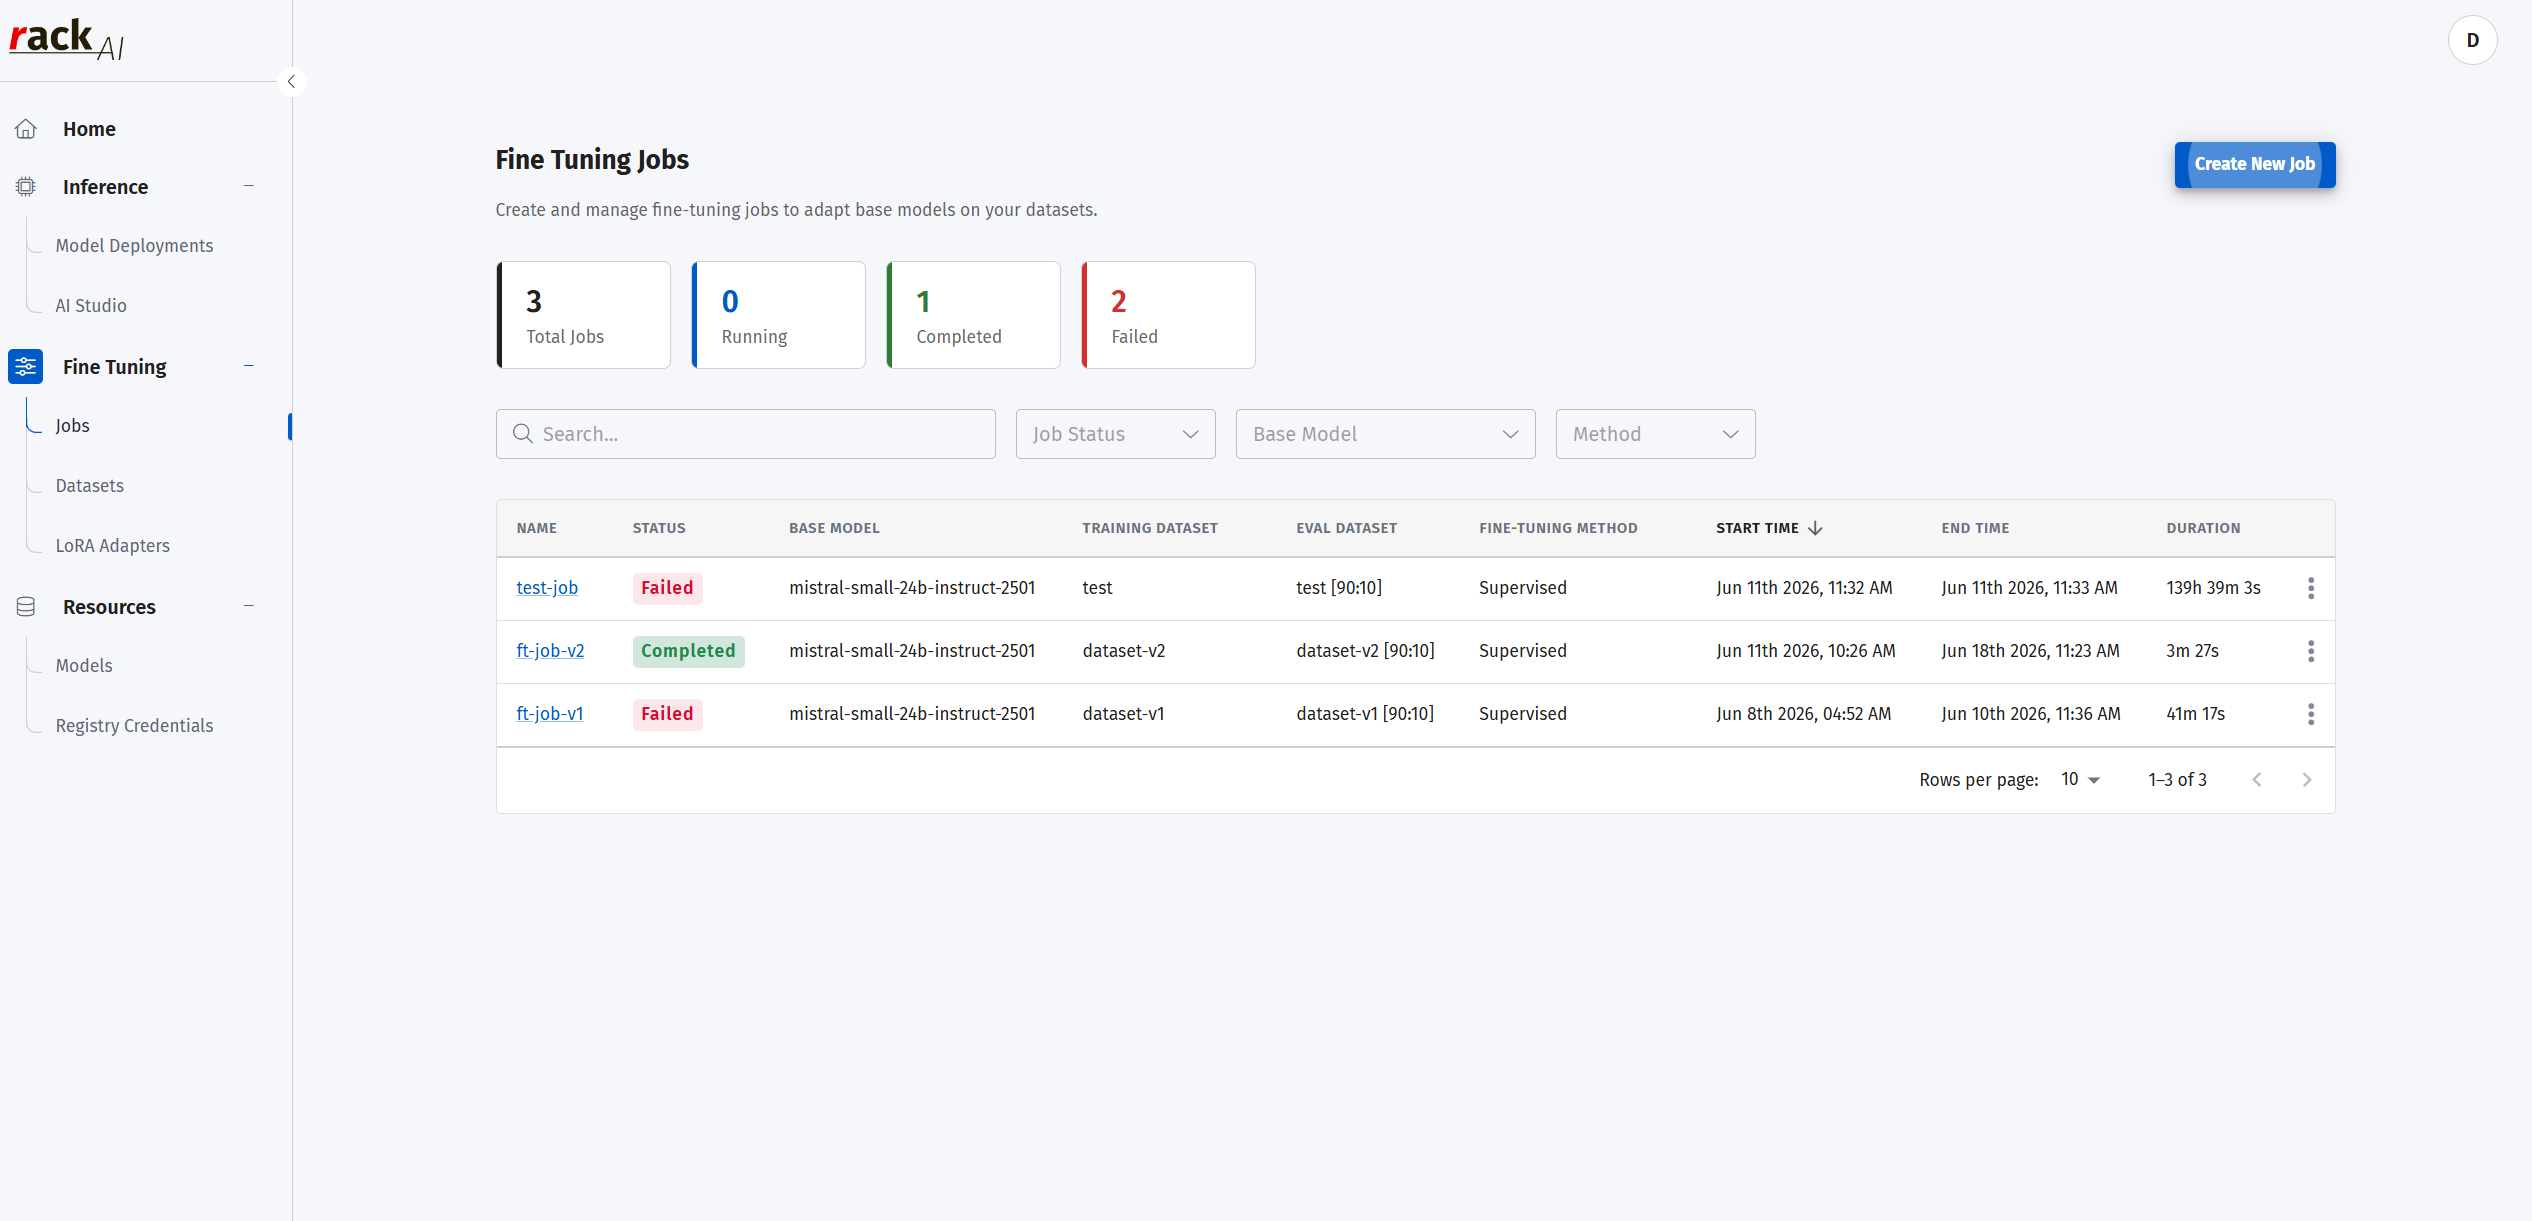
The top counters summarize Total Jobs, Running, Completed, and
Failed. The table lists each job's Name, Status, Base Model, Training
Dataset, Eval Dataset (with split, e.g. [90:10]), Fine-tuning Method,
Start/End Time, and Duration. You can search and filter by Job Status, Base
Model, and Method.
To start a run, click Create New Job. First, choose a method:
- Supervised Fine Tuning — train on labeled input/output pairs; best for
teaching a specific task or style from your dataset. (Available.) - Reinforcement Learning — optimize behavior using reward signals (RLHF).
Coming Soon. - Direct Preference Optimization — fine-tune directly on preference pairs
without a separate reward model. Coming Soon.
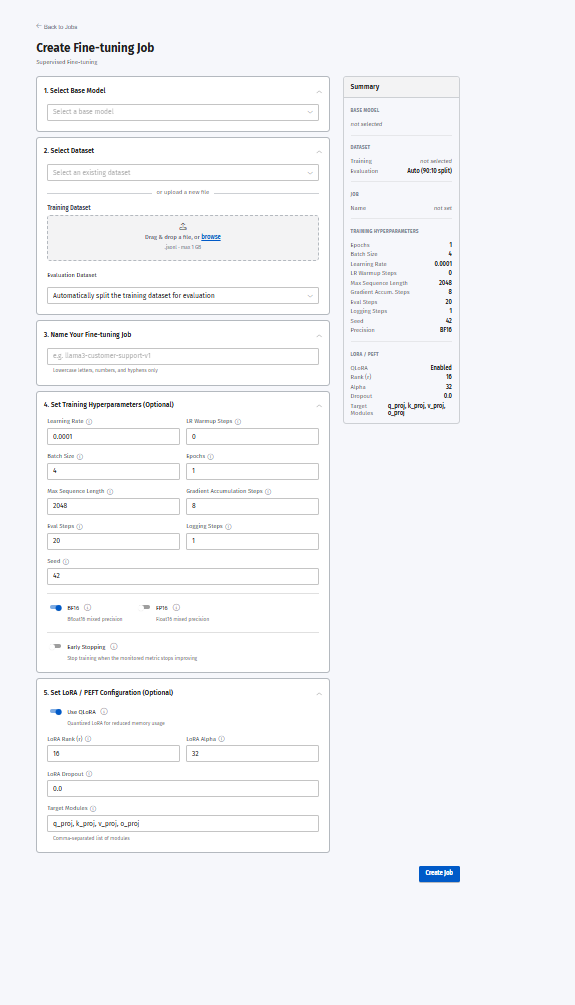
After selecting Supervised Fine Tuning, you configure the job:
- Select Base Model — choose the model to adapt.
- Select Dataset — pick an existing dataset or upload a new
.jsonl
training file (max 1 GB). Set the Evaluation Dataset, or let it automatically
split the training dataset (default 90:10). - Name Your Fine-tuning Job — lowercase letters, numbers, and hyphens only.
- Set Training Hyperparameters (Optional).
- Set LoRA / PEFT Configuration (Optional).
The Summary panel on the right reflects your current selections and defaults.
Expanding the optional sections exposes the full set of controls:
- Training Hyperparameters — Learning Rate, LR Warmup Steps, Batch Size,
Epochs, Max Sequence Length, Gradient Accumulation Steps, Eval Steps, Logging
Steps, Seed; precision toggle (BF16 / FP16); and Early Stopping. - LoRA / PEFT Configuration — Use QLoRA toggle (quantized LoRA for reduced
memory), LoRA Rank (r), LoRA Alpha, LoRA Dropout, and Target Modules
(comma-separated, e.g.q_proj, k_proj, v_proj, o_proj).
Click Create Job to launch.
Detailed explanation
Training Hyperparameters
These control how the model learns. The defaults are sensible starting points;
adjust only if you have a reason to.
- Learning Rate — how big a step the model takes each time it updates. Too
high and training becomes unstable; too low and it learns very slowly. Default
0.0001. - LR Warmup Steps — number of steps over which the learning rate ramps up
from zero to its set value at the start, which helps training stay stable
early on. Default0. - Batch Size — how many training examples the model looks at before each
update. Larger is steadier but uses more memory. Default4. - Epochs — how many times the model goes through the entire dataset. More
epochs means more learning, but too many can cause it to memorize
("overfit"). Default1. - Max Sequence Length — the longest input (in tokens) the model will
process; anything longer is truncated. Higher values handle longer text but
use more memory. Default2048. - Gradient Accumulation Steps — lets you simulate a larger batch size by
combining several smaller batches before updating, useful when memory is
limited. Default8. - Eval Steps — how often (every N steps) the model is checked against the
evaluation dataset to track progress. Default20. - Logging Steps — how often (every N steps) training metrics are recorded.
Default1. - Seed — a fixed number that makes the run reproducible, so the same setup
produces the same result. Default42. - Precision (BF16 / FP16) — the numeric format used during training. Both
are "mixed precision" modes that save memory and speed things up versus full
precision; BF16 is generally more stable on supported hardware. Default BF16. - Early Stopping — automatically stops training when the model stops
improving on the evaluation set, saving time and avoiding overfitting.
LoRA / PEFT Configuration
LoRA (Low-Rank Adaptation) is a parameter-efficient fine-tuning (PEFT) method:
instead of retraining the whole model, it trains a small set of extra weights
(the "adapter"). This is far faster and cheaper, and produces a small adapter
file you can attach to the base model.
- Use QLoRA — runs LoRA on a compressed (quantized) copy of the base model
to cut memory use further, letting you fine-tune larger models on smaller
hardware. Enabled by default. - LoRA Rank (r) — the size/capacity of the adapter. Higher rank can capture
more, but makes the adapter larger and slower to train. Default16. - LoRA Alpha — a scaling factor that controls how strongly the adapter
influences the model. Default32. - LoRA Dropout — randomly ignores a fraction of adapter connections during
training to reduce overfitting.0.0means none. Default0.0. - Target Modules — which parts of the model the adapter attaches to, given
as a comma-separated list. The defaults (q_proj, k_proj, v_proj, o_proj) are
the attention layers, which is the standard choice.
5.3 LoRA Adapters
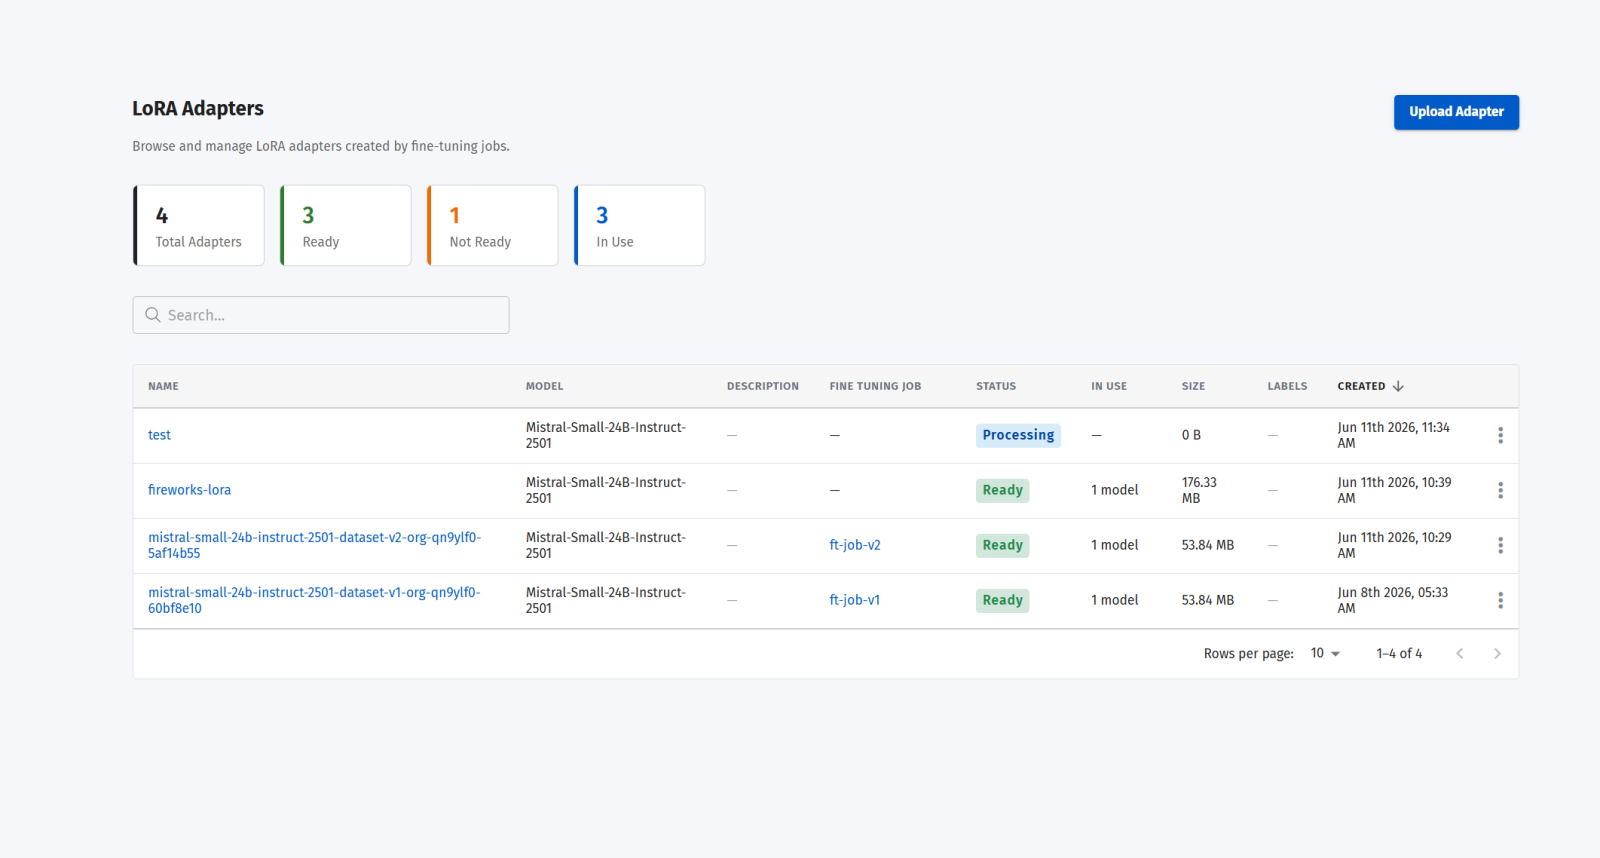
Open Fine Tuning → LoRA Adapters to manage adapters produced by fine-tuning
jobs (or uploaded directly).
The counters show Total Adapters, Ready, Not Ready, and In Use.
The table lists each adapter's Name, Model, Description, source Fine Tuning Job,
Status (e.g. Ready / Processing), In Use, Size, Labels, and Created time.
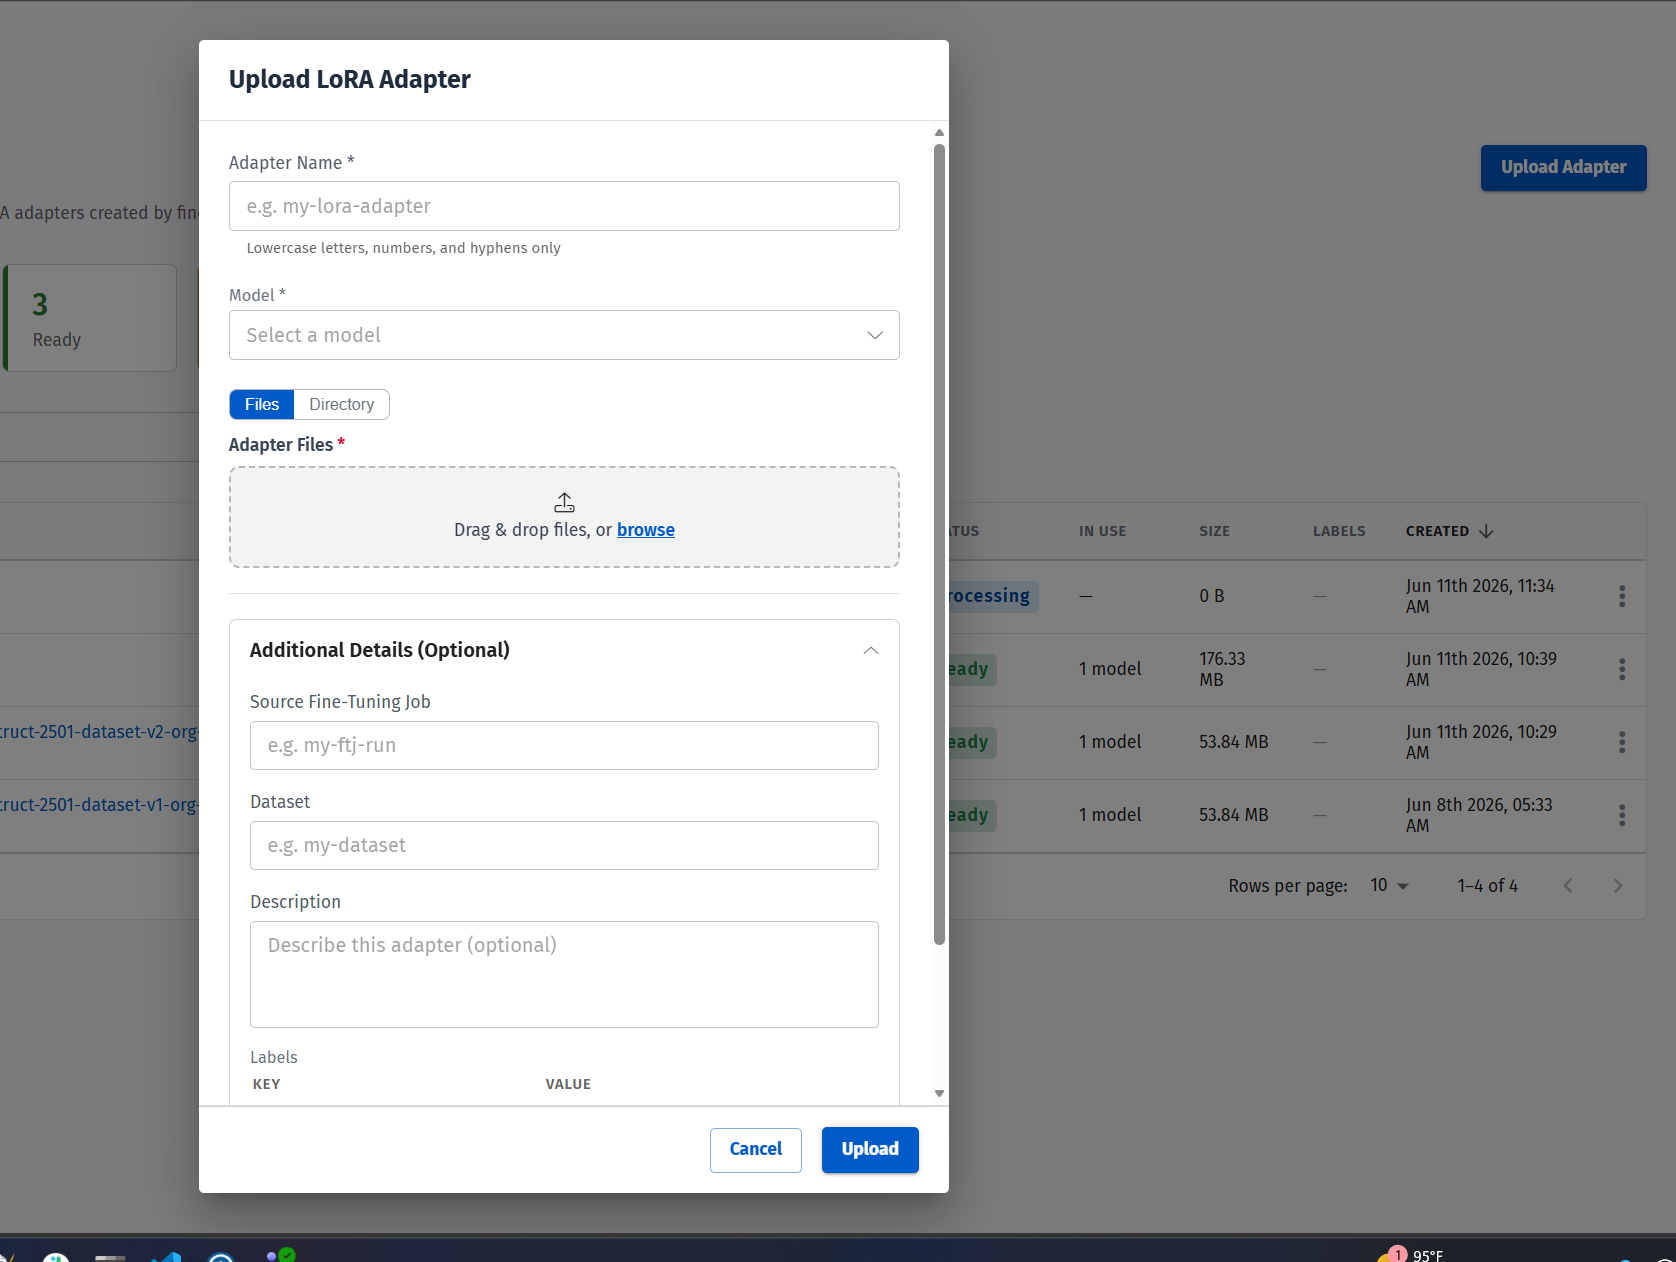
To add one manually, click Upload Adapter:
- Adapter Name — lowercase letters, numbers, and hyphens only.
- Model — select the base model the adapter targets.
- Adapter Files — upload via Files or Directory mode (drag & drop or browse).
- Additional Details (Optional) — Source Fine-Tuning Job, Dataset,
Description, and Labels. - Click Upload to finish.
6. Resources
6.1 Models
Open Resources → Models to browse all models available in your namespace.
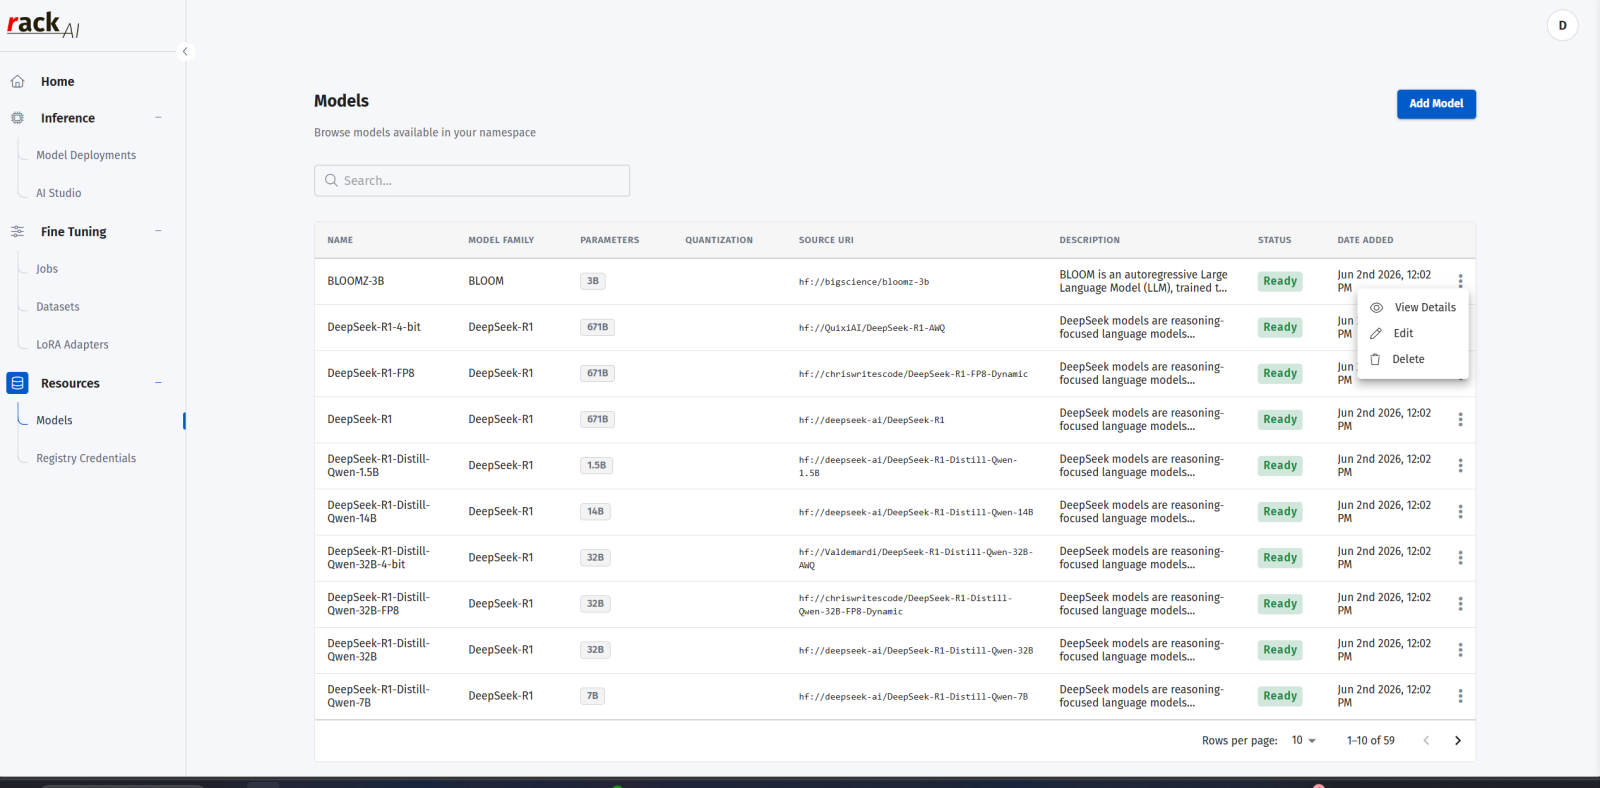
The table lists each model's Name, Model Family, Parameters, Quantization, Source
URI (e.g. hf://deepseek-ai/DeepSeek-R1), Description, Status, and Date Added.
Use search to filter. The per-row menu (⋮) offers View Details, Edit, and
Delete.
To register a new model, click Add Model.
6.2 Registry Credentials
Open Resources → Registry Credentials to manage the credentials used to fetch
model weights and access container registries.
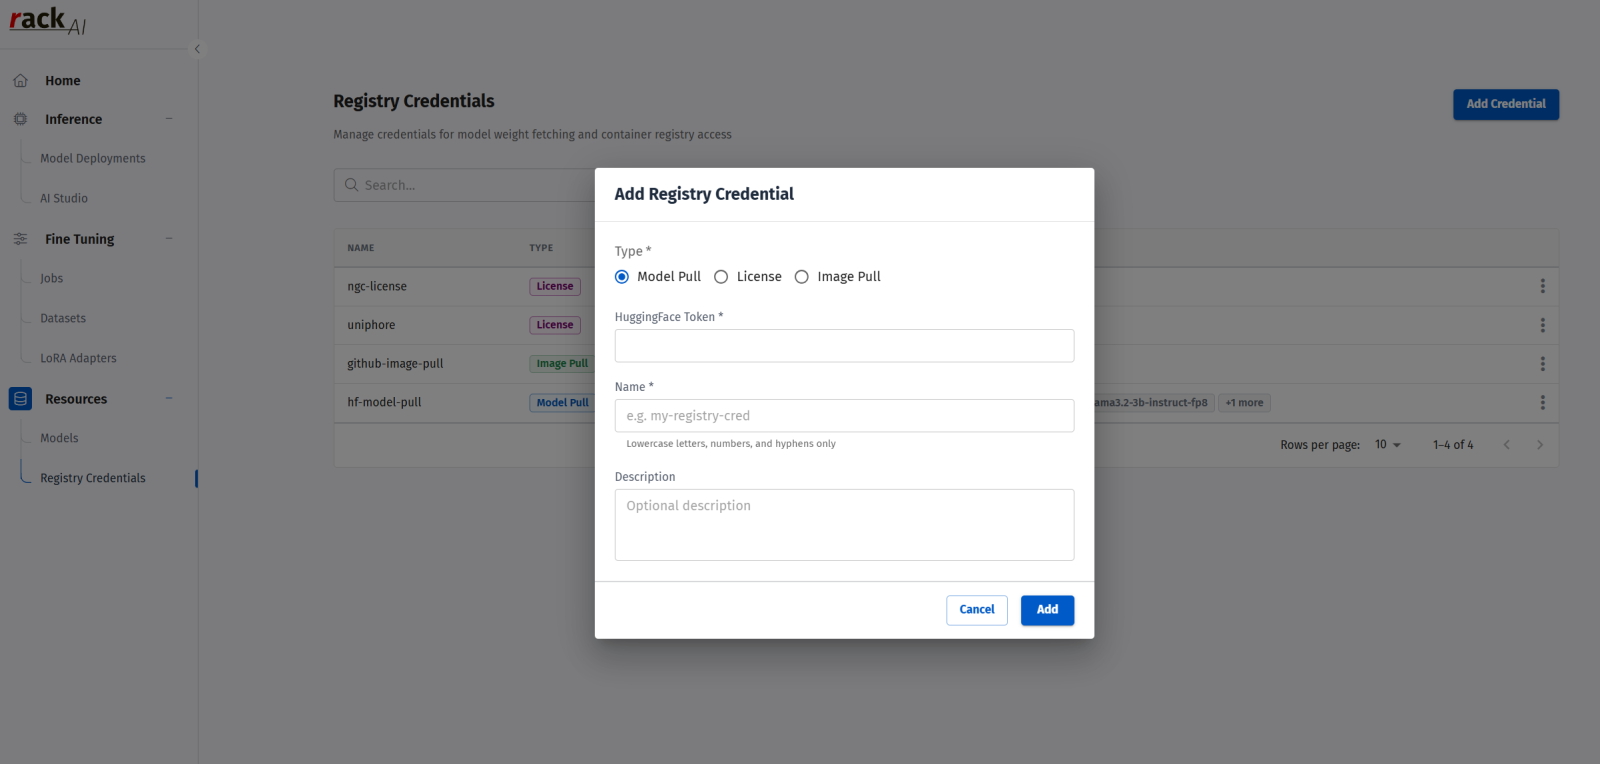
The list shows each credential's Name and Type. Click Add Credential to
create one:
- Type — choose Model Pull, License, or Image Pull.
- HuggingFace Token — the token used to pull model weights (for Model Pull).
- Name — lowercase letters, numbers, and hyphens only.
- Description — optional.
- Click Add to save.
These credentials are what allow RackAI to download gated model weights and pull
container images on your behalf.
7. Deploying a model with a LoRA adapter
Once you have a base model deployed and a Ready LoRA adapter, you can serve
the base model and apply the adapter on top of it — the adapter shapes the
model's behavior without changing the underlying weights. There are two common
ways to use an adapter.
Before you start, confirm:
- The base model is deployed (Inference → Model Deployments).
- The adapter shows Ready under Fine Tuning → LoRA Adapters, and its
Model column matches the base model you're deploying (an adapter only works
with the base model it was trained on — e.g. aMistral-Small-24B-Instruct-2501
adapter must be paired with that same base model).
Option A — Apply the adapter in AI Studio
- Go to Inference → AI Studio.
- In the Model dropdown, select the deployed base model.
- In the LoRA Adapter dropdown on the right, choose your adapter (instead of
None). - Optionally add instructions and adjust Temperature / Top P.
- Send a prompt — responses now reflect the adapter.
This is the fastest way to confirm an adapter behaves as expected before
committing it to a deployment.
Option B — Attach the adapter to a deployment
- Go to Inference → Model Deployments and start a deployment of the base
model from the Models Catalog (or open an existing deployment of it). - In the deployment configuration, select the LoRA adapter to attach. Only
adapters whose Model matches the base model will be available. - Deploy. The served endpoint now applies the adapter, so applications calling
it get the fine-tuned behavior.
TipA single base model deployment can be paired with different adapters of the
same model, so you can reuse the same served model for multiple fine-tuned
behaviors rather than deploying a separate full model for each.
8. Typical end-to-end flow
- Add credentials under Resources → Registry Credentials (e.g. a HuggingFace
token) so weights can be fetched. - Confirm the base model is available under Resources → Models, or add it.
- Deploy a model from Inference → Model Deployments (Models Catalog) and
test it in AI Studio. - Upload a dataset (
.jsonl) under Fine Tuning → Datasets. - Create a fine-tuning job under Fine Tuning → Jobs, choosing Supervised
Fine Tuning and your base model + dataset. - Use the resulting LoRA Adapter — apply it in AI Studio or attach it to a
deployment.
9. Quick reference
| Task | Where | Notes |
|---|---|---|
| Log in | RackAI login page | Credentials provided by Rackspace |
| Switch organization | Initial menu, top-right | Resources are org-scoped |
| Browse / deploy a model | Inference → Model Deployments → Models Catalog | Search + provider filter |
| Test a model in chat | Inference → AI Studio | Pick model, set LoRA / temperature / Top P |
| Upload a dataset | Fine Tuning → Datasets → Upload Dataset | .jsonl, max 1 GB, Messages format |
| Run a fine-tuning job | Fine Tuning → Jobs → Create New Job | Supervised available; RL & DPO coming soon |
| Manage adapters | Fine Tuning → LoRA Adapters | Created by jobs or uploaded |
| Deploy a model with an adapter | AI Studio, or Model Deployments | Adapter must match the base model |
| Register / edit a model | Resources → Models → Add Model | View / Edit / Delete per row |
| Add credentials | Resources → Registry Credentials → Add Credential | Model Pull / License / Image Pull |
Updated about 1 month ago