
How to configure HTTP/Password Authentication for Nginx in linux servers
This guide walks you through setting up basic HTTP authentication on Nginx web servers running on Linux. HTTP authentication prompts visitors for a username and password before they can access protected areas of your website.
Prerequisites
Before starting, make sure you have:
- A Linux server with Nginx installed and running
- Root or sudo access to the server
- Basic familiarity with the command line
- The
htpasswdutility (we'll install this in Step 1)
Understanding HTTP Basic Authentication
HTTP Basic Authentication is a straightforward method that prompts users for credentials before granting access to specific directories or files on your web server. When configured, visitors see a browser pop-up requesting a username and password before they can view the protected content.
This authentication method works well for:
- Restricting access to development or staging environments
- Protecting administrative dashboards
- Adding a security layer to sensitive directories
- Controlling access to internal tools and applications
- Securing staging sites before public launch
Install the htpasswd Utility
The htpasswd utility helps you create and manage password files for HTTP authentication. It originates from Apache's HTTP server utilities, but it works perfectly with Nginx.
For Ubuntu/Debian-based systems:
$ sudo apt-get update
$ sudo apt-get install apache2-utils -y

## Enable Required Apache Modules

$ sudo a2enmod auth_basic
$ sudo a2enmod authn_file
$ sudo a2enmod authz_user
$ sudo apachectl configtest
$ sudo systemctl reload apache2
For CentOS/RHEL/Fedora systems:
$ sudo yum install httpd-tools -y(Use dnf instead of yum for EL7+)

## Review Required Apache Modules

$ sudo yum install httpd-tools
$ sudo httpd -M | grep auth
auth_basic_module (shared)
authn_file_module (shared)
authz_user_module (shared)
After installation, verify that htpasswd is available:
htpasswd --helpYou should see the help information for the htpasswd command.
Create the Password File and Add Your First User
Now you'll need to create a password file that stores encrypted usernames and passwords.
The standard location is /etc/nginx/.htpasswd, though you can choose any secure location outside your web root directory.
Create the password file and add your first user:
$ sudo htpasswd -c /etc/nginx/.htpasswd usernameReplace username with your desired username.
You'll be prompted to enter and confirm a password:
New password:
Re-type new password:
Adding password for user alma_user
Important Note: The -c flag creates a new file.
Only use this flag when creating the file for the first time.
Using -c on an existing file will overwrite all previous entries.
Understanding the Command Options
-c- Creates a new password file (use only once)/etc/nginx/.htpasswd- The path where the password file will be stored.username- The username for authentication.
Add Additional Users
To add more users to your existing password file, use the same command without the -c flag:
$ sudo htpasswd /etc/nginx/.htpasswd seconduserEnter and confirm the password when prompted. You can add as many users as needed by repeating this command with different usernames.
Quick Reference for Adding Users
$ sudo htpasswd /etc/nginx/.htpasswd alma_user
$ sudo htpasswd /etc/nginx/.htpasswd admin
$ sudo htpasswd /etc/nginx/.htpasswd testuser
Verify Your Password File
Check that your password file was created correctly and contains your users:
$ sudo cat /etc/nginx/.htpasswd
alma_user:$apr1$IRxrtSSe$BjmYowEgu5M7LyoxUH18e.
admin:$apr1$pwRYKYsw$dO4IPGjikWKbzZdVIKT76.
testuser:$apr1$pxQgX0sX$h2B1o2WzGjUZ775XEdD9T.
Each line contains:
- A username
- A colon (
:) - An encrypted password hash
The passwords are encrypted using APR1 (Apache's MD5 algorithm), making them secure even if someone gains access to the file.
Set Proper File Permissions
Secure your password file with appropriate permissions to prevent unauthorized access:
$ sudo chmod 640 /etc/nginx/.htpasswdFor Ubuntu/Debian systems:
$ sudo chown root:www-data /etc/nginx/.htpasswdFor CentOS/RHEL/Fedora systems:
$ sudo chown root:nginx /etc/nginx/.htpasswdThis configuration ensures:
- Only the root can modify the file
- The Nginx process can read it
- Other users cannot access it
Verify the permissions:
$ ls -l /etc/nginx/.htpasswdYou should see something like:
-rw-r----- 1 root www-data 145 Jan 17 10:30 /etc/nginx/.htpasswdConfigure Nginx to Require Authentication
Now you'll modify your Nginx configuration to require authentication for specific locations or your entire site.
Option A: Protect a Specific Directory
Open your site's Nginx configuration file.
This is typically located at:
- Ubuntu/Debian:
/etc/nginx/sites-available/defaultor/etc/nginx/sites-available/yoursite - CentOS/RHEL:
/etc/nginx/conf.d/default.confor/etc/nginx/nginx.conf
$ sudo vim /etc/nginx/sites-available/defaultAdd the authentication directives within a location block for the directory you want to protect
server {
    listen 80;
    server_name example.com;
    root /var/www/html;

    # Public area - no authentication required
    location / {
        try_files $uri $uri/ =404;
    }

    # Protected admin area
    location /admin {
        auth_basic "Admin Area - Restricted Access";
        auth_basic_user_file /etc/nginx/.htpasswd;

        try_files $uri $uri/ =404;
    }
}
Configuration Explanation:
auth_basic "Admin Area - Restricted Access"- Sets the message displayed in the authentication pop-upauth_basic_user_file /etc/nginx/.htpasswd- Specifies the path to your password file
Option B: Protect Your Entire Website
To require authentication for your entire site, place the directives at the server level:
server {
    listen 80;
    server_name example.com;
    root /var/www/html;

    # Authentication required for entire site
    auth_basic "Private Site - Authentication Required";
    auth_basic_user_file /etc/nginx/.htpasswd;

    location / {
        try_files $uri $uri/ =404;
    }
}
Option C: Protect Multiple Directories with Different Credentials
You can use different password files for different areas:
server {
    listen 80;
    server_name example.com;
    root /var/www/html;

    # Public area
    location / {
        try_files $uri $uri/ =404;
    }

    # Admin area with admin credentials
    location /admin {
        auth_basic "Admin Panel";
        auth_basic_user_file /etc/nginx/.htpasswd-admin;
    }

    # Staff portal with staff credentials
    location /staff {
        auth_basic "Staff Portal";
        auth_basic_user_file /etc/nginx/.htpasswd-staff;
    }

    # Developer area with developer credentials
    location /dev {
        auth_basic "Development Area";
        auth_basic_user_file /etc/nginx/.htpasswd-dev;
    }
}
Test Your Configuration
Before restarting Nginx, always test your configuration for syntax errors:
$ sudo nginx -tIf your configuration is correct, you'll see:
nginx: the configuration file /etc/nginx/nginx.conf syntax is ok
nginx: configuration file /etc/nginx/nginx.conf test is successful
If there are errors, the output will show you exactly what needs to be fixed, including the line number and file location.
Reload Nginx
Apply your changes by reloading the Nginx service:
$ sudo systemctl reload nginxAlternatively, you can restart Nginx:
$ sudo systemctl restart nginxDifference between reload and restart:
reload- Gracefully reloads configuration without dropping connectionsrestart- Stops and starts Nginx, which briefly interrupts service
Test Authentication in Your Browser
Open your web browser and navigate to the protected area (e.g., http://yourserver.com/admin).
You should see an authentication dialog box appear with the message you configured in the auth_basic directive.
Test the following scenarios:
- Enter valid credentials - You should gain access to the protected area
- Enter invalid credentials - Access should be denied with a 401 error
- Click "Cancel" - Access should be denied
- Try accessing unprotected areas - These should load without requiring authentication
You should see a pop-up like below: -
Once you enter the correct credentials, you will be allowed to access the content.
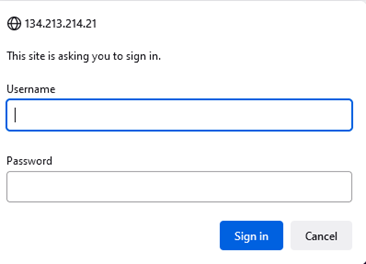
If you enter the wrong credentials or hit “Cancel”, you will see the following error page

Managing Users
Change a User's Password
To update an existing user's password:
$ sudo htpasswd /etc/nginx/.htpasswd usernameEnter the new password when prompted. The old password will be replaced.
Remove a User
Delete a user from the password file:
$ sudo htpasswd -D /etc/nginx/.htpasswd usernameReplace username with the username you want to remove.
View All Users
To see all usernames in your password file (without passwords):
$ sudo cut -d: -f1 /etc/nginx/.htpasswdThis displays only the usernames, one per line.
Verify a Password
Test if a password is correct for a specific user:
$ sudo htpasswd -v /etc/nginx/.htpasswd usernameYou'll be prompted to enter the password, and htpasswd will tell you if it matches.
After Making Changes
Always reload Nginx after modifying password files or adding/removing users:
$ sudo systemctl reload nginxSecurity Best Practices
Always Use HTTPS
HTTP Basic Authentication transmits credentials encoded in Base64, which can be easily decoded.
Never use basic authentication over plain HTTP in production environments.
Always configure SSL/TLS certificates and use HTTPS:
server {
    listen 443 ssl http2;
    server_name example.com;

    ssl_certificate /etc/ssl/certs/your-certificate.crt;
    ssl_certificate_key /etc/ssl/private/your-private-key.key;

    # Modern SSL configuration
    ssl_protocols TLSv1.2 TLSv1.3;
    ssl_ciphers HIGH:!aNULL:!MD5;
    ssl_prefer_server_ciphers on;

    auth_basic "Secure Area";
    auth_basic_user_file /etc/nginx/.htpasswd;

    location / {
        root /var/www/html;
        try_files $uri $uri/ =404;
    }
}

# Redirect HTTP to HTTPS
server {
    listen 80;
    server_name example.com;
    return 301 https://$server_name$request_uri;
}
Use Strong Passwords
When creating users, ensure passwords are:
- At least 12 characters long
- Include uppercase and lowercase letters
- Include numbers and special characters
- Not based on dictionary words
- Unique to this system
Restrict Password File Access
Ensure your password file permissions are correct:
# Set permissions
$ sudo chmod 640 /etc/nginx/.htpasswd

# Set ownership (Ubuntu/Debian)
$ sudo chown root:www-data /etc/nginx/.htpasswd

# Set ownership (CentOS/RHEL)
$ sudo chown root:nginx /etc/nginx/.htpasswd
Store Files Outside Web Root
Never store password files inside your web root directory (e.g., /var/www/html).
Always use locations like:
/etc/nginx/.htpasswd/etc/apache2/.htpasswd/usr/local/etc/nginx/.htpasswd
Regular Password Rotation
Implement a password rotation policy:
- Change passwords every 90 days
- Update passwords when team members leave
- Rotate passwords after suspected security incidents
Combining with IP Restrictions
For enhanced security, combine authentication with IP address restrictions:
Require Both Authentication AND Valid IP
location /admin {
    satisfy all;

    # Allow specific IP addresses
    allow 192.168.1.0/24;
    allow 10.0.0.50;
    deny all;

    # Require authentication
    auth_basic "Admin Access";
    auth_basic_user_file /etc/nginx/.htpasswd;
}
With satisfy all, users must have BOTH a valid IP address AND correct credentials.
Require Either Authentication OR Valid IP
location /admin {
    satisfy any;

    # Allow office IP addresses without authentication
    allow 192.168.1.0/24;
    deny all;

    # Or require authentication from anywhere else
    auth_basic "Admin Access";
    auth_basic_user_file /etc/nginx/.htpasswd;
}
With satisfy any, users from allowed IPs can access without authentication, while others must authenticate.
Advanced Configuration Examples
Protect Specific File Types
Require authentication only for certain file types:
location ~ \.(zip|tar|gz|sql|bak)$ {
    auth_basic "Download Authentication Required";
    auth_basic_user_file /etc/nginx/.htpasswd;
}
Exclude Specific Files from Authentication
Protect a directory but allow public access to certain files:
location /admin {
    auth_basic "Admin Area";
    auth_basic_user_file /etc/nginx/.htpasswd;

    # Allow public access to login.html
    location ~ /admin/login\.html$ {
        auth_basic off;
    }
}
Different Authentication for API Endpoints
# Public API
location /api/v1 {
    try_files $uri $uri/ =404;
}

# Admin API requires authentication
location /api/admin {
    auth_basic "API Admin";
    auth_basic_user_file /etc/nginx/.htpasswd;

    proxy_pass http://backend;
    proxy_set_header Host $host;
    proxy_set_header X-Real-IP $remote_addr;
}
Custom 401 Error Page
Create a custom unauthorized access page:
server {
    listen 80;
    server_name example.com;

    # Custom 401 error page
    error_page 401 /401.html;

    location = /401.html {
        root /var/www/errors;
        internal;
    }

    location /protected {
        auth_basic "Restricted";
        auth_basic_user_file /etc/nginx/.htpasswd;
    }
}
Create the custom error page at /var/www/errors/401.html:
<!DOCTYPE html>
<html>
<head>
    <title>Authentication Required</title>
</head>
<body>
    <h1>401 - Authentication Required</h1>
    <p>You must provide valid credentials to access this resource.</p>
</body>
</html>
Subdomain Authentication
Different subdomains with different authentication:
# Admin subdomain
server {
    listen 80;
    server_name admin.example.com;

    auth_basic "Admin Subdomain";
    auth_basic_user_file /etc/nginx/.htpasswd-admin;

    root /var/www/admin;
    location / {
        try_files $uri $uri/ =404;
    }
}

# Main site - no authentication
server {
    listen 80;
    server_name www.example.com;

    root /var/www/public;
    location / {
        try_files $uri $uri/ =404;
    }
}
Troubleshooting Common Issues
Authentication Prompt Not Appearing
Check configuration syntax:
$ sudo nginx -tVerify directives are in the correct location:
Ensure auth_basic and auth_basic_user_file are within the proper server or location block.
Check Nginx error logs:
$ sudo tail -f /var/log/nginx/error.logVerify Nginx is running:
$ sudo systemctl status nginx403 Forbidden Error
Check file permissions:
$ ls -l /etc/nginx/.htpasswdThe file should be readable by the Nginx user (www-data or nginx).
Verify file ownership:
# Ubuntu/Debian
$ sudo chown root:www-data /etc/nginx/.htpasswd

# CentOS/RHEL
$ sudo chown root:nginx /etc/nginx/.htpasswd
Check Nginx user in configuration:
$ grep "^user" /etc/nginx/nginx.confShould show user www-data; (Ubuntu/Debian) or user nginx; (CentOS/RHEL).
Authentication Keeps Prompting (Loop)
Verify password file format:
$ sudo cat /etc/nginx/.htpasswdEach line should be: username:encryptedpassword
Check for special characters in username:
Avoid spaces and special characters in usernames unless properly escaped.
Clear browser cache:
Clear your browser's cache, cookies, and authentication data for the site.
Try a different browser:
Test with another browser to rule out browser-specific issues.
Password File Not Found
Verify the file exists:
$ ls -l /etc/nginx/.htpasswdCheck the path in Nginx configuration:
$ sudo grep -r "auth_basic_user_file" /etc/nginx/Ensure the path matches the actual file location.
Use absolute paths:
Always use absolute paths in the configuration:
auth_basic_user_file /etc/nginx/.htpasswd;  # Correct
auth_basic_user_file .htpasswd;              # Wrong
Changes Not Taking Effect
Reload Nginx after changes:
$ sudo systemctl reload nginxCheck for configuration errors:
$ sudo nginx -tView recent logs:
$ sudo journalctl -u nginx -n 50 --no-pagerVerify the correct config file is being used:
$ sudo nginx -T | grep "auth_basic"This shows all loaded configurations with your authentication directives.
500 Internal Server Error
Check Nginx error log:
$ sudo tail -f /var/log/nginx/error.logCommon causes:
Syntax errors in the configuration
- Password file permissions issues
- SELinux blocking access (on CentOS/RHEL)
For SELinux issues (CentOS/RHEL):
# Check SELinux status
$ getenforce

# Set correct context for password file
$ sudo chcon -t httpd_config_t /etc/nginx/.htpasswd

# Or temporarily disable SELinux for testing
$ sudo setenforce 0
Disabling Authentication
To remove authentication from a location, either delete the directives or explicitly disable it:
location /admin {
    auth_basic off;

    try_files $uri $uri/ =404;
}
Or simply remove/comment out the auth lines:
location /admin {
    # auth_basic "Admin Area";
    # auth_basic_user_file /etc/nginx/.htpasswd;

    try_files $uri $uri/ =404;
}
After making changes, reload Nginx:
$ sudo systemctl reload nginxUsing htpasswd Command Reference
Here's a quick reference for common htpasswd commands:
# Create new password file with first user
$ sudo htpasswd -c /etc/nginx/.htpasswd username

# Add user to existing file
$ sudo htpasswd /etc/nginx/.htpasswd username

# Delete a user
$ sudo htpasswd -D /etc/nginx/.htpasswd username

# Verify a password
$ sudo htpasswd -v /etc/nginx/.htpasswd username

# Batch mode (password on command line - less secure)
$ sudo htpasswd -b /etc/nginx/.htpasswd username password

# Display help
$ htpasswd --h

# Force MD5 encryption (default)
$ sudo htpasswd -m /etc/nginx/.htpasswd username

# Use bcrypt encryption (more secure, requires newer htpasswd)
$ sudo htpasswd -B /etc/nginx/.htpasswd username

# Use SHA encryption
$ sudo htpasswd -s /etc/nginx/.htpasswd username
Conclusion
You've now successfully configured HTTP password authentication on your Nginx server using the htpasswd utility.
This provides a simple yet effective security layer for protecting sensitive areas of your website.
Key Takeaways:
- Install
apache2-utils(Ubuntu/Debian) orhttpd-tools(CentOS/RHEL) for htpasswd - Use
htpasswd -conly when creating a new password file - Always use HTTPS in production environments
- Set proper file permissions (640) and ownership
- Store password files outside your web root
- Reload Nginx after configuration changes
- Combine with IP restrictions for enhanced security
These solutions provide better user management, auditing capabilities, and security features suitable for enterprise applications.
Updated 5 months ago