Run:AI - Quickstart

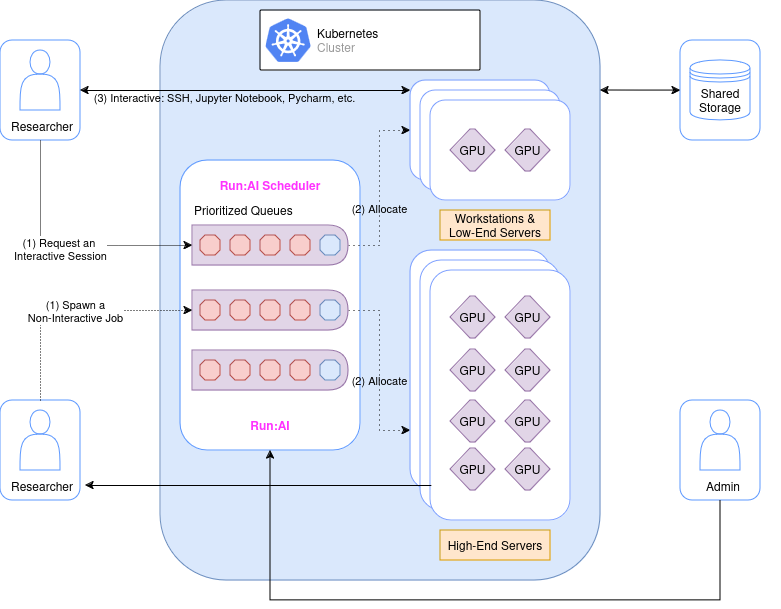
Run:AI's compute management platform accelerates data science initiatives by consolidating available resources and then dynamically assigning resources based on demand, thereby maximizing accessible compute power.


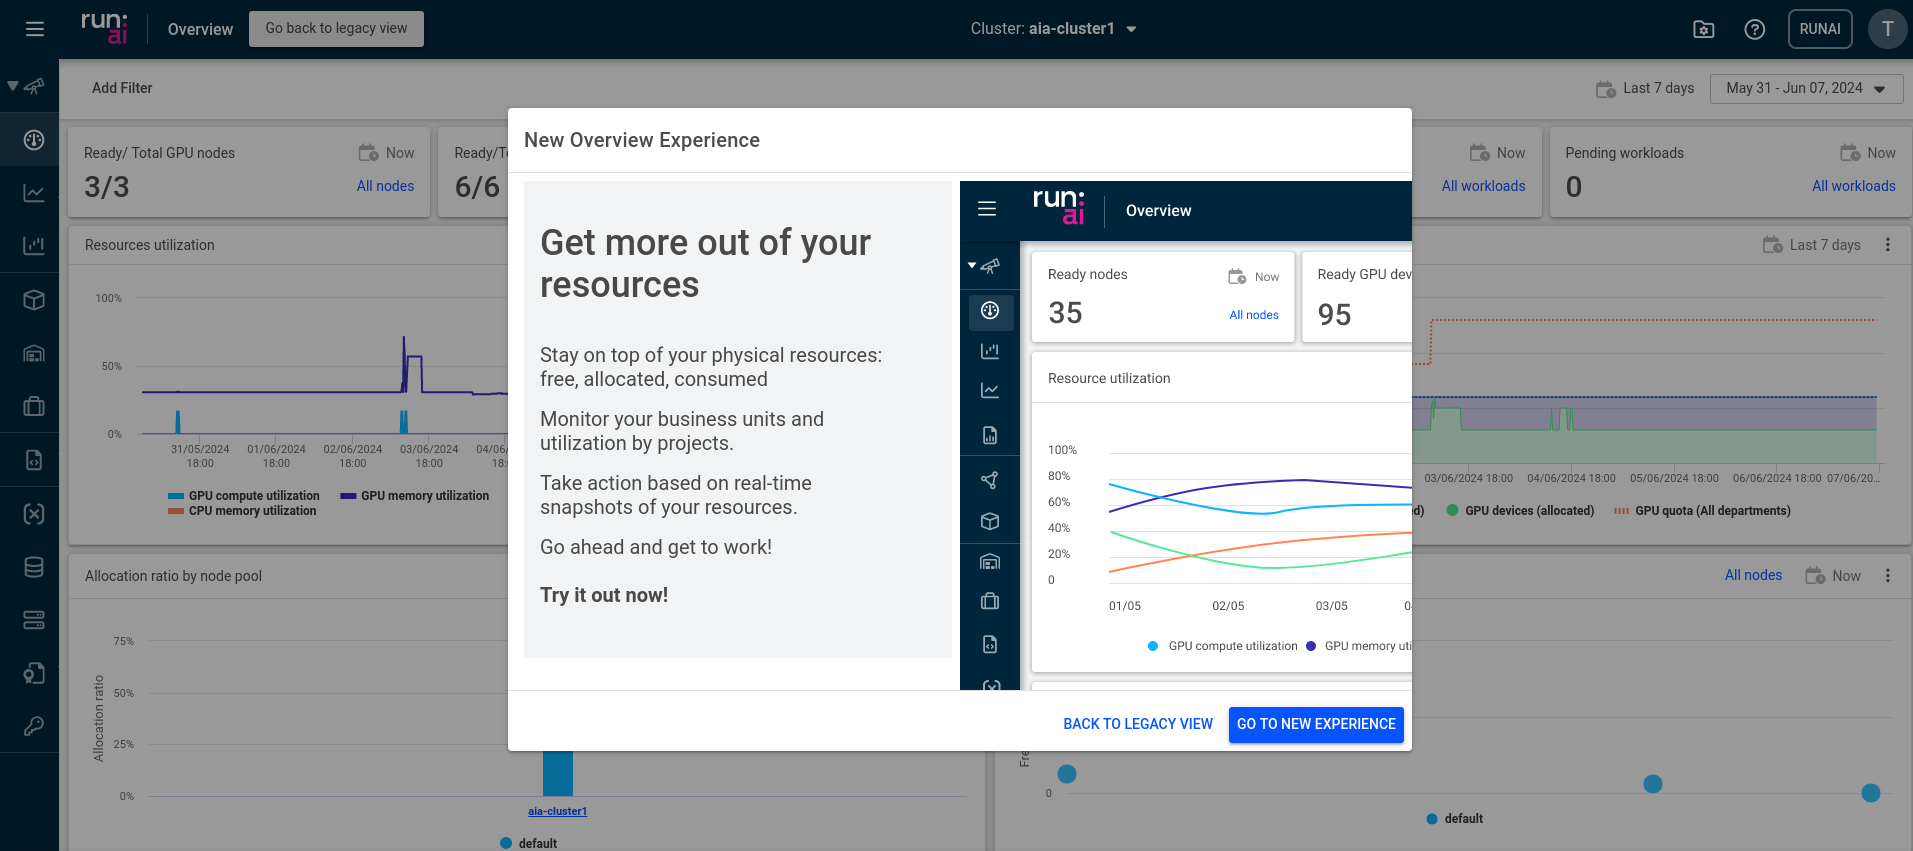
Log in to Run:AI using the Web UI

If you are currently not logged in to Run:AI and would like to use the Web UI, please follow these steps:

  • Open your browser and navigate to https://<YOUR_HOSTNAME>.
  • If prompted for your credentials, enter them or click on "Forgot Password?" if you have forgotten your password.
  • Once logged in, you can submit jobs (in the "Workloads" pane), view currently allocated resources ("Overview" and "Analytics" panes), see your allocated projects and corresponding resources ("Project" pane), and much more.


Log in to Run:AI using the CLI

We have developed a small tool to install Run:AI and Kubernetes CLI tools, and included here you have the bash completion for both pieces of software, please set the hostname (include http or https) using the env variable RUNAI_HOSTNAME:

❗️

If you are using macOS (including Darwin and other versions), ensure that you have wget installed for the download to work. This was tested and implemented successfully using bash on Linux and macOS.

#!/bin/bash
 
# Use RUNAI_HOSTNAME environment variable if available, otherwise use default hostname
RUNAI_HOSTNAME=${RUNAI_HOSTNAME:-"<NOHOSTNAME>"}
 
# Function to detect the operating system
detect_os() {
    if [[ "$OSTYPE" == "linux-gnu"* ]]; then
        echo "linux"
    elif [[ "$OSTYPE" == "darwin"* ]]; then
        echo "darwin"
    else
        echo "Unsupported OS"
        exit 1
    fi
}
 
# Function to download Run:AI CLI
download_runai_cli() {
    wget --no-check-certificate --content-disposition "$RUNAI_HOSTNAME/cli/$1" || { echo "Failed to download Run:AI CLI"; exit 1; }
    sudo mv runai /usr/local/bin/ || { echo "Failed to move Run:AI CLI to /usr/local/bin"; exit 1; }
    sudo chmod +x /usr/local/bin/runai || { echo "Failed to set executable permissions for Run:AI CLI"; exit 1; }
    runai completion bash > $HOME/.local_bashcompletion || { echo "Failed to generate bash completion for Run:AI CLI"; exit 1; }
    source $HOME/.local_bashcompletion || { echo "Failed to enable bash completion for Run:AI CLI"; exit 1; }
}
 
# Function to download kubectl
download_kubectl() {
    curl -LO "https://dl.k8s.io/release/$(curl -L -s https://dl.k8s.io/release/stable.txt)/bin/$1/amd64/kubectl" || { echo "Failed to download kubectl"; exit 1; }
    sudo mv kubectl /usr/local/bin/ || { echo "Failed to move kubectl to /usr/local/bin"; exit 1; }
    sudo chmod +x /usr/local/bin/kubectl || { echo "Failed to set executable permissions for kubectl"; exit 1; }
    kubectl completion bash > $HOME/.local_kubectlcompletion || { echo "Failed to generate bash completion for kubectl"; exit 1; }
    source $HOME/.local_kubectlcompletion || { echo "Failed to enable bash completion for kubectl"; exit 1; }
}
 
# Main script function
main() {
    os=$(detect_os)
 
    # Ask the user which tool to download
    echo "Which tool do you want to download?"
    echo "1. Run:AI CLI"
    echo "2. kubectl"
    read -p "Select an option (1/2): " option
 
    case $option in
        1)
            tool="Run:AI CLI"
            download_runai_cli "$os"
            ;;
        2)
            tool="kubectl"
            download_kubectl "$os"
            ;;
        *)
            echo "Invalid option. Exiting the script."
            exit 1
            ;;
    esac
 
    echo "$tool has been downloaded and configured successfully."
    echo ""
    echo "We also enabled bash completion for $tool"
}
 
# Execute the main function
main

The tool, once downloaded and saved, should be executed as any other Bash script:

username@dell:~$ ./install_tools.sh
Which tool do you want to download?
1. Run:AI CLI
2. kubectl
Select an option (1/2):

Choose the tool to be installed and the result should look like this:

username@dell:~$ ./install_tools.sh
Which tool do you want to download?
1. Run:AI CLI
2. kubectl
Select an option (1/2): 1
..............................................
runai                                         [                          <=>                                                       ]  49.63M  10.3MB/s    en 5.2s   
 
2024-06-07 17:41:26 (9.53 MB/s) - ‘runai’ saved [52043776]
 
Run:AI CLI has been downloaded and configured successfully.
 
We also enabled bash completion for Run:AI CLI
.....

Then, we create a ~/.kube folder in your $HOME directory and copy the "config" file shown here to ~/.kube/config (cp config ~/.kube/config).

apiVersion: v1
clusters:
- cluster:
    certificate-authority-data: <YOUR_CERTIFICATE_AUTH_DATA>
    server: https://<CLUSTER_ADDRESS:443>
  name: k8s-cluster1
contexts:
- context:
    cluster: k8s-cluster1
    namespace: <YOUR_NAMESPACE>
    user: runai-authenticated-user
  name: default
current-context: default
kind: Config
preferences: {}
users:
- name: runai-authenticated-user
  user:
    auth-provider:
      config:
        airgapped: "true"
        auth-flow: remote-browser
        client-id: runai-cli
        id-token: <ID_TOKEN>
        idp-issuer-url: https://<RUNAI_HOSTNAME>/auth/realms/runai
        realm: runai
        redirect-uri: https://<RUNAI_HOSTNAME>/oauth-code
        refresh-token: <REFRESH_TOKEN>
      name: oidc

First steps using the Run:AI CLI

If you are currently not logged in to Run:AI from your terminal, you can log in. First, install Run:AI as described in the previous section. Then, follow these steps:

In your terminal, run the command runai login and an URL will be printed in your terminal. Open this URL using your browser. Enter your credentials and click "Sign In".

You will see a token. Click on the copy button on the right. Paste the token into your terminal and press Enter.

Once you insert the token, you will see "INFO[0007] Logged in successfully" in your terminal.

If you are successful, the output should be similar to this example:

username@dell:~$ runai login
Go to the following link in your browser:
    https://<RUNAI_HOSTNAME>/auth/realms/runai/protocol/openid-connect/auth?access_type=offline&client_id=runai-cli&redirect_uri=.....
Enter verification code: <YOUR_VERIFICATION_CODE_GOES_HERE>
INFO[0027] Logged in successfully                      
username@dell:~$

You can always check if you are logged in (or with which user you are logged in) by running:

username@dell:~$ runai whoami
INFO[0000] User: [email protected]
Logged in Id: [email protected]
username@dell:~$

You can now, for example, list the projects you are associated with by running:

username@dell:~$ runai list projects
PROJECT                   DEPARTMENT              DESERVED GPUs  ALLOCATED GPUs  INT LIMIT  TRAIN LIMIT  INT IDLE LIMIT  TRAIN IDLE LIMIT  INT PREEMPTIBLE IDLE LIMIT  INT AFFINITY  TRAIN AFFINITY  MANAGED NAMESPACE
plexus-testing (default)  dep-private-ai-testing  4              2               -          -            -               -                 -                                                         runai-plexus-testing
username@dell:~$

We suggest you spend a few minutes to review the few available commands of Run:AI by running:

username@dell:~$ runai help
runai is a command line interface to a Run:ai cluster
 
Usage:
  runai [flags]
  runai [command]
 
Available Commands:
  attach         Attach standard input, output, and error streams to a running job session
  bash           Get a bash session inside a running job
  completion     Generate completion script
  config         Set a current configuration to be used by default
  delete         Delete resources
  describe       Display detailed information about resources
  exec           Execute a command inside a running job
  help           Help about any command
  list           Display resource list. By default displays the job list
  login          Log in to Run:ai
  logout         Log out from Run:ai
  logs           Print the logs of a job
  port-forward   Forward one or more local ports to the job.
         The forwarding session ends when the selected pod terminates, and a rerun of the command is needed to resume forwarding
  resume         Resume a job and its associated pods
  submit         Submit a new job
  submit-dist    Submit a new distributed job
  suspend        Suspend a job and its associated pods
  top            Display top information about resources
  update         Display instructions to update Run:ai CLI to match cluster version
  version        Print version information
  whoami         Current logged in user
 
Flags:
  -h, --help              help for runai
      --loglevel string   Set the logging level. One of: debug, info, warn, error. Defaults to info (default "info")
  -p, --project string    Specify the project to which the command applies. By default, commands apply to the default project.
 
Use "runai [command] --help" for more information about a command.
username@dell:~$

What are Projects on Run:AI

Researchers submit Workloads. To streamline resource allocation and prioritize work, Run:AI introduces the concept of Projects. Projects serve as a tool to implement resource allocation policies and create segregation between different initiatives. In most cases, a project represents a team, an individual, or an initiative that shares resources or has a specific resource budget (quota).

When a Researcher submits a workload, they must associate a Project name with the request. The Run:AI scheduler will compare the request against the current allocations and the Project's settings, determining whether the workload can be allocated resources or whether it should remain in the queue for future allocation.

Setting the Default Project:

In most cases, your projects will be assigned to you by your administrator, project manager, or the person in charge of the product. For the purpose of this documentation, we will exemplify the creation of a project by following these steps:

  1. Log in to the Run:AI Platform.
  2. Select "Projects" from the left menu.
  3. Click on the top-left button with the name "New Project."

After completing step 3, you will be presented with the following page:

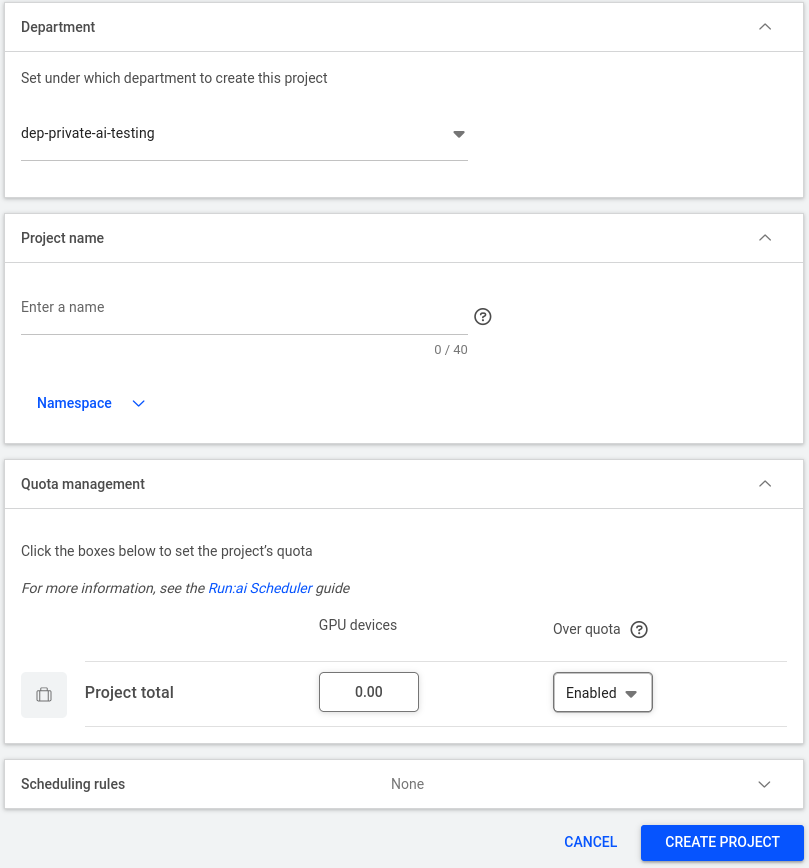
Proceed and fill in the "Project Name," create or select a Namespace if applicable, and then assign the desired amount of GPU devices under Quota Management, enabling Over quota if necessary.

Next, configure the Scheduling Rules, where you set the rules to control the utilization of the project's compute resources.

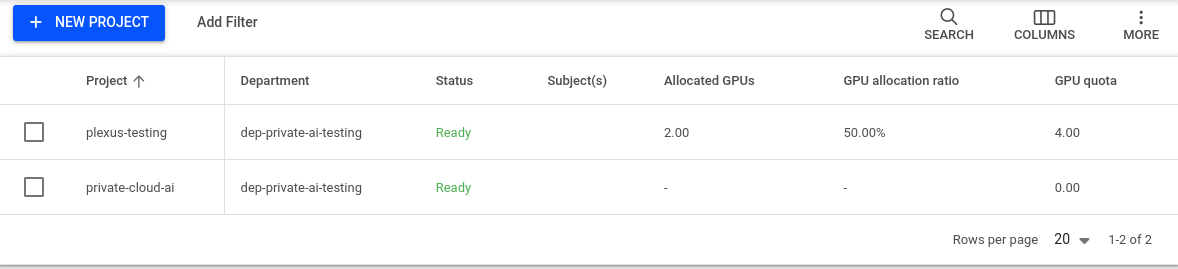
Upon creating a project, you will be redirected to the main project page. The "Status" column will display "Ready" once all creation tasks are completed, as demonstrated below:

Now, we can set the default project on the command-line interface using the "runai" command:

username@dell:~$ runai config project plexus-testing
Project plexus-testing has been set as default project
username@dell:~$

Resource Allocation in Run:AI

On a project level

Every project in Run:AI has a preassigned amount of resources, such as 1 GPU. Please note that we have a project overquota policy in place. This means that in practice, your project can use more resources than the assigned amount as long as the worker node assigned to your job is not fully utilized. Historically, the utilization of our virtual machines has been around 9% for GPU and 8% for CPU.

We guarantee that every researcher involved in a Run:AI project can use 0.2 GPUs at any time. This guarantee is subject to change to 0.1 in the future.

When a researcher requests more than the guaranteed 0.2 GPU, the corresponding jobs must be started using the --preemptible flag (a preemptible job).

Preemptible jobs can be scheduled above the guaranteed quota but may be reclaimed at any time if the worker node becomes overallocated (not before).

Preempted jobs are stopped (i.e., terminated) and restarted (from the pending state) once the resources become available again. Preempted jobs can have the following job statuses:

  • Terminating: The job is now being preempted.
  • Pending: The job is waiting in the queue again to receive resources.

For Run:AI "Training" jobs (In Run:AI, you have "Interactive," "Training," and "Inference" job types; see the link for more information), checkpointing can be used (storing the intermediate state of your training run):

If used, the job will continue (i.e., restart from the "Pending" state) from the last checkpoint. For more details on "Checkpoints," please refer to the section below.

Requesting GPU, CPU & Memory

When submitting a job, you can request a guaranteed amount of CPUs and memory by using the --cpu and --memory flags in the runai submit command.

runai submit job1 -i ubuntu --gpu 2 --cpu 12 --memory 1G

The system ensures that if the job is scheduled, you will be able to receive the specified amount of CPU and memory. For further details on these flags see: runai submit.

CPU over allocation

The number of CPUs your workload will receive is guaranteed to be the number specified using the --cpu flag. However, in practice, you may receive more CPUs than you have requested. For example, if you are currently alone on a node, you will receive all the node's CPUs until another workload joins. At this point, each workload will receive a number of CPUs proportional to the number requested via the --cpu flag. For instance, if the first workload requested 1 CPU and the second requested 3 CPUs, then on a node with 40 CPUs, the workloads will receive 10 and 30 CPUs, respectively. If the --cpu flag is not specified, it will default to the cluster setting (see the "Memory Over-allocation" section below).

The amount of memory your workload will receive is also guaranteed to be the number defined using the --memory flag. Nonetheless, you may receive more memory than requested, which follows the same principle as CPU over-allocation, as described above.

Please note that if you utilize this memory over-allocation and new workloads join, your workload may encounter an out-of-memory exception and terminate. To learn how to avoid this, refer to the "CPU and Memory Limits" section.

Additionally, be aware that when you submit a workload with the --preeemptible flag, your workload can be preempted or terminated at any time. In this case, you will see the message "Job was preempted" in the runai logs output. To restart the workload, run "runai restart <workload_name>". Note that you can only restart a job that was preempted. If you stop a workload manually, you cannot restart it.

Memory over allocation

The allocated memory for your job is guaranteed to be the number specified using the --memory flag. In practice, however, you may receive more memory than you have requested. This is similar to the CPU over-allocation described earlier.

Please note, however, that if you have utilized this memory over-allocation and new workloads have joined, your job may encounter an out-of-memory exception and terminate.

CPU and Memory limits

You can limit the allocation of CPU and memory for your Job by using the --cpu-limit and --memory-limit flags in the runai submit command. For example:

runai submit job1 -i ubuntu --gpu 2 --cpu 12 --cpu-limit 24 --memory 1G --memory-limit 4G

The behavior of the limits differs for CPUs and memory.

Your Job will never be allocated with more than the amount specified in the --cpu-limit flag. If your Job attempts to allocate more than the amount specified in the --memory-limit flag, it will receive an out-of-memory exception. The limit (for both CPU and memory) overrides the cluster default described in the section below.

For further details on these flags, refer to the runai submit documentation.

Available Flags to Allocate Resources for Run:AI Workloads

You can go through the examples in the next section to test different job submission flags for resource allocation hands-on. Run runai help submit for details on available flags. Here is a part of the available flags related to Resource Allocation in Run:AI:

GPU-related flags:

  • --gpu-memory <string>: GPU memory that will be allocated for this Job (e.g., 1G, 20M, etc). Attempting to allocate more GPU memory in the job will result in an out-of-memory exception. You can check the available GPU memory on the worker node by running nvidia-smi in the container. The total memory available to your job is circled in red in the example below.
  • --gpu <float> or -g <float>: This flag is just an alternative for assigning GPU memory. For example, set --gpu 0.2 to get 20% of the GPU memory on the GPU assigned for you. In general, the compute resources are shared (not the memory) on a worker node when using fractions of a GPU (not when allocating full GPUs).
  • --large-shm: When you run jobs with > 1 GPU, add this flag on job submission. This allocates a large /dev/shm device (large shared memory) for this Job (64G). In case you don't use this flag with GPU > 1, you will get an error: ERROR: Unexpected bus error encountered in worker. This might be caused by insufficient shared memory (shm).

To learn more about GPU allocation, follow this part of the Run:AI documentation.

Note that if you only specify -g <float> and no memory requirements, the GPU RAM is allocated proportionally to available hardware GPU RAM: E.g., with -g 0.1, you will get 10% of total GPU RAM. (The total GPU ram of an A30 is 24GB).

CPU-Related Flags

--cpu: The number of CPUs your job will receive is guaranteed to be the number defined using the --cpu flag. However, you may receive more CPUs than you have requested in practice:

  • If you are currently the only workload on a node, you will receive all the node's CPUs until another workload joins.

  • When a second workload joins, each workload will receive a number of CPUs proportional to the number requested via the --cpu flag. For example, if the first workload requested 1 CPU and the second requested 3 CPUs, then on a node with 40 CPUs, the workloads will receive 10 and 30 CPUs, respectively.

--memory <string> : The guaranteed (minimum) CPU memory to allocate for this job (1G, 20M). In practice, you will receive more memory than the minimum amount if it is currently available on the worker node.

If your job does not specify --cpu, the system will use a default value. The default is cluster-wide and is defined as a ratio of GPUs to CPUs.

For example, we currently have a total of 6 GPUs and 384 CPUs with 3TB of RAM in runai. Check the runai GUI "Analytics" pane for up-to-date values under the "Workloads" section or execute runai top nodes:

username@dell:~$ runai top nodes
                           │ CPU       │ MEMORY      │ GPU  
NAME               STATUS  │ CAPACITY  │ CAPACITY    │ CAPACITY
────               ──────  │ ────────  │ ────────    │ ────────
xxxxxxx-k8s-wn101  Ready   │ 128       │ 1007.5 GiB  │ 2
xxxxxxx-k8s-wn102  Ready   │ 128       │ 1007.5 GiB  │ 2
xxxxxxx-k8s-wn103  Ready   │ 128       │ 1007.5 GiB  │ 2
xxxxxxx-k8s-cp101  Ready   │ 80        │ 376.5 GiB   │ 0
xxxxxxx-k8s-cp102  Ready   │ 80        │ 376.5 GiB   │ 0
xxxxxxx-k8s-cp103  Ready   │ 80        │ 376.5 GiB   │ 0
username@dell:~$

Learn more about CPU and memory allocation in the following sections of the Run:AI documentation.

Note that any Run:AI job cannot be scheduled unless the system can guarantee the defined amount of resources to the job.

Persistent storage (Data Source)

How to access Data Sources? click on the main menu, at the botton, next to Templates.

A data source is a location where research-relevant data sets are stored. The data can be stored locally or in the cloud. Workspaces can be attached to multiple data sources for both reading and writing.

Run:AI supports various storage technologies, including:

  • NFS
  • PVC
  • S3 Bucket
  • Git
  • Host path

Creating a PVC Data Source

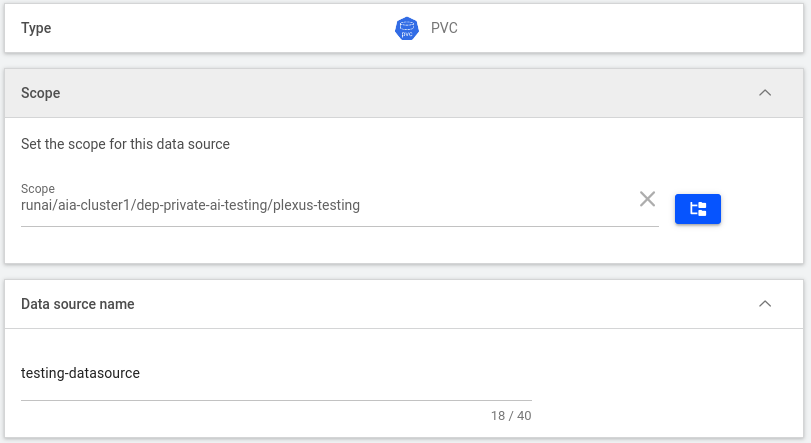
To create a Persistent Volume Claim (PVC) data source, please provide the following:

  • Scope (cluster, department, or project) that will be assigned to the PVC and all its subsidiaries. This scope determines the visibility and access control of the PVC within the Run:AI environment.
  • A data source name: This will be used to identify the PVC in the system.

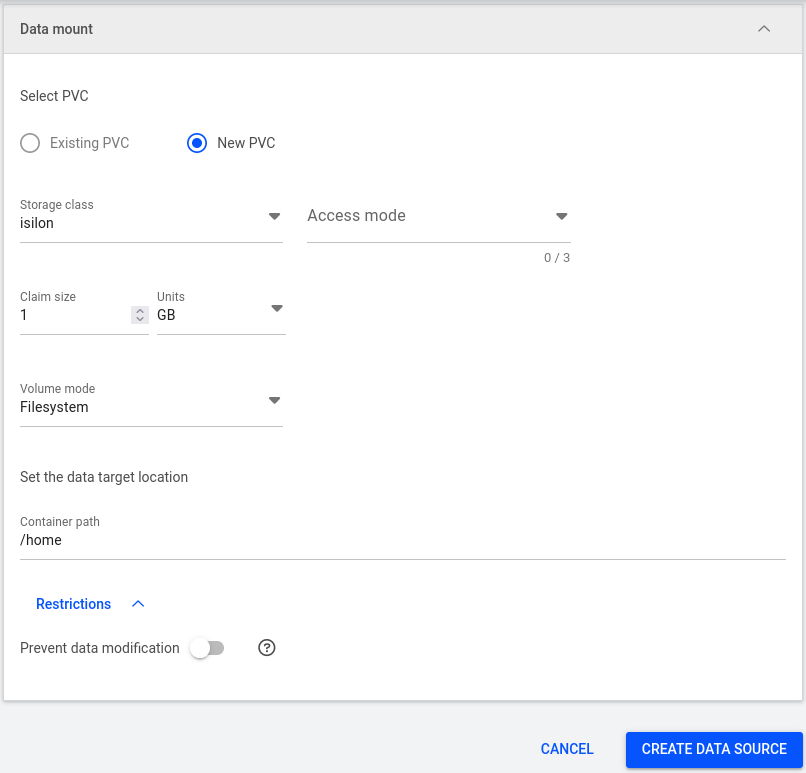
Select an existing PVC or create a new one by providing:

  • A storage class
  • Access mode
  • Claim size with Units
  • Volume mode
  • The path within the container where the data will be mounted
  • Restrictions to prevent data modification

Example image:

How do i integrate a PVC with Run:AI on the CLI?

As you can see in the example provided, this is done using kubectl to obtain the full name of the Persistent Volume Claim (PVC).

username@dell:~$ kubectl get pvc
NAME                                      STATUS   VOLUME                 CAPACITY      ACCESS MODES   STORAGECLASS   AGE
vllm-hf-dep-private-ai-testing-af723      Bound    csipscale-d3c21f9008   9765625Ki     RWO            isilon         49d
username@dell:~$

Then, you can construct your command line as follows:

runai submit --image nvidia/cuda:12.4.0-devel-ubuntu22.04 --cpu 2 --gpu 1 --memory 8G --attach --interactive --existing-pvc claimname=vllm-hf-dep-private-ai-testing-af723,path=/srv

Copying Files to and from Kubernetes Pods

kubectl cp <local_file_path> <pod_name>:<destination_path_inside_pod>
kubectl cp <pod_name>:<source_path_inside_pod> <local_destination_path>

Kubernetes & Docker images in Run:AI

  • Every Run:AI workload is started from a docker image.
  • You select the image you want to use by specifying the --image/-i flag.

Most used Docker images related to Machine Learning/AI

By default, images are pulled from Docker Hub. For example:

  • The official Triton Server image can be pull with --image nvcr.io/nvidia/tritonserver:24.04-trtllm-python-py3
  • The official TensorTR image can be pull with --image nvidia/cuda:12.4.0-devel-ubuntu22.04
  • The official vLLM with OpenAI style endpoint can be pull with --image vllm/vllm-openai
  • The official Ubuntu image can be pull with --image ubuntu
  • The official Alpine image can be pull with --image alpine
  • The official Jupyter/base-notebook can be pull with --image jupyter/base-notebook
  • The official TensorFlow can be pull with --image tensorflow/tensorflow

Troubleshooting Workloads

To debug a crashed container(job or workload), try the following:

Get your job status by running:

username@dell:~$ runai describe job my-ubuntu -p plexus-testing
Name: my-ubuntu
Namespace: runai-plexus-testing
Type: Interactive
Status: Succeeded
Duration: 4s
GPUs: 1.00
Total Requested GPUs: 1.00
Allocated GPUs: 1.00
Allocated GPUs memory: 24576M
Running PODs: 1
Pending PODs: 0
Parallelism: 1
Completions: 1
Succeeded PODs: 0
Failed PODs: 0
Is Distributed Workload: false
Service URLs:
Command Line: runai submit my-ubuntu -i ubuntu --gpu 1 --cpu 12 --memory 4G --interactive
 
Pods:
POD            STATUS     TYPE         AGE  NODE
my-ubuntu-0-0  SUCCEEDED  INTERACTIVE  6s   xxxxxxx-k8s-wn101/10.4.102.30
 
Events:
SOURCE                                                        TYPE    AGE  MESSAGE
--------                                                      ----    ---  -------
runaijob/my-ubuntu                                            Normal  6s   [SuccessfulCreate] Created pod: my-ubuntu-0-0                                                                                                                                                                                                                                                                                
podgroup/pg-my-ubuntu-0-010cd1ee-140a-44ed-9eb7-dc4e4c9747ff  Normal  6s   [Pending] Job status is Pending                                                                                                                                                                                                                                                                                               
pod/my-ubuntu-0-0                                             Normal  4s   [Scheduled] Successfully assigned pod runai-plexus-testing/my-ubuntu-0-0 to node xxxxxxx-k8s-wn101 at node-pool default                                                                                                                                                                                                       
podgroup/pg-my-ubuntu-0-010cd1ee-140a-44ed-9eb7-dc4e4c9747ff  Normal  4s   [ContainerCreating] Job status changed from Pending to ContainerCreating                                                
pod/my-ubuntu-0-0                                             Normal  3s   [Pulling] Pulling image "ubuntu"                                                                                        
pod/my-ubuntu-0-0                                             Normal  3s   [Pulled] Successfully pulled image "ubuntu" in 527.668474ms (527.677575ms including waiting)                            
pod/my-ubuntu-0-0                                             Normal  3s   [Created] Created container my-ubuntu                                                                                   
pod/my-ubuntu-0-0                                             Normal  2s   [Started] Started container my-ubuntu                                                                                   
podgroup/pg-my-ubuntu-0-010cd1ee-140a-44ed-9eb7-dc4e4c9747ff  Normal  2s   [Succeeded] Job status changed from ContainerCreating to Succeeded                                                      
runaijob/my-ubuntu                                            Normal  0s   [Completed] RunaiJob completed                                                                                                                                                                                                                                                                                               
username@dell:~$

Because the type of workload launched to perform a single task, it will generate the container and then be marked as completed on our Run:AI UI, ensuring no errors occur:

You could also catch the output logs by using the runai logs <workload>:

username@dell:~$ runai logs infer4-00001-deployment 
INFO 06-10 22:10:57 metrics.py:334] Avg prompt throughput: 0.0 tokens/s, Avg generation throughput: 0.0 tokens/s, Running: 0 reqs, Swapped: 0 reqs, Pending: 0 reqs, GPU KV cache usage: 0.0%, CPU KV cache usage: 0.0%
INFO 06-10 22:11:07 metrics.py:334] Avg prompt throughput: 0.0 tokens/s, Avg generation throughput: 0.0 tokens/s, Running: 0 reqs, Swapped: 0 reqs, Pending: 0 reqs, GPU KV cache usage: 0.0%, CPU KV cache usage: 0.0%
INFO 06-10 22:11:17 metrics.py:334] Avg prompt throughput: 0.0 tokens/s, Avg generation throughput: 0.0 tokens/s, Running: 0 reqs, Swapped: 0 reqs, Pending: 0 reqs, GPU KV cache usage: 0.0%, CPU KV cache usage: 0.0%
INFO 06-10 22:11:27 metrics.py:334] Avg prompt throughput: 0.0 tokens/s, Avg generation throughput: 0.0 tokens/s, Running: 0 reqs, Swapped: 0 reqs, Pending: 0 reqs, GPU KV cache usage: 0.0%, CPU KV cache usage: 0.0%
INFO 06-10 22:11:37 metrics.py:334] Avg prompt throughput: 0.0 tokens/s, Avg generation throughput: 0.0 tokens/s, Running: 0 reqs, Swapped: 0 reqs, Pending: 0 reqs, GPU KV cache usage: 0.0%, CPU KV cache usage: 0.0%
INFO 06-10 22:11:47 metrics.py:334] Avg prompt throughput: 0.0 tokens/s, Avg generation throughput: 0.0 tokens/s, Running: 0 reqs, Swapped: 0 reqs, Pending: 0 reqs, GPU KV cache usage: 0.0%, CPU KV cache usage: 0.0%
INFO 06-10 22:11:57 metrics.py:334] Avg prompt throughput: 0.0 tokens/s, Avg generation throughput: 0.0 tokens/s, Running: 0 reqs, Swapped: 0 reqs, Pending: 0 reqs, GPU KV cache usage: 0.0%, CPU KV cache usage: 0.0%
INFO 06-10 22:12:07 metrics.py:334] Avg prompt throughput: 0.0 tokens/s, Avg generation throughput: 0.0 tokens/s, Running: 0 reqs, Swapped: 0 reqs, Pending: 0 reqs, GPU KV cache usage: 0.0%, CPU KV cache usage: 0.0%
INFO 06-10 22:12:17 metrics.py:334] Avg prompt throughput: 0.0 tokens/s, Avg generation throughput: 0.0 tokens/s, Running: 0 reqs, Swapped: 0 reqs, Pending: 0 reqs, GPU KV cache usage: 0.0%, CPU KV cache usage: 0.0%
INFO 06-10 22:12:27 metrics.py:334] Avg prompt throughput: 0.0 tokens/s, Avg generation throughput: 0.0 tokens/s, Running: 0 reqs, Swapped: 0 reqs, Pending: 0 reqs, GPU KV cache usage: 0.0%, CPU KV cache usage: 0.0%
INFO 06-10 22:12:37 metrics.py:334] Avg prompt throughput: 0.0 tokens/s, Avg generation throughput: 0.0 tokens/s, Running: 0 reqs, Swapped: 0 reqs, Pending: 0 reqs, GPU KV cache usage: 0.0%, CPU KV cache usage: 0.0%
username@dell:~$

There are several options available for the logs sub-command:

username@dell:~$ runai help logs
Print the logs of a job
 
Usage:
  runai logs JOB_NAME [flags]
 
Flags:
  -f, --follow              Stream the logs
  -h, --help                help for logs
      --interactive         Search for interactive jobs
      --mpi                 Search for MPI jobs
      --pod string          Specify a pod of a running job. To get a list of the pods of a specific job, run "runai describe <job-name>" command
      --pytorch             Search for PyTorch jobs
      --since duration      Return logs newer than a relative duration, like 5s, 2m, or 3h. Note that only one flag "since-time" or "since" may be used
      --since-time string   Return logs after a specific date (e.g. 2019-10-12T07:20:50.52Z). Note that only one flag "since-time" or "since" may be used
  -t, --tail int            Return a specific number of log lines (default -1)
      --tf                  Search for TensorFlow jobs
      --timestamps          Include timestamps on each line in the log output
      --train               Search for train jobs
      --xgboost             Search for XGBoost jobs
 
Global Flags:
      --loglevel string   Set the logging level. One of: debug, info, warn, error. Defaults to info (default "info")
  -p, --project string    Specify the project to which the command applies. By default, commands apply to the default project. To change the default project use ‘runai config project <project name>’
username@dell:~$

Step by Step examples

Running your first workload

Deploy Ubuntu with CPU only

In this example, we will start a Run:AI job (only cpu, no gpu) in your preferred terminal.

Run the following command in your terminal:

runai submit <CONTAINER_NAME> -i ubuntu --cpu 4 --attach --interactive

Explanation of the above command:

  • -i ubuntu: the image you want to use. If no full address is specified -as here- the image is searched in the registry on dockerhub, specifically for the ubuntu image.
  • --cpu 4: Optional. This will ensure that you get 4 CPU's allocated for your job. In practice, you will receive more CPU's than the minimum amount if currently available on the worker node.
  • --attach: attach directly to the container after starting it.
  • --interactive: Mark this Job as interactive, meaning, it can run indefinitely and will not be preempted by other jobs. In case you don't specify --interactive the job is assumed to be a training job that a) can be preempted and b) is terminated once all execution steps are finished in the container.

Once you started your job, you will see the message "Waiting for pod to start running..." for about 5-10 seconds and finally "Connecting to pod ubuntu-0-0". In this specific example, you are automatically connected to the container since you used --attach.

In case you are not automatically connected to your container or want to learn to connect/reconnect to a container, read the next subsection "Connecting to your container". Once your container has started, you will be directly connected to it.

Your PROMPT will change to container shell:

root@ubuntu-0-0:~# for the ubuntu image.

Connecting/Reconnecting to your container

There are several reasons why you might not have been connected to your container. For example, 'Timeout waiting for job to start running' occurs for large images that take a long time to download.

In case you want to connect or reconnect to your container from your terminal, run:

runai attach <workload_name>

In case your container has a TTY. While most images allocate a TTY, you can allocate a TTY manually for any Run:AI jobs by specifying --tty with runai submit.

In case your container has the Bash command available, you can connect/reconnect by running:

runai bash <workload_name>

You can also connect or reconnect using kubectl, the Kubernetes command-line interface, without utilizing RunAi, by executing the following command:

kubectl exec -i -t <workload_name> -- sh -c "bash"

In all the mentioned cases, replace <workload_name> with your desired job name. For example, use "ubuntu" for the current job, and replace with your project name, such as "plexus-testing." Please note that in Run:AI, your workload will have the job name "ubuntu." When using the kubectl command, the name of your container will always be the Run:AI workload name followed by "-0-0."

Consequently, your Run:AI container with the workload name "ubuntu" will be referred to as "ubuntu-0-0" when using the kubectl command.

👍

Congratulations! You have successfully started your first Run:AI container.

Exiting a workload in Run:AI

If you type "exit" within the container, you will exit the container and, in this case, terminate the Run:AI job (the container hosting the session). A persistent container example is shown further below. Please note that "training" jobs (as opposed to "interactive" jobs) will persist until they are finished (or terminated by the user or preempted by the system in case they exceed their quota).

To verify that your job is no longer running and has a status of "Succeeded" (or "Failed," which is also acceptable), wait for at least 2-3 seconds after exiting the container and then run:

runai list jobs

Note that as long as you see your job with the name "ubuntu" in the list above, you cannot create a new job with the same job name "ubuntu." To remove the job from the list, run:

runai delete job ubuntu

This will make it possible for you to submit a new job with a different job name. Alternatively, you can choose a different job name altogether.

To delete all of your jobs, run:

runai delete jobs -A

Other examples

Deployment of vLLM

Depending on whether you have a PVC (Persistent Volume Claim) created or not, the deployment should be pretty straightforward. For this example, we will deploy via the Web UI and then use kubectl with YAML:

How to Submit a Workload

To submit a workload using the UI, please follow these steps:

  • In the left menu, click on "Workloads."
  • Click on "New Workload," and then select "Inference."

Then a new page will be presented similar to this one:

Inference for vLLM

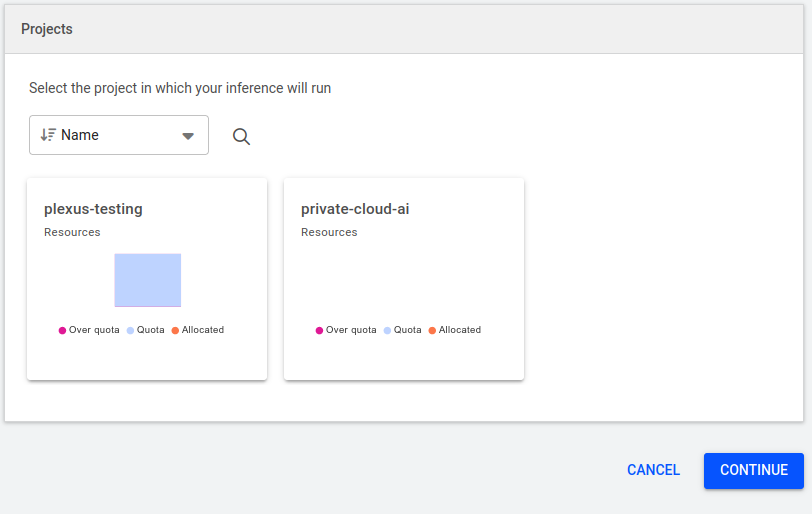
In the Projects pane, select a project. Use the search box to find projects that are not listed. If you cannot find the project, consult your system administrator.

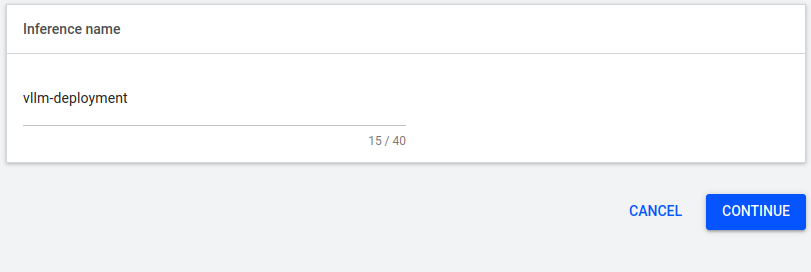
When you select your Project, a new dialog will be displayed as "Inference name":

When you click on continue:

  • In the Inference Name field, enter a name for the workload, in this case, vllm-deployment.
  • In the Inference Name field, enter a name for the workload, in this case, vllm-deployment.
  • In the Environment field, select an environment. Use the search box to find an environment that is not listed. If you cannot find an environment, press New Environment or consult your system administrator.
    • In the Set the Connection for Your Tool(s) pane, choose a tool for your environment (if available).
    • In the Runtime Settings field, set commands and arguments for the container running in the pod (optional).
    • In the Environment Variable you should have set vllm/vllm-openai:v0.5.0 for your image.
      • For the Runtime Settings we should add the following:
        • Set a command and arguments for the container running in the pod:
          • Command: python3
          • Arguments: -m vllm.entrypoints.openai.api_server --model NousResearch/Hermes-2-Pro-Mistral-7B --dtype=half --tensor-parallel-size 2 --served-model-name gpt-3.5-turbo --enforce-eager --max-model-len 16384
        • Set the environment variable(s)
          • NCCL_P2P_DISABLE set to 1
        • Set the container's working directory if required.
    • Press Create Environment.
  • In the Compute Resource field, select a compute resource from the tiles. Use the search box to find a compute resource that is not listed. If you cannot find a compute resource, press New Compute Resource or consult your system administrator.
    • In the Replica Autoscaling section, set the minimum and maximum replicas for your inference. Then select either Never or After One Minute of Inactivity to set when the replicas should be automatically scaled down to zero.
    • In the Nodes field, change the order of priority of the node pools, or add a new node pool to the list.
  • Press Create Inference when you are done.

🚧

Notice

Data sources that are unavailable will be displayed in a faded (gray) color.

Assets currently undergoing cluster synchronization will also be displayed in a faded (gray) color.

Only the following resources are supported: Pod Visualizer Charts (PVC), Git repositories, and Configuration Maps.

Follow your job status with the describe verb as show here:

runai describe job vllm-deployment-00001-deployment

If successful, you will see an output similar to this one:

username@dell:~$ runai logs vllm-deployment-00001-deployment
INFO 06-12 19:45:19 api_server.py:177] vLLM API server version 0.5.0
INFO 06-12 19:45:19 api_server.py:178] args: Namespace(host=None, port=8000, uvicorn_log_level='info', allow_credentials=False, allowed_origins=['*'], allowed_methods=['*'], allowed_headers=['*'], api_key=None, lora_modules=None, chat_template=None, response_role='assistant', ssl_keyfile=None, ssl_certfile=None, ssl_ca_certs=None, ssl_cert_reqs=0, root_path=None, middleware=[], model='NousResearch/Hermes-2-Pro-Mistral-7B', tokenizer=None, skip_tokenizer_init=False, revision=None, code_revision=None, tokenizer_revision=None, tokenizer_mode='auto', trust_remote_code=False, download_dir=None, load_format='auto', dtype='half', kv_cache_dtype='auto', quantization_param_path=None, max_model_len=None, guided_decoding_backend='outlines', distributed_executor_backend=None, worker_use_ray=False, pipeline_parallel_size=1, tensor_parallel_size=2, max_parallel_loading_workers=None, ray_workers_use_nsight=False, block_size=16, enable_prefix_caching=False, disable_sliding_window=False, use_v2_block_manager=False, num_lookahead_slots=0, seed=0, swap_space=4, gpu_memory_utilization=0.9, num_gpu_blocks_override=None, max_num_batched_tokens=None, max_num_seqs=256, max_logprobs=20, disable_log_stats=False, quantization=None, rope_scaling=None, rope_theta=None, enforce_eager=True, max_context_len_to_capture=None, max_seq_len_to_capture=8192, disable_custom_all_reduce=False, tokenizer_pool_size=0, tokenizer_pool_type='ray', tokenizer_pool_extra_config=None, enable_lora=False, max_loras=1, max_lora_rank=16, lora_extra_vocab_size=256, lora_dtype='auto', long_lora_scaling_factors=None, max_cpu_loras=None, fully_sharded_loras=False, device='auto', image_input_type=None, image_token_id=None, image_input_shape=None, image_feature_size=None, image_processor=None, image_processor_revision=None, disable_image_processor=False, scheduler_delay_factor=0.0, enable_chunked_prefill=False, speculative_model=None, num_speculative_tokens=None, speculative_max_model_len=None, speculative_disable_by_batch_size=None, ngram_prompt_lookup_max=None, ngram_prompt_lookup_min=None, model_loader_extra_config=None, preemption_mode=None, served_model_name=['gpt-3.5-turbo'], qlora_adapter_name_or_path=None, engine_use_ray=True, disable_log_requests=False, max_log_len=None)
/usr/local/lib/python3.10/dist-packages/huggingface_hub/file_download.py:1132: FutureWarning: `resume_download` is deprecated and will be removed in version 1.0.0. Downloads always resume when possible. If you want to force a new download, use `force_download=True`.
  warnings.warn(
WARNING 06-12 19:45:19 config.py:1218] Casting torch.bfloat16 to torch.float16.
..........
username@dell:~$

Then, call the model list and inference using cURL:

username@dell:~$ curl http://vllm-deployment.../v1/models |jq
  % Total    % Received % Xferd  Average Speed   Time    Time     Time  Current
                                 Dload  Upload   Total   Spent    Left  Speed
100   455  100   455    0     0    886      0 --:--:-- --:--:-- --:--:--   885
{
  "object": "list",
  "data": [
    {
      "id": "gpt-3.5-turbo",
      "object": "model",
      "created": 1718221704,
      "owned_by": "vllm",
      "root": "gpt-3.5-turbo",
      "parent": null,
      "permission": [
        {
          "id": "modelperm-1a50a7b2b21e42bf959fbfcf40da4d1f",
          "object": "model_permission",
          "created": 1718221704,
          "allow_create_engine": false,
          "allow_sampling": true,
          "allow_logprobs": true,
          "allow_search_indices": false,
          "allow_view": true,
          "allow_fine_tuning": false,
          "organization": "*",
          "group": null,
          "is_blocking": false
        }
      ]
    }
  ]
}
username@dell:~$ curl http://vllm-deployment..../v1/completions -H "Content-Type: application/json" -d '{
"model": "gpt-3.5-turbo",
"prompt": "What is Run:ai?",
"max_tokens": 120,
"temperature": 0
}'|jq
  % Total    % Received % Xferd  Average Speed   Time    Time     Time  Current
                                 Dload  Upload   Total   Spent    Left  Speed
100   966  100   872  100    94    295     31  0:00:03  0:00:02  0:00:01   327
{
  "id": "cmpl-c04704d134ef4e63b6791dbdbfb95b0a",
  "object": "text_completion",
  "created": 1718221877,
  "model": "gpt-3.5-turbo",
  "choices": [
    {
      "index": 0,
      "text": "\n\nRun:ai is a cloud-based platform that enables developers to build, deploy, and manage containerized applications for Kubernetes. It provides a streamlined and automated approach to container management, allowing developers to focus on writing code rather than managing infrastructure.\n\nWhat are the key features of Run:ai?\n\n1. Simplified Kubernetes Management: Run:ai simplifies the management of Kubernetes clusters, making it easy for developers to deploy and manage containerized applications.\n\n2. Automated Container Orchestration: Run:ai automates the deployment and scaling",
      "logprobs": null,
      "finish_reason": "length",
      "stop_reason": null
    }
  ],
  "usage": {
    "prompt_tokens": 7,
    "total_tokens": 127,
    "completion_tokens": 120
  }
}
username@dell:~$

Launching Jupyter Lab/Notebook with Port Forwarding on Run:AI

Using the same method described in "How do I integrate a PVC with Run:AI on the CLI?", we execute the command-line command by appending --service-type=nodeport --port 30088:8888.

runai submit --image $HARBOR_IMAGE --cpu 24 --gpu 1 --memory 32G --attach --interactive --existing-pvc claimname=$RUNAI_PVC,path=/srv/permanent --service-type=nodeport --port 30088:30088

Because the image isn't prepared for Jupyter Lab or the Notebook itself (we use a Finetune prepared image), I would proceed to install the required packages for the application as follows:

apt-get install nodejs npm
python3 -m pip install jupyterhub
npm install -g configurable-http-proxy
python3 -m pip install jupyterlab notebook

After the installation, we can execute Jupyter in the following manner:

(unsloth_env) root@job-5cdf5638ed70-0-0:/srv/permanent# jupyter notebook --allow-root --port 30088
[I 2024-06-20 18:48:55.550 ServerApp] jupyter_lsp | extension was successfully linked.
[I 2024-06-20 18:48:55.553 ServerApp] jupyter_server_terminals | extension was successfully linked.
[I 2024-06-20 18:48:55.557 ServerApp] jupyterlab | extension was successfully linked.
[I 2024-06-20 18:48:55.561 ServerApp] notebook | extension was successfully linked.
[I 2024-06-20 18:48:55.709 ServerApp] notebook_shim | extension was successfully linked.
[I 2024-06-20 18:48:55.720 ServerApp] notebook_shim | extension was successfully loaded.
[I 2024-06-20 18:48:55.723 ServerApp] jupyter_lsp | extension was successfully loaded.
[I 2024-06-20 18:48:55.724 ServerApp] jupyter_server_terminals | extension was successfully loaded.
[I 2024-06-20 18:48:55.725 LabApp] JupyterLab extension loaded from /srv/miniconda3/envs/unsloth_env/lib/python3.10/site-packages/jupyterlab
[I 2024-06-20 18:48:55.725 LabApp] JupyterLab application directory is /srv/miniconda3/envs/unsloth_env/share/jupyter/lab
[I 2024-06-20 18:48:55.725 LabApp] Extension Manager is 'pypi'.
[I 2024-06-20 18:48:55.746 ServerApp] jupyterlab | extension was successfully loaded.
[I 2024-06-20 18:48:55.748 ServerApp] notebook | extension was successfully loaded.
[I 2024-06-20 18:48:55.749 ServerApp] Serving notebooks from local directory: /srv/permanent
[I 2024-06-20 18:48:55.749 ServerApp] Jupyter Server 2.14.1 is running at:
[I 2024-06-20 18:48:55.749 ServerApp] http://localhost:30088/tree?token=0493cc93338a15e59815e769470b923d92a63b1288099188
[I 2024-06-20 18:48:55.749 ServerApp]     http://127.0.0.1:30088/tree?token=0493cc93338a15e59815e769470b923d92a63b1288099188
[I 2024-06-20 18:48:55.749 ServerApp] Use Control-C to stop this server and shut down all kernels (twice to skip confirmation).
[W 2024-06-20 18:48:55.752 ServerApp] No web browser found: Error('could not locate runnable browser').
[C 2024-06-20 18:48:55.752 ServerApp]
     
    To access the server, open this file in a browser:
        file:///root/.local/share/jupyter/runtime/jpserver-4215-open.html
    Or copy and paste one of these URLs:
        http://localhost:30088/tree?token=0493cc93338a15e59815e769470b923d92a63b1288099188
        http://127.0.0.1:30088/tree?token=0493cc93338a15e59815e769470b923d92a63b1288099188
[I 2024-06-20 18:48:56.008 ServerApp] Skipped non-installed server(s): bash-language-server, dockerfile-language-server-nodejs, javascript-typescript-langserver, jedi-language-server, julia-language-server, pyright, python-language-server, python-lsp-server, r-languageserver, sql-language-server, texlab, typescript-language-server, unified-language-server, vscode-css-languageserver-bin, vscode-html-languageserver-bin, vscode-json-languageserver-bin, yaml-language-server
[W 2024-06-20 18:49:02.417 ServerApp] 404 GET /hub/api/users/root/server/progress?_xsrf=[secret] ([email protected]) 10.71ms referer=http://127.0.0.1:30088/hub/spawn-pending/root
[I 2024-06-20 18:49:13.967 ServerApp] New terminal with automatic name: 1
[W 2024-06-20 18:49:54.697 LabApp] Could not determine jupyterlab build status without nodejs
[I 2024-06-20 18:50:01.861 ServerApp] New terminal with automatic name: 2

Now, we forward the port in another terminal using the job name provided by Run:AI (by executing the command "runai list jobs").:

runai port-forward job-5cdf5638ed70 --port 30088:30088

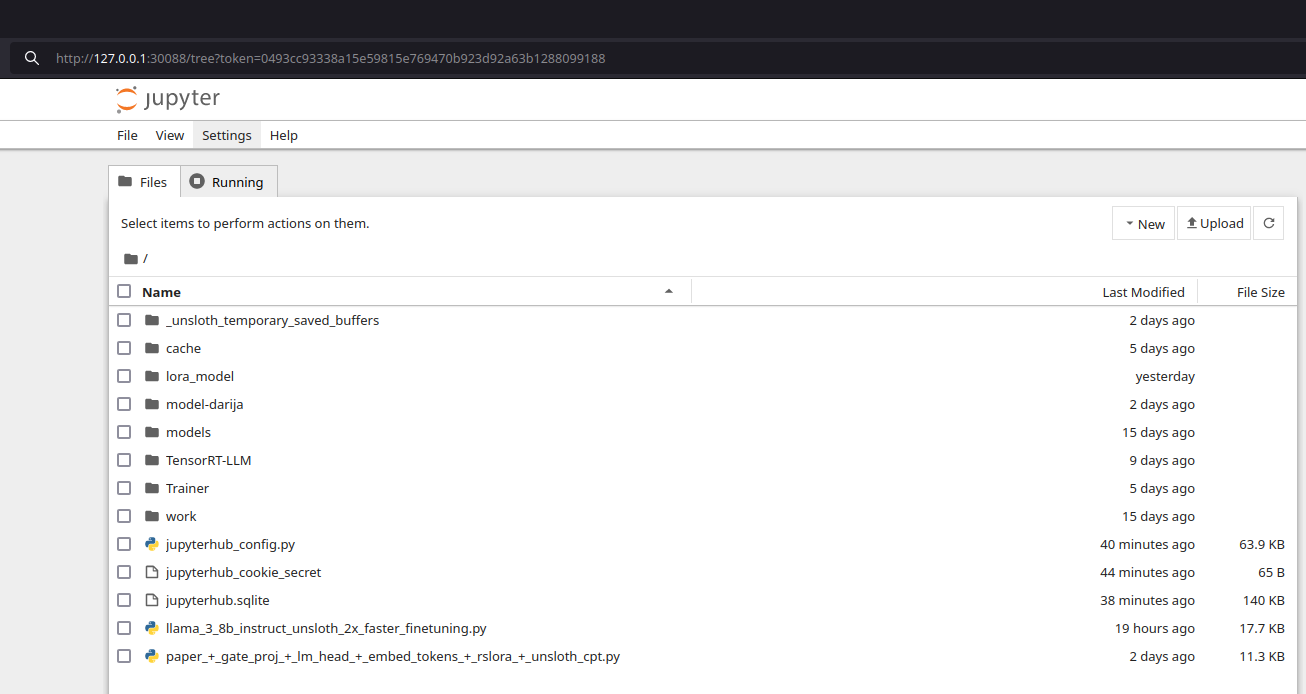
Now, simply enter the address into your browser as shown below (Tree View):

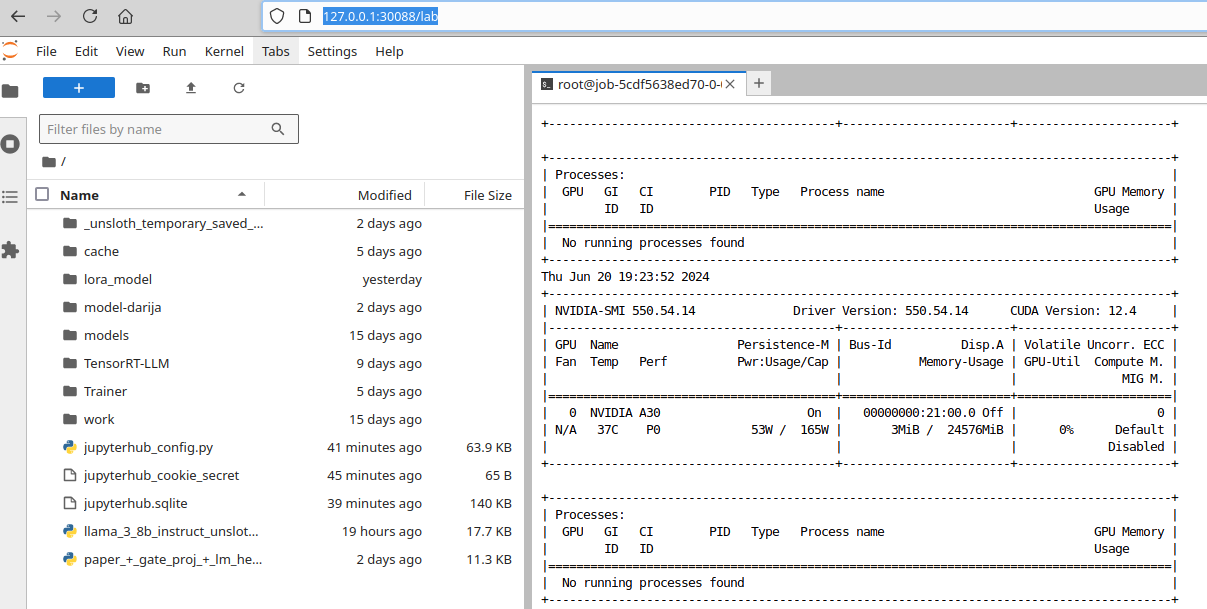
Or replace tree on the URL with Lab:


Run:AI Supported Integrations

Third-party integrations are tools that Run:ai supports and manages. These are tools typically used to create workloads tailored for specific purposes. Third-party integrations also encompass typical Kubernetes workloads.

Notable features of third-party tool support include:

  • Airflow: Airflow™ is a scalable, modular workflow management platform that uses a message queue to orchestrate workers. It allows for dynamic pipeline generation in Python, enabling users to define their own operators and extend libraries. Airflow™'s pipelines are lean and explicit, with built-in parametrization using the Jinja templating engine.
  • MLflow: MLflow is an open-source platform specifically designed to assist machine learning practitioners and teams in managing the intricacies of the machine learning process. With a focus on the entire lifecycle of machine learning projects, MLflow ensures that each phase is manageable, traceable, and reproducible.
  • Kubeflow: Kubeflow is a project aimed at simplifying, porting, and scaling machine learning (ML) workflows on Kubernetes. It provides a way to deploy top-tier open-source ML systems to various infrastructures wherever Kubernetes is running.
  • Seldon Core: Seldon Core is a software framework designed for DevOps and ML engineers to streamline the deployment of machine learning models into production with flexibility, efficiency, and control. It has been used in highly regulated industries and reduces complications in deployment and scaling.
  • Apache Spark: Apache Spark is a versatile analytics engine designed for large-scale data processing. It offers APIs in Java, Scala, Python, and R, along with an optimized engine for executing general execution graphs. It includes various high-level tools such as Spark SQL for SQL and structured data processing, pandas API for pandas workloads, MLlib for machine learning, GraphX for graph processing, and Structured Streaming for incremental computation and stream processing.
  • Ray Serve: Ray is an open-source, unified framework designed for scaling AI and Python applications, including machine learning. It offers a compute layer for parallel processing, eliminating the need for expertise in distributed systems. Ray simplifies the complexity of running distributed individual and end-to-end machine learning workflows by minimizing the associated complexity.