
Using Swagger for DNSv2 API
How to use the DNSv2 API exploration UI provided via Swagger
Introduction
In February 2022, Rackspace's Cloud DNS API was updated to Rackspace Cloud DNSv2. The Cloud DNS v1 API continues to be supported and works as before, but v2 brought with it several enhancements.
What's New?
- CAA record support has been added. CAA records are used to specify which certificate authorities are allowed to issue certificates for a domain.
- A more efficient internal architecture which results in faster change-to-publish times as well as the ability to handle more volume.
- Record validation is consistent through all of Rackspace's external and internal APIs, allowing quicker finding of common bugs and mistakes in the creation of DNS records.
- The code base is easier to understand and maintain, so our DNS developers can deliver new features quicker.
The new DNSv2 API Documentation is not stored in the typical API Documentation format. Instead it makes use of an OpenAPI document, and there’s an API exploration UI provided via Swagger available here.
What is Swagger?
Swagger is an open-source framework that makes it easier to design, build, and use APIs by providing a clear, standardized way to describe how an API works. Using the OpenAPI Specification, Swagger automatically generates interactive documentation where developers and non-developers alike can see available endpoints, required inputs, and expected outputs in a simple, user-friendly format. Swagger streamlines the entire API lifecycle, making APIs easier to understand, share, and integrate. It also allows for users to authenticate and send API calls directly from within the Swagger UI.
The Rackspace Cloud DNSv2 Swagger can be found here: https://dns.api.rackspacecloud.com/
How To Use Swagger
Prerequisites
- A Rackspace Cloud Account
- A Rackspace Cloud Account User & API Key
1. Authenticate
You must authenticate if you plan to execute API calls through Swagger's UI. Click the 'Authorize' button on the right-hand side of the page to open the authentication pane.
2. Credentials
You'll be presented with a window like the below.
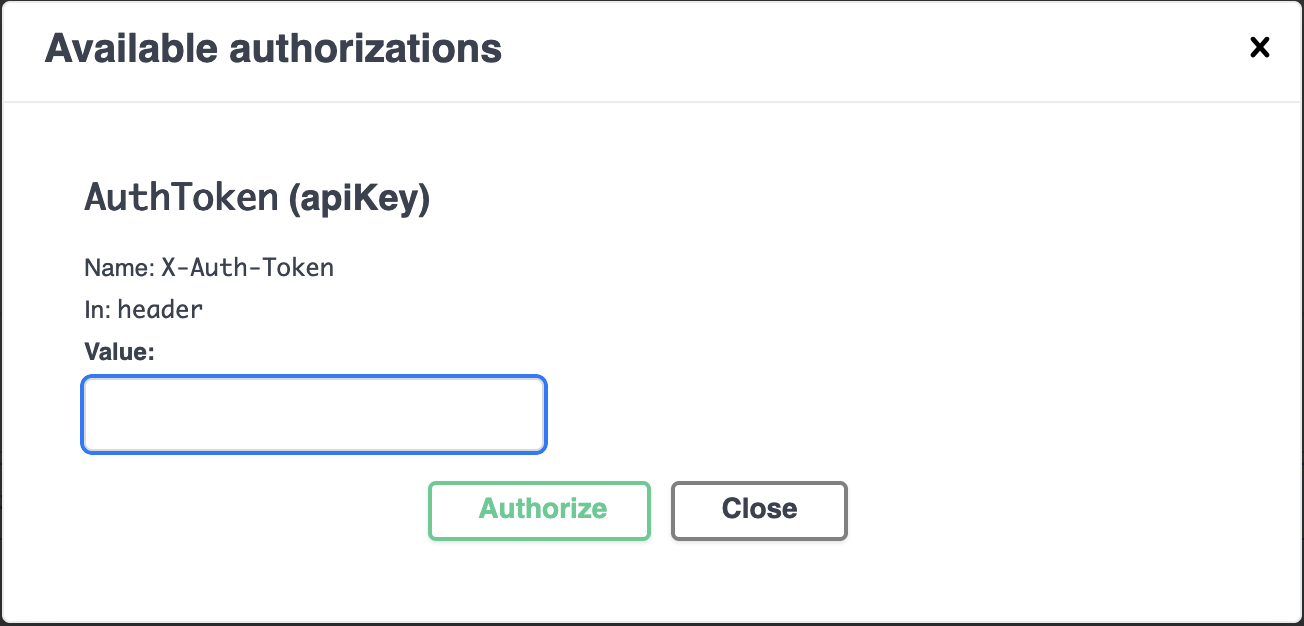
The Authorize Window in Swagger
The prompt in the window can be confusing because it shows AuthToken(apiKey) but it's NOT the API Key you want, you need your API Token. To obtain your API Token you'll have to first use the Rackspace Identity API directly with your Rackspace username and API Key to pass the request and retrieve a token. If you're unsure how to find your Rackspace API Key - see this guide
Once you have your API Key you can run the cURL command as shown below, but replace $yourUserName and $apiKey with your own values.
curl https://identity.api.rackspacecloud.com/v2.0/tokens -X POST -d '{"auth":{"RAX-KSKEY:apiKeyCredentials":{"username":"$yourUserName","apiKey":"$apiKey"}}}' -H "Content-type: application/json" | python -m json.toolIn the response that you receive, you're looking for lines that look like this:
{
    "access": {
        "token": {
            "id": "d74f592f986e4d6e995853ccf0123456",
            "expires": "2015-06-05T16:24:57.637Z",
In this example, the "id" shows the API Token to be d74f592f986e4d6e995853ccf0123456
3. Authorize
After you've copied your API Token from the output of the cURL command in Step 2, click 'Authorize' once you've entered your token to save it.
4. Execute
You can now use the UI to send API calls. To execute an API call via Swagger, use the following procedure:
- Click the downward facing arrow next to the padlock on the right side of the listed API call that you want to run.
- This will expand the details around that API call. Now click the button that says 'Try It Out'
- Now the fields for the API call are unlocked and you can enter in any of the required or option fields for the 'Parameters' and 'Request body'
- After filling out the parameters and modifying the request body where necessary, click the blue button labeled 'Execute' to actually send the API call.
- Below your parameters and request body you'll now see a Responses section that's filled out with the actual response to your API call.
Examples
Below are the 'Request body' sections for some of the notable DNS entries that are newer and less documented.
NameServer Delegation
When setting up a NS Record for nameserver delegation you'll need to include a request body that contains the following:
{
  "type": "NS",
  "fqdn": "$DOMAIN",
  "destination": "$NAMESERVER",
  "ttl": 300,
  "weight": 0,
  "priority": 5,
  "comment": "This is a record comment."
}
CAA Record
CAA's can now be managed and added with Cloud DNSv2. But you need the following info first to place into request body. For a more in-depth understanding of CAA Records, see our guide here
- FQDN: The domain or subdomain on which the policy is being set.
- Flag: An integer. Almost always “0”.
- Tag: A string indicating the type of CAA record. Common tags are:
- issue: The CA is allowed to issue SSL certificates.
- issuewild: The CA is allowed to issue wildcard SSL certificates.
- iodef: Specifies an URI or URL where the CA can report attempts to obtain certificates that violate the policy. This is optional.
- Value: The CA allowed to issue certificates. The special character “;” indicates that certificates may not be issued for the FQDN.
{
  "type": "CAA",
  "fqdn": "$YOUR_DOMAIN",
  "ttl": 300,
  "flag": 0,
  "comment": "This is a record comment.",
  "tag": "issue",
  "text": "letsencrypt.org"
}
Updated 8 months ago