Manage multi-factor authentication for Rackspace Webmail
This article describes how to manage multi-factor authentication for
Rackspace Webmail.
Prerequisites
- Applies to: User
- Difficulty: Easy
- Tools required: Access to your Rackspace Webmail account
For more information on prerequisite terminology, see
Cloud Office support terminology.
Rackspace Webmail provides two options for enabling multi-factor
authentication when you first log in: text message authentication and mobile
application authentication.
Use text message authentication
With text message multi-factor authentication, you can use your phone number to
receive a one-time code that allows you to access Webmail.
- Log in to Rackspace Webmail.
- When prompted to Choose Your Multi-Factor Authentication Method,
select Get A Text Message. - Enter the phone number that you want to use for multi-factor SMS messaging.
- Enter the code sent to your phone in the verification field and then click
Verify Code.
A message stating You have successfully set up Multi-Factor Authentication
displays.
Use a multi-factor authentication mobile application
Mobile applications for authentication enable you to manage multi-factor
authentication for multiple accounts in one place without having to provide
your phone number.
- Log in to Rackspace Webmail.
- When prompted to Choose Your Multi-Factor Authentication Method,
select Use an Authenticator. - Link your mobile device to your account by following the instructions on
the Securing Your Account with an Authenticator App screen. - The last step displays a message stating You have successfully set up
Multi-Factor Authentication.
Log in to Webmail with multi-factor authentication
After you have enabled multi-factor authentication, use the following steps
when you log in to Rackspace Webmail:
- Log in to Rackspace Webmail by using your
email address and password. - When prompted, enter the verification code from the SMS text message or
authentication app. - Select the appropriate option for Remember This Device.
- Click Verify My Code.
Enable or disable multi-factor authentication
If your account administrator has multi-factor authentication configured as
optional for your account, you can enable or disable multi-factor
authentication in your account settings.
-
Log in to Rackspace Webmail.
-
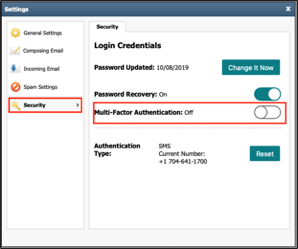
Open the Webmail settings page and select Security.
-
Slide the Multi-Factor Authentication setting to either the On or
Off position.- When you select On, the system displays the multi-factor
authentication setup screen if you don't have password recovery enabled. - If you have password recovery enabled, the system uses the authentication
type configured for password recovery. - If you select Off, multi-factor authentication is immediately
disabled.
- When you select On, the system displays the multi-factor

Reset multi-factor authentication
You might need to perform these steps if you want to change your
authentication method or set up a new device.
-
Log in to Rackspace Webmail.
-
Open the Webmail settings page and select Security.
-
In the Authentication Type section, click Reset.

-
The Choose Your Multi-Factor Authentication Method screen displays. See
the previous sections for instructions to set up your preferred
authentication type.
Manage multi-factor authentication on linked devices
If you access your Rackspace Webmail account on multiple devices, you can
manage which devices are trusted and no longer receive a prompt for
multi-factor authentication when you log in. You can also remove devices from
the trusted list.
-
Log in to Rackspace Webmail.
-
Open the Webmail settings page and select Security.
-
In the Trusted Devices section, you can see a list of trusted devices
associated with your email account.You can remove devices that you do not recognize or no longer use by
clicking the trash icon.
If you remove a device from the Trusted Devices list, you must use
multi-factor authentication when you next log in to your account on that
device.
Updated 3 months ago