Multi-factor Authentication (MFA)- Dedicated (MyRack)
Rackspace customers are required to have multi-factor authentication on all user accounts. MFA adds an extra layer of identity verification to the login process by requiring a user to submit a time-sensitive code generated from an authentication app of choice, or sent via SMS.
-
Time Based One Time Password (TOTP) (recommended): A client application installed on your phone, computer, or other digital device generates a one-time password. You can use this with applications like:
- Authy
- Duo
- Google Authenticator
- 1Password
- macOS (Monterey/12+) or iOS (15+) Passwords
-
SMS: Users without smartphones or other digital devices with linked phone numbers capable of receiving SMS text messages can use an SMS text messaging service. Please note, that SMS is not as reliable and can be delayed at times and this is outside the control of Rackspace.
You can add MFA by updating your account settings in the MyRackspace Portal. After you pair a device with your account, authentication becomes a two-step process:
-
Once you authenticate with your username and password, the system will prompt for MFA Verification.
-
Input the code that is visible in your selected authenticator application or the code sent via SMS to complete the authentication process.
Standard text message rates and data fees apply based on your contract with your mobile device provider.
Additionally, MyRackspace account administrators can configure account-wide settings to specify an MFA policy for all account users. Administrators can update the account-wide settings to require MFA for all users. When this setting is Enabled, users cannot access their account until they configure MFA.
The system logs current users out as soon as it applies the account-wide requirement. The next time they log in, users get a notification of the increased security and a prompt to complete the setup process.
As of March 2024, all Rackspace accounts are required to have multi-factor authentication. These settings will only be available for accounts that have followed the exception process. If you have questions, please reach out to your support team.
Considerations
-
You must log in to the MyRackspace Portal and use these instructions to set up your users for the Rackspace Dedicated.
-
Administrators cannot set up devices for users. Users must configure their own devices. To change MFA settings, users must log in to the MyRackspace Portal with the user credentials they want to modify.
Configure your account to authenticate by using a Mobile App (Recommended)
To configure your account to use a mobile passcode device for MFA, you must install one of the following client applications on your device:
To register and verify a mobile passcode device, use the following steps:
-
Log in to the MyRackspace Portal.
-
In the upper-right corner of the MyRackspace Portal, click the user menu and select My Profile & Settings.

- In the My Multi-Factor Devices section, select Mobile Passcode.
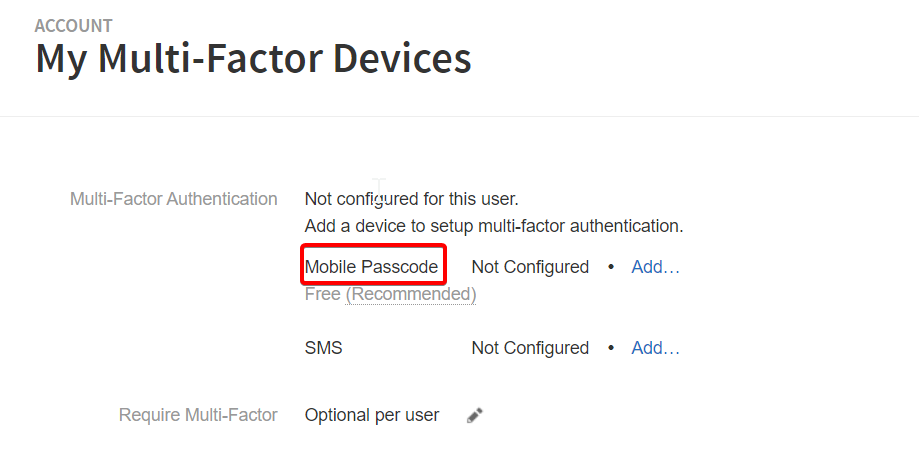
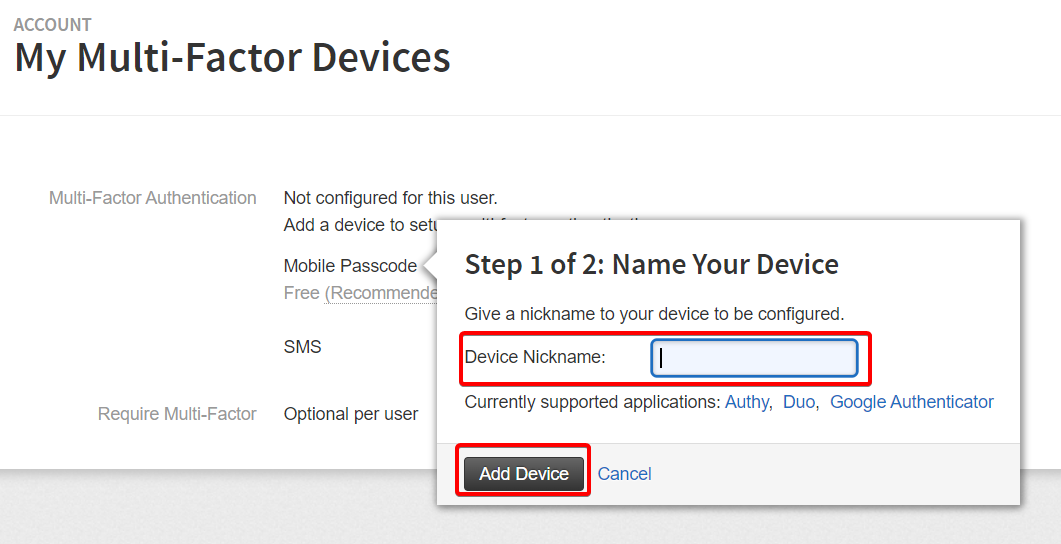
- Type a Device Nickname, this will be used within the mobile app to identify this account. Then click Add Device.
- The Identity service generates a QR code. Use the OTP client application on your device to scan the barcode and click Verify Mobile Passcode.
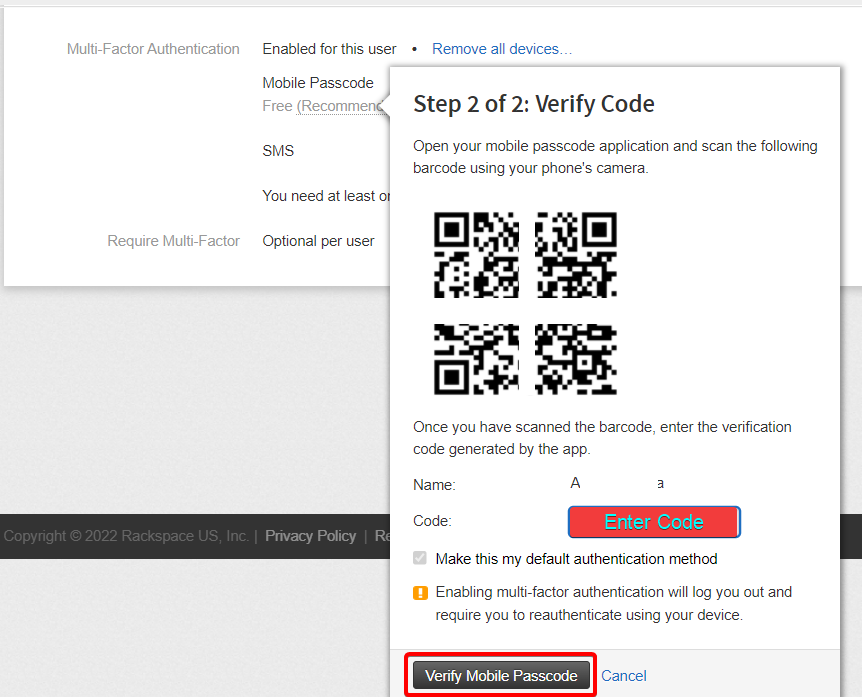
After you scan the barcode, verification code gets generated by app.
-
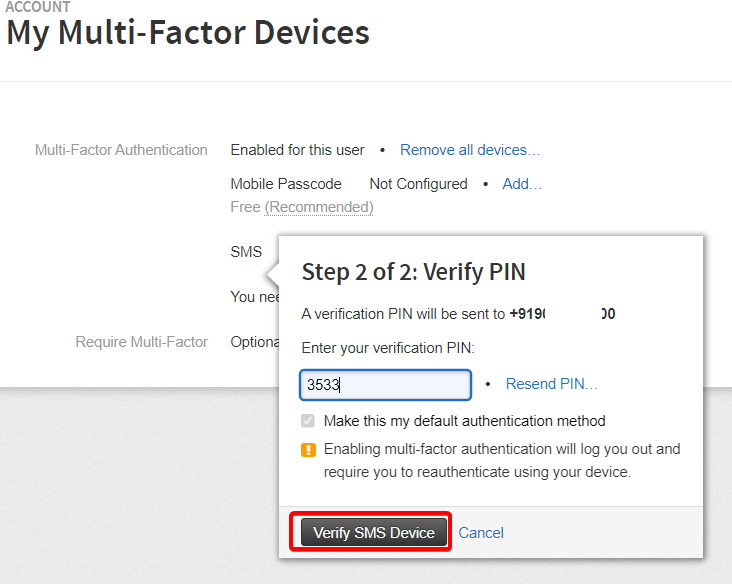
To verify the new device, enter the code on the Verification Code form. Then, click Verify SMS Device.
-
After you submit the verification code, the system automatically logs you out.
By default, the new mobile passcode is the default method for authentication. If you do not want it to be the default or if you do not want to be logged out of your account, remove the selection from Make this my default authentication method. -
In the login page, enter your username and password. Then, enter the verification code from the OTP device that you paired with your account.
Configure your account to authenticate by using SMS
To configure your account to use SMS for MFA, you need the phone number associated with your digital device. Ensure that you have enabled the device to receive SMS text messages.
To register and verify SMS, use the following steps:
-
Log in to the MyRackspace Portal.
-
In the upper-right corner of the MyRackspace Portal Panel, click the user menu and select My Profile & Settings.

- In the My Multi-Factor Devices section, select SMS.
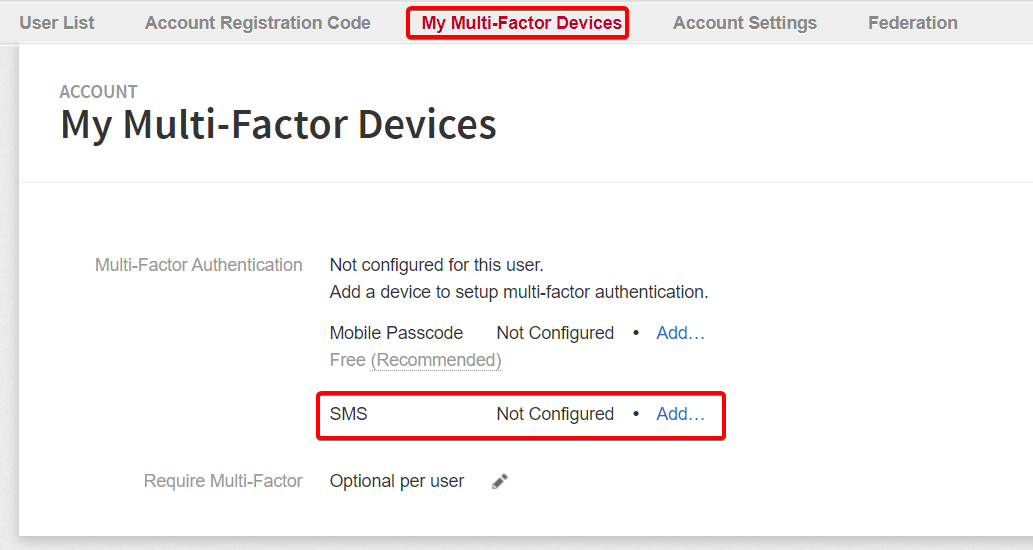
- Select Add and select the country code for the device, type the device phone number and click Next.
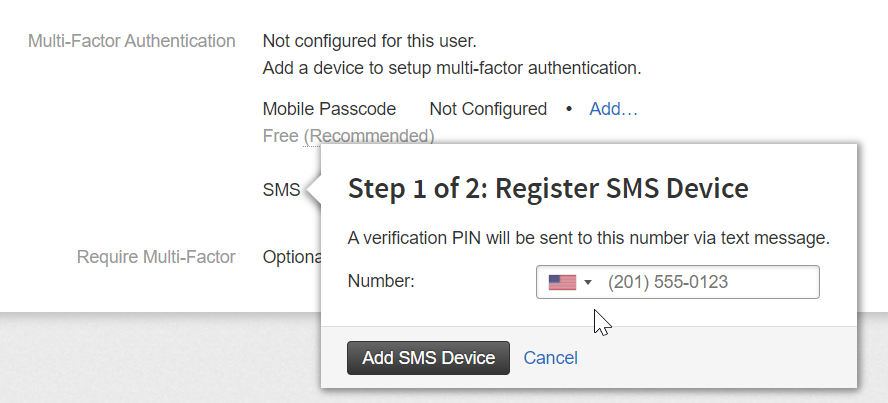
The Identity service sends an SMS text message with a four-digit PIN to the specified phone.
- Type the code sent to your mobile device in the verification code field then, click Verify.
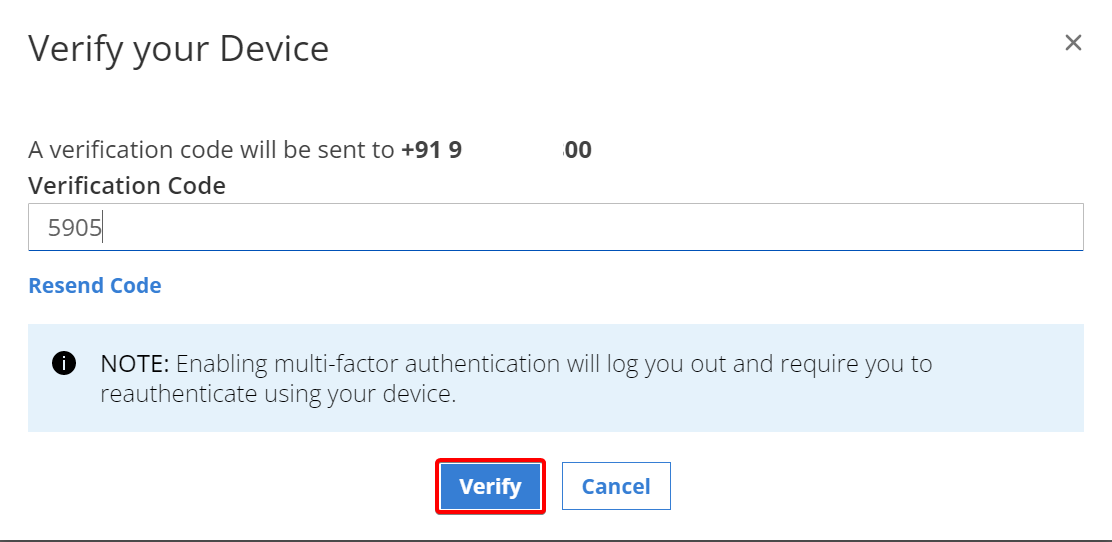
After you submit the verification code, you need to re-authenticate by using the MFA process.
Change the Default MFA Method
If you configured your account with both SMS and mobile passcode, you could select the default MFA method from the My Profile & Settings page.
-
Log in to the MyRackspace Portal.
-
In the upper-right corner of the MyRackspace Panel, click the user menu and select My Profile & Settings.

- In the My Multi-factor devices tab, under Multi-Factor Authentication, select Manage.
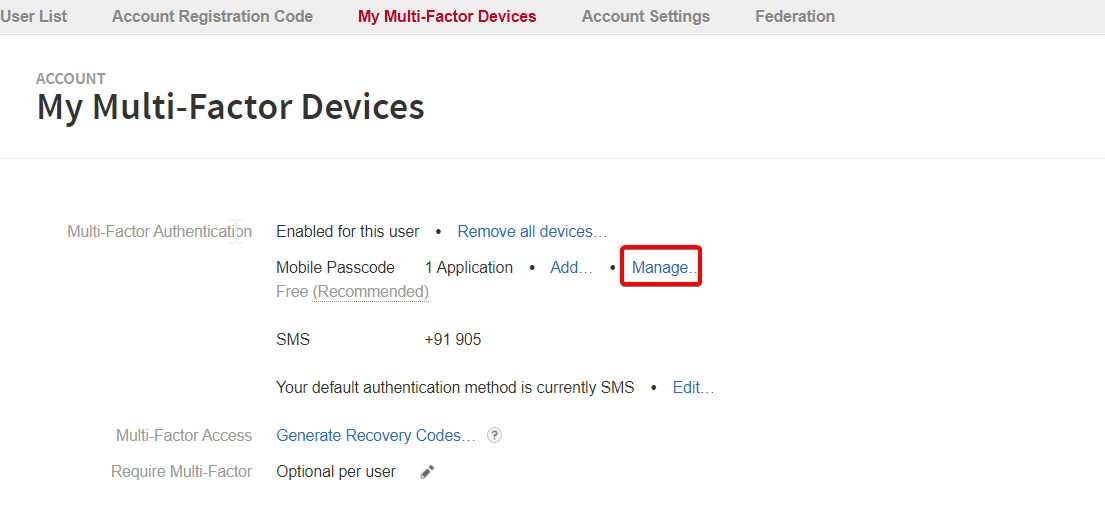
When a mobile app is configured, the status in the Manage option is verified by default.
Your default authentication method is currently set as SMS. Click Edit option, then you can select either Mobile Passcode Application or SMS.
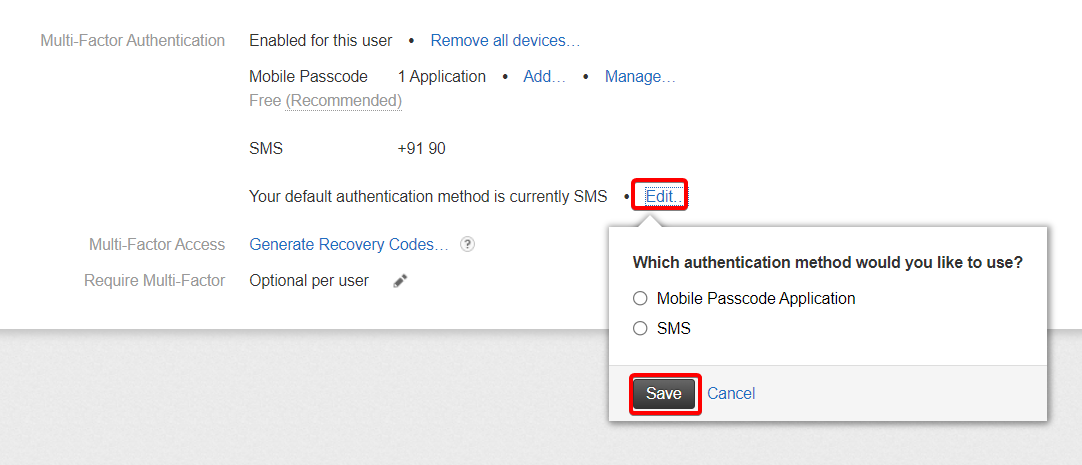
Switching from SMS to Mobile Passcode Application
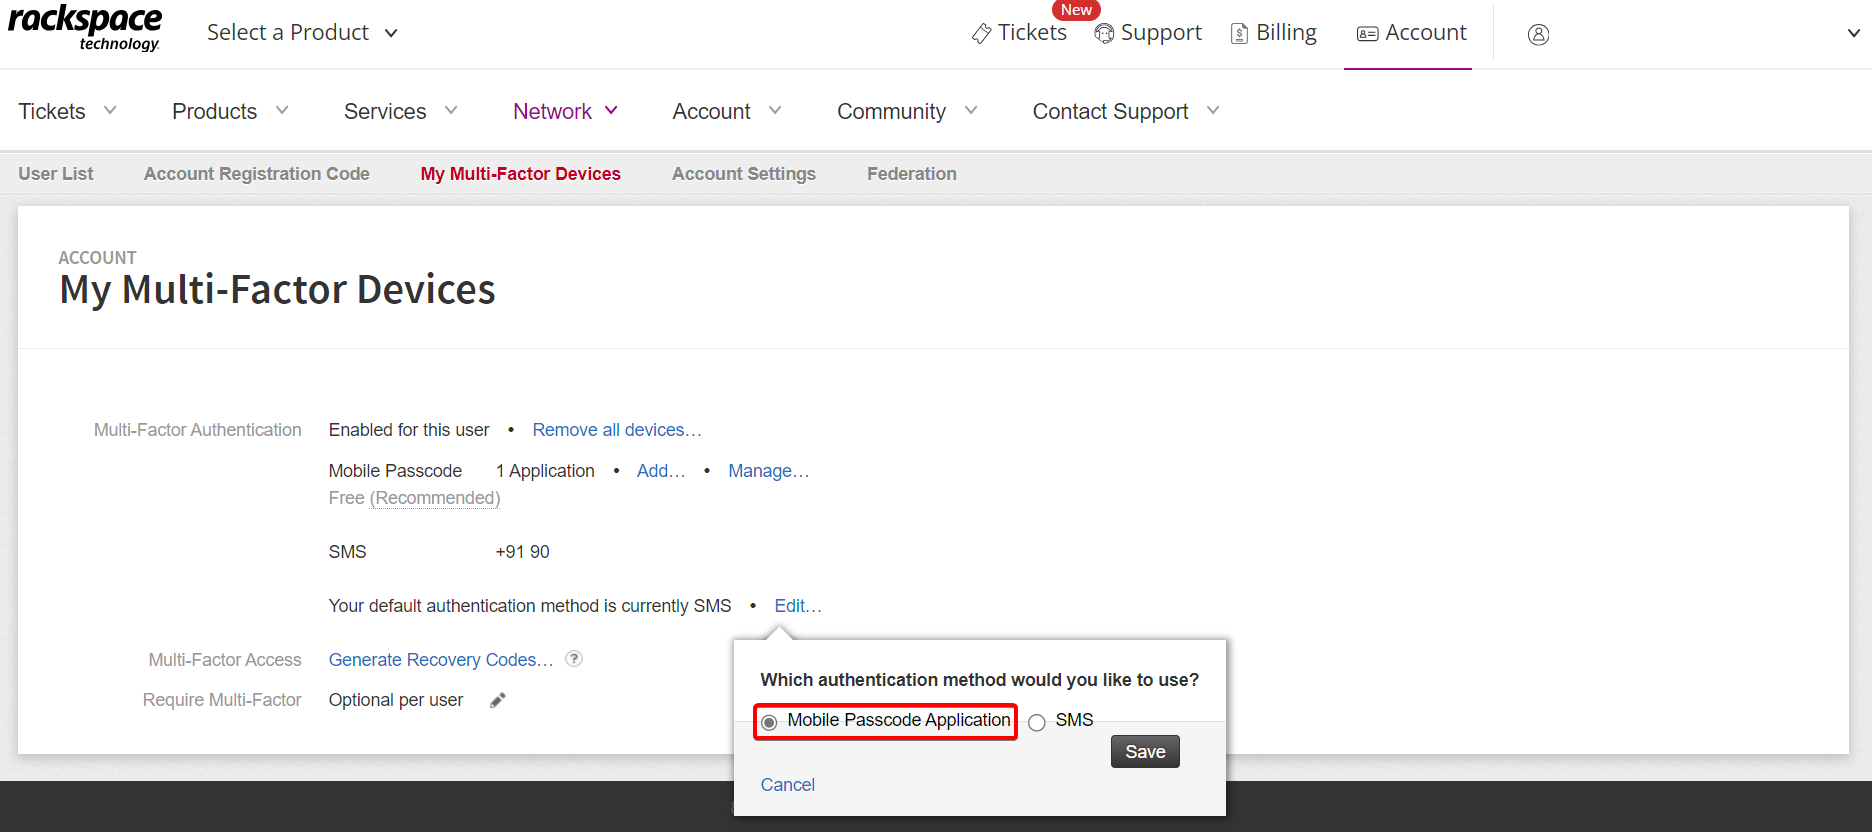
In above section default authentication method is set as SMS. To switch from SMS to Mobile Passcode Application follow below steps:
Set authentication method as “Mobile Passcode Application” and click Save button.
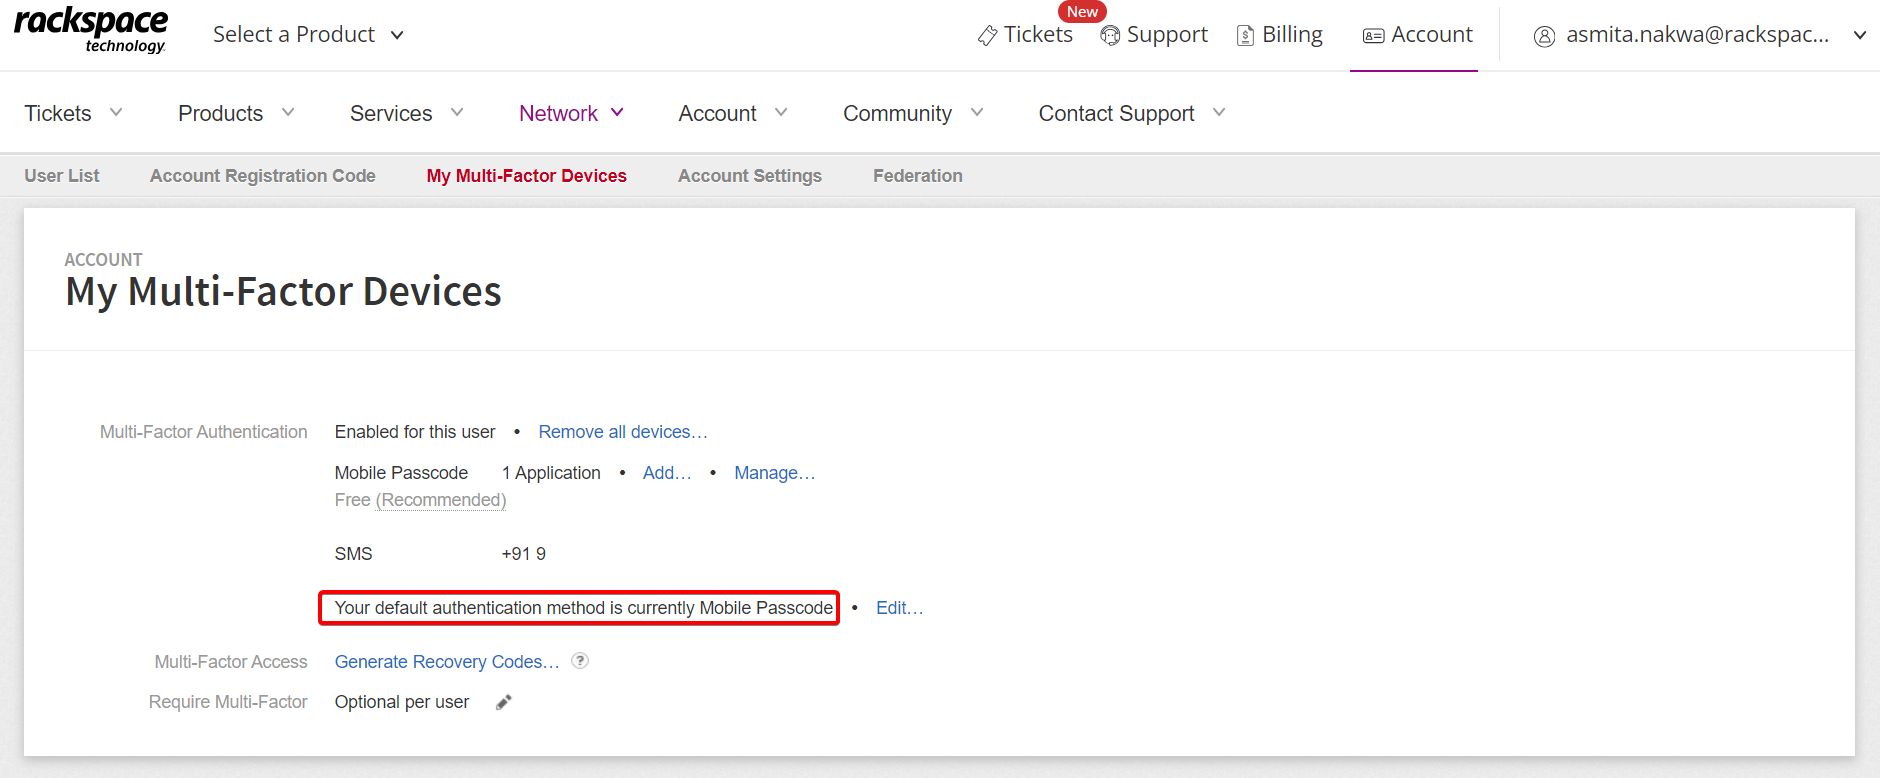
Your default authentication method is set as Mobile Passcode Application. Click Edit option, then you can select either Mobile Passcode Application or SMS.
Configure account-wide MFA settings from an Administrator account
Account administrators can update MyRackspace account-wide settings to require all users to authenticate by using MFA. When this setting is enabled, users can't access their accounts until they add and verify a device on their account.
As of March 2024, all Rackspace accounts are required to have multi-factor authentication. These settings will only be available for accounts that have followed the exception process. If you have questions, please reach out to your support team.
To configure account-wide settings for MFA, use the following steps:
-
Log in to the MyRackspace Portal.
-
Click Account, and then select User Management from the menu.
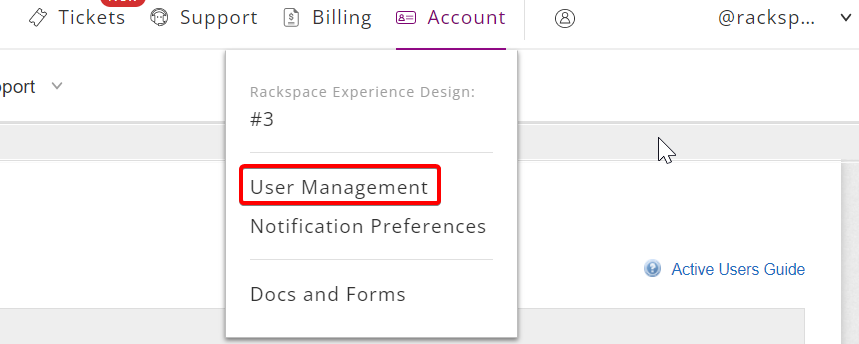
- Click My Multi-Factor Devices.

- Click the pencil icon to edit the Require Multi-Factor setting.
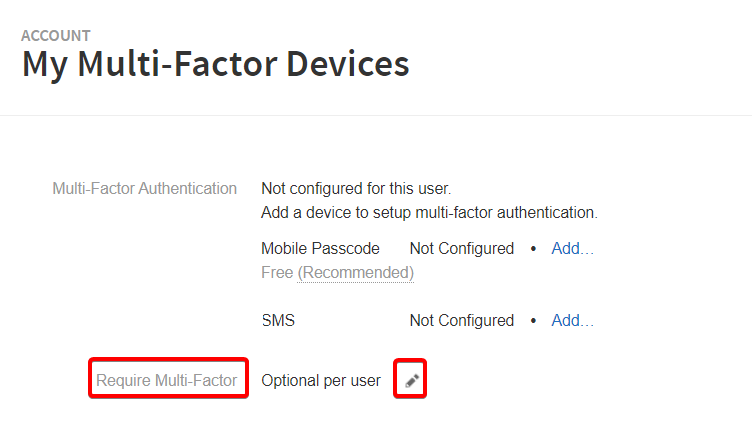
- In the account-wide multi-factor authentication pop-up dialog box, select an option to set the policy for account users. Then, click Save Setting to apply the change.
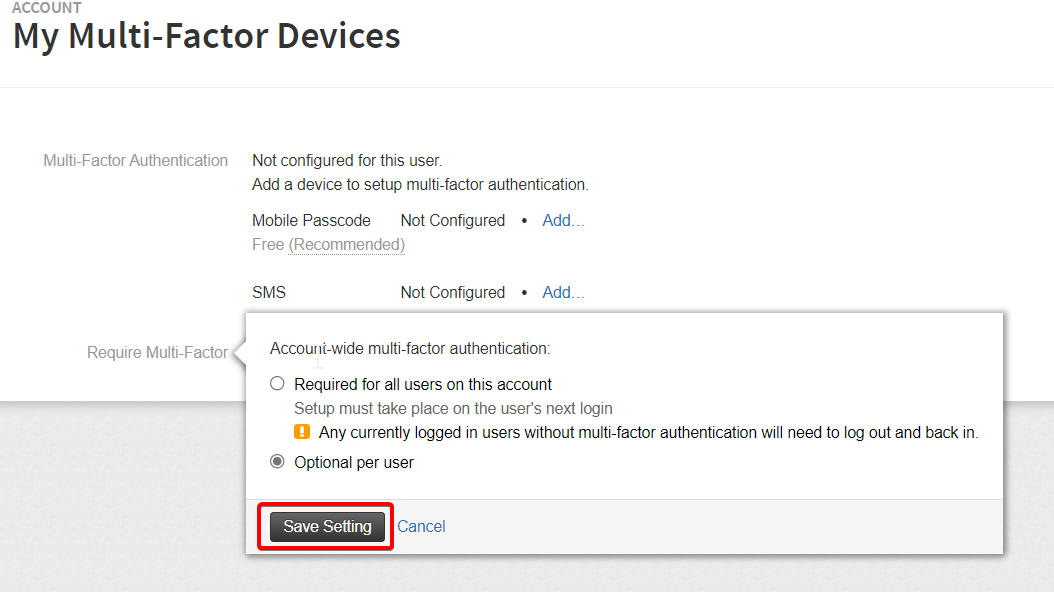
If you update the setting to required, users who do not have MFA configured must add it the next time they log in.
When these users log back in, the system guides them through the MFA setup.
Configure MFA during account login
If you did not configure your account for MFA when required, the system notifies you about the increase in security requirements and prompts you to set up authentication.
To access your account, click Set Up Multi-Factor Authentication. Then, follow the above steps to register and verify a device and authenticate by using the code sent to the device.
Log in to MyRackspace by using MFA
If you add MFA to your account, authentication is a two-step process.
Prerequisites
- MyRackspace account with a valid username and password credentials
- Access to the registered and verified SMS or mobile code device paired with your MyRackspace account.
To log in to the MyRackspace Portal with MFA, use the following steps:
-
Log in to the MyRackspace Portal With your username and password.
If you configured your account to use MFA with an SMS, the Identity service sends an SMS text message with a 7-digit code to the device registered to your account.
If you configured your device to use MFA with a mobile code device, open the client application and get the code from the mobile code device associated with your MyRackspace account.
-
When prompted, type the code in the MFA Code field on the login page. Then, click Verify to log in to your account.
Manage MFA
MyRackspace users can view and manage the MFA configuration from the Account > User Management > My Multi-Factor Devices menu in the MyRackspace Portal.
To verify your device
You can verify your SMS or mobile passcode device from the My Multi-Factor Devices page.
-
If you have not verified SMS device on your account, use the Verify option to complete the verification process.
-
If you have not verified mobile code device, use the Manage option to complete the verification process.
To recover an account
You could generate up to ten bypass codes that you could use to authenticate if the device associated with your account is not available. You save the generated codes to a file on your computer for future use.
To avoid losing access to your account, generate and save the bypass codes as soon as you enable MFA by using the following steps:
- On the My Multi-Factor Devices page, click Generate Recovery Codes.
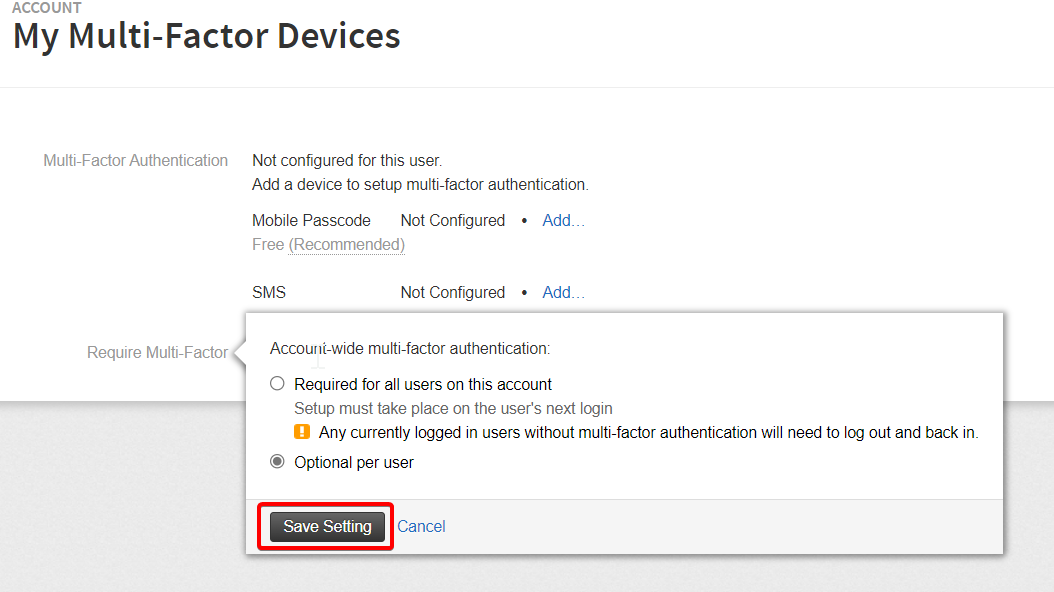
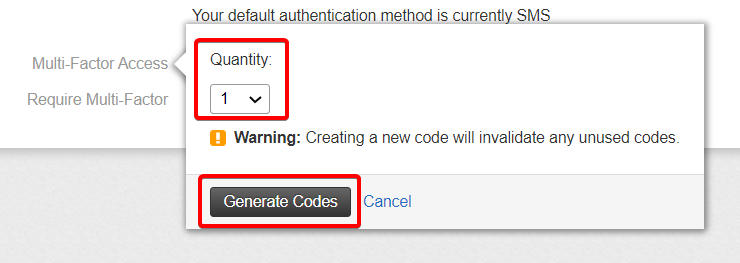
- In the Quantity field, select the number of codes to generate or accept the default value.
-
Click Generate Codes.
-
Manually copy the recovery codes to a file or click Save Your Codes to generate a text file with the codes.
To Remove MFA
You can turn off MFA and remove all devices associated with your account.
On the My Multi-Factor Devices page, click Remove all devices.
To change the mobile phone number
To change the mobile phone number paired with your account, use the Remove all devices option to remove the existing phone number (for instructions, see the preceding task). Then, update the authentication settings with the new phone number and verify the device.
To Remove SMS device
To remove SMS device, use the Remove all devices option.
Troubleshooting
Use the following information to resolve common issues that can occur when configuring and using MFA.
| Issue | Resolution |
Invalid phone number | If you get an error message when registering a phone number, verify that you have entered the correct country code and a valid phone number with no extra characters or spaces. |
Invalid PIN when verifying device | When you try to verify a mobile device, you might receive an error caused by an invalid PIN. Confirm that you are entering the correct four-digit PIN that you received via SMS text message. Ensure that you are using the mobile device that is paired with the MyRackspace account. |
Locked account | If you enter an incorrect code more than six times during the MFA process, your account will be locked. Contact Rackspace Support to restore access to a locked account. |
Cannot link cloud account in MyRackspace with MFA enabled | If you are using MyRackspace, you can't link to an existing Rackspace Cloud account enabled for MFA. |
Account recovery | If you configured your account for MFA and do not have access to your device or your generated account recovery codes, contact Rackspace Support. |
Updated 3 months ago