
Creating a Rackspace Cloud OpenStack Network
The article covers getting your Rackspace Cloud account set up with a network architecture, known as Neutron.
In OpenStack, creating a network is the foundation of any project because it enables communication between instances, external networks, and storage resources. Without a network, instances are isolated and cannot access the internet or interact with other services. A properly configured network ensures connectivity, security, and efficient resource allocation, forming the backbone of a functional cloud environment. Whether setting up private networks for internal communication or public networks for external access, networking is a critical first step in deploying and managing OpenStack resources.
Using QuickNet
QuickNet allows you to quickly setup all your Rackspace Cloud networking needs with a few clicks in the UI. This feature expedites and lowers the barrier to entry for customers who may not be as technical or just want to move quickly. This guide will show you where it is and how to use it.
Manual Network Creation
In the following documentation, we'll walk you through setting up your Rackspace Cloud project with networking using the Skyline UI. If you're familiar with OpenStack CLI or prefer to use a CLI, check out this documentation: Getting Started with Rackspace Cloud
Setting Up the Network
In Rackspace Cloud, users within a project are required to create their own network architecture using a virtual router at its core. This router connects to both an external public network that is already provided to all accounts called "PUBLICNET" and one or more internal project networks that you've created. Unlike the legacy Rackspace Public Cloud, there is no default private intra-datacenter network (ServiceNet) that exists, so we'll be creating our own private internal network.
Creating a Router
The virtual router is the central component of the network architecture that you build. It enables communication between internal private networks and external networks, such as the public internet. Every virtual router must have at least two interfaces:
External Interface: Connects to an external provider network, which provides outbound Internet access. In this environment, the external network is predefined and labeled PUBLICNET.
Internal Interface: Connects to one or more private networks within the project.
To create your router, follow the steps below:
- From the left-hand toolbar click Networks
- Click Routers from the drop-down options.
- Click the Create Router button from the viewing pane.
- In the window that is presented you can fill out the details of your router. We've supplied an example below that shows the selections required to get your router connected to the external gateway.
- When you've finished click 'OK' in the bottom right.
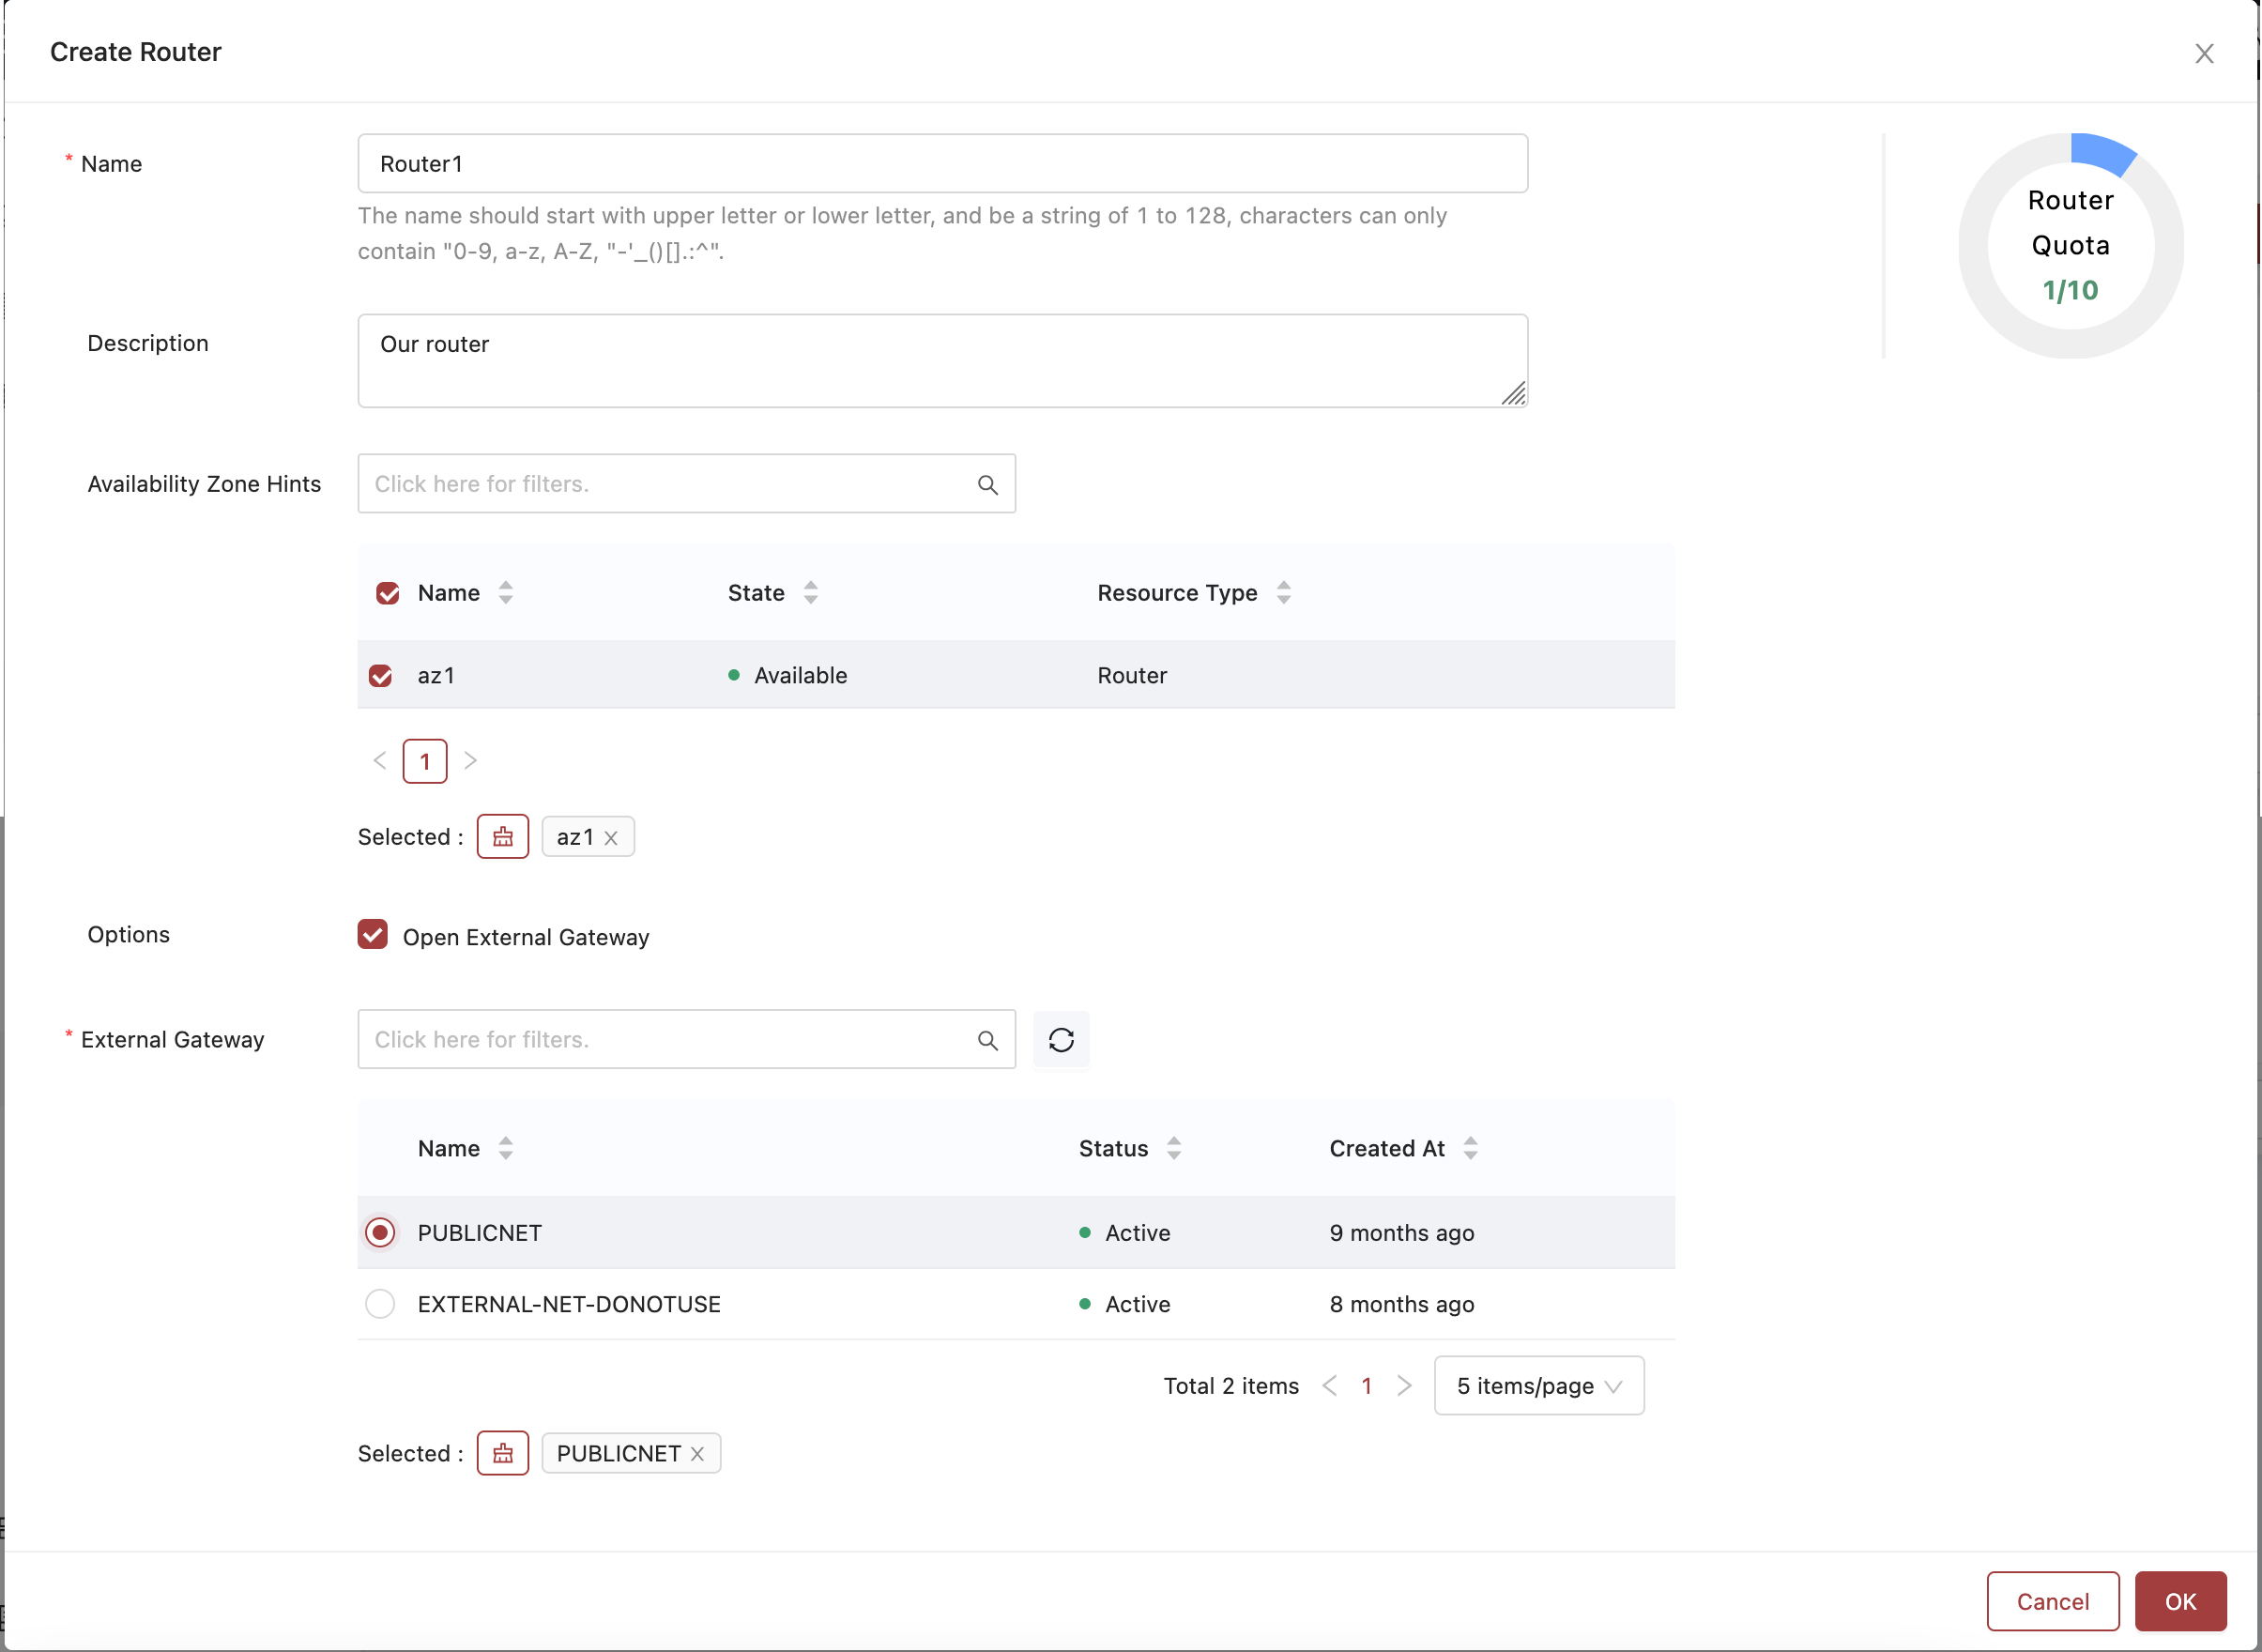
An example of a router ready for creation.
Creating a Network and Subnet
In Rackspace Cloud, a network consists of two distinct layers:
- Network (Layer 2) – Defines how devices connect at the data link layer, including attributes such as physical network interfaces and segmentation (e.g., VLAN ID).
- Subnet (Layer 3) – Defines IP addressing and routing characteristics, such as CIDR blocks, gateway addresses, and DHCP options.
Each network can have multiple subnets, but a subnet can only belong to one network. As we stated initially, new projects do not have networks created by default, so we’ll need to define both a network and at least one subnet before launching instances.
To accomplish this, follow the steps below:
- From the left-hand toolbar click Networks
- Click Networks from the drop-down options.
- Click the 'Create Network' button in the viewing pane.
- You'll now have a new window called 'Create Network' where you set your network up. In the screenshot below, we've provided an example of a network ready for creation.
- When you're finished - click 'OK' to create the network.
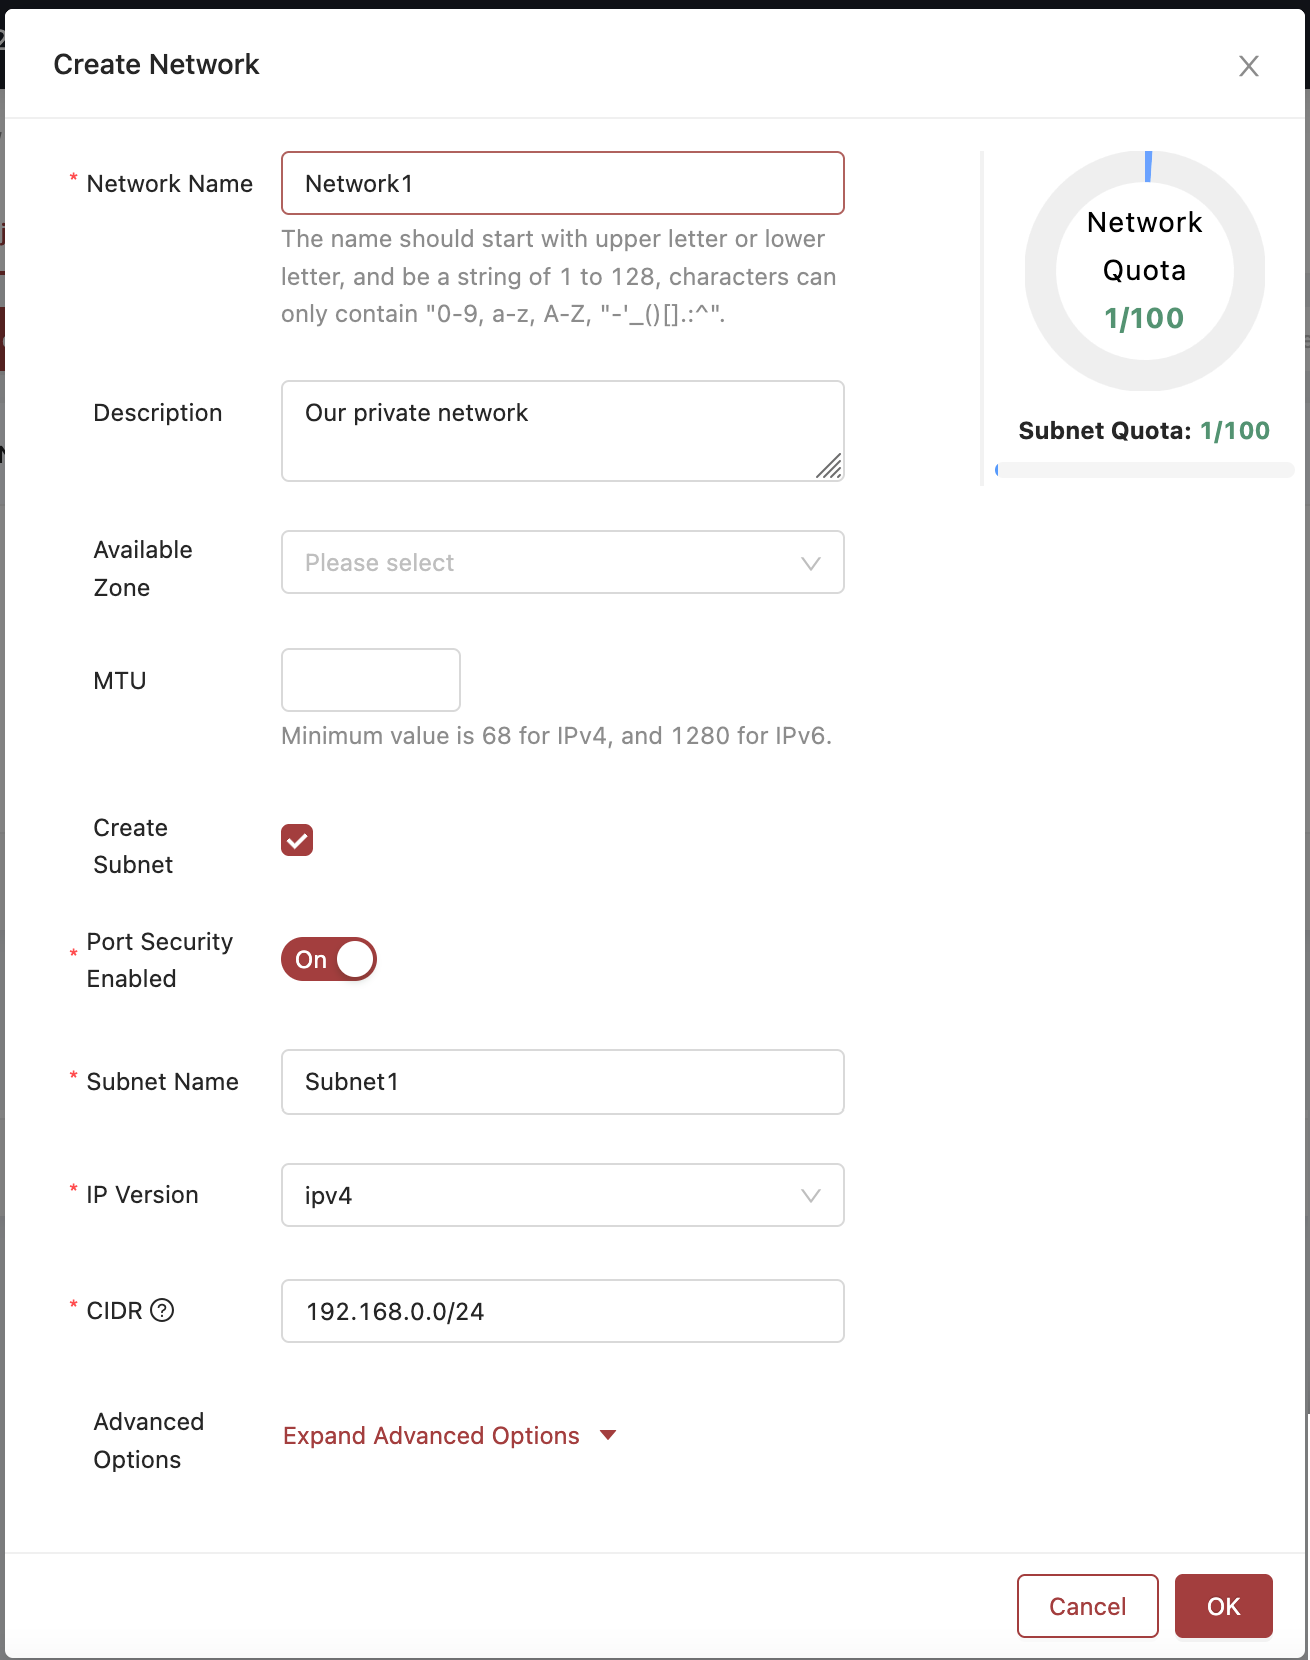
An example of a network ready to be created.
Connecting the Network to the Router
Once we've created our network and subnet, we need to link them to the our router. This step will allow traffic to flow between our private network and the external PUBLICNET network. To do this, we must attach our subnet to the router’s internal interface, effectively bridging the internal and external networks.
To accomplish this, follow the steps below:
- From the left-hand toolbar click Networks
- Click Routers from the drop-down options.
- From the viewing pane, click More to the right of your listed router.
- From the drop-down menu click Connect Subnet
- A new window will appear that allows you to choose which network and subnet you want to connect to. We've provided an example below showing selections of a network and subnet.
- When you're finished making your selections, click OK.

Choosing the subnet to connect.
Creating and Managing Security Groups
In OpenStack, Security Groups act as virtual firewalls that control inbound and outbound traffic to instances. They define rules that specify which ports and IP ranges are allowed or denied, enhancing network security by restricting unauthorized access.
Every Rackspace Cloud project comes with a 'default' security group. This group is automatically applied to any instance port that doesn't have a custom security group assigned. By default, this security group denies all incoming traffic and allows only outgoing traffic from the instance.
Therefore its essential that we create our own Security Group to ensure that the appropriate access is allowed based on the traffic our VM needs to accept or send.
To accomplish this, follow the steps below:
- From the left-hand toolbar click Networks
- Click Security Groups from the drop-down options.
- Click the Create Security Group button in the viewing pane.
- In the small window that appears give your Security Group a name, and a description to help identify it. Click OK when you're finished.
You'll now see that your Security Group shows up in the list of groups on the account alongside the 'default' group. However, our group still needs its own rules to function. The steps below will detail that process:
- From the list of Security Groups, click the hyperlinked ID of the Security Group we want to make rules for.
- In the new Security Group Detail window we can see the default rules applied and also have a button to click called Create Rule
- In the new window we have a set of options we use to create our rule. A description of these options is provided in the table below.
- Once you've filled out the fields, click OK to create the rule.
| Option | Description |
|---|---|
| Protocol | Determines the type of traffic allowed, such as TCP, UDP, ICMP, or All Proto (all protocols). |
| Direction | Specifies whether the rule applies to ingress (incoming) or egress (outgoing) traffic. |
| Ether Type | Defines the IP version for the rule—either IPv4 or IPv6. |
| Port Type | Specifies whether the source port(s) are a Custom selection or if they are for All Ports |
| Source Port/ Port Range | If using the Custom port type, allow the setting a specific port or range of ports affected (e.g., 22 for SSH, 80 for HTTP). |
| Remote Type | Specifies whether traffic is allowed from a specific IP range (CIDR) or another Security Group. |
| Remote CIDR | Defines an CIDR range of IPs to allow (e.g., 0.0.0.0/0 allows all traffic, 192.168.1.0/24 restricts it to a subnet). |
| Security Group | Instead of a CIDR, allows traffic from another Security Group, enabling controlled communication between instances. |
IMPORTANT: Remember that there are limits to the number of Security Group Rules you can create. So be sure to efficiently create these rules and use CIDR Ranges or blanket protocols where necessary.
You can read more in-depth about Security Groups here
Additional Documentation
Updated 7 months ago
What’s Next
Now that you've created your network, you can begin creating instances.