Launch a Windows Web Farm with Web Deploy
Introduction
This article is intended for system administrators with at least an intermediate
skill level working with Windows Server® 2012 operating system
operations and administration.
You cannot launch an Internet Information Services (IIS) web farm by using the
Microsoft® Web Farm Framework (WFF) in IIS8. Microsoft says that they
are not abandoning the WFF technology, but they have not provided a solution.
However, this article shows you how to use Web Deploy and PowerShell® scripts
to keep your web content synced while you manage it from a single primary server.
This process is not as quick or GUI-friendly as WFF, but it uses official
Microsoft technology and keeps your web content synced.
Preparation
To get started, create a new user account with the same username and password
on each server in the farm. Make this account a member of the local
Administrators group on each server. On the primary server, add this account
to the Log On As Batch security setting by navigating to Administrative
Tools -> Local Security Policy -> Local Policies -> User Rights Assignment.
This exercise uses the following credentials:
Username: SyncMan
Password: P@ss1234
On each of your secondary cloud servers, create a Windows Firewall rule to allow
ALL TRAFFIC from the primary server.
On the primary server only, perform the following actions:
-
Create a common directory, such as
C:\WebSync, to store the Web Deploy templates. -
Open a PowerShell window and execute
Set-ExecutionPolicy Unrestricted. When
prompted, type Y and press ENTER.
To simplify your scripts, modify C:\Windows\system32\drivers\etc\Hosts to
include a listing for each node, matching its internal IP address to an easy
host name, such as WEB2.
Web Deploy
Download Web Deploy from IIS
and install it on each server in the farm.
Scripts
Use the following steps to create two scripts on the primary server.
Batch script
Open a new Notepad file, and paste the following code into the file:
"powershell.exe -command C:\WebSync\WebDeploySync.ps1"Save this file as C:\WebSync\WDSync.bat.
PowerShell script
In a new Notepad file, enter the following lines:
add-pssnapin wdeploysnapin3.0

New-WDPublishSettings -ComputerName [MasterServerName] -AgentType MSDepSvc -FileName c:\WebSync\[MasterServerName].publishsettings

New-WDPublishSettings -ComputerName [SecondaryServerName] -AgentType MSDepSvc -FileName c:\WebSync\[SecondaryServerName].publishsettings -UserID SyncMan -Password P@ss1234

Sync-WDServer -SourcePublishSettings c:\WebSync\[PrimaryServerName].publishSettings -DestinationPublishSettings c:\WebSync\[SecondaryServerName].publishSettings
Note: The preceding code reflects a 2-node setup. If you want to have more
secondary nodes, you need to add another New-WDPublishSettings -ComputerName [SecondaryServerName]...
line for each secondary server and add a new Sync-WDServer.. line that syncs
the primary server to each subsequent secondary server.
Save this file as C:\WebSync\WebDeploySync.ps1.
Schedule the scripts
Set up a scheduled task to run the scripts at a semi-constant rate to ensure
that your web content stays synced across the nodes. This task needs to be set
up on only the primary server. The task should have the following characteristics:
- Use the SyncMan credentials that we specified earlier.
- Run even when the user is not logged on.
- Be a daily task that runs every 1 minute for a duration of 1 day to ensure
that it will run indefinitely at a 1-minute intervals.
Use the following steps to schedule the task:
-
To access the Task Scheduler, navigate to START -> Administrative Tools -> Task Scheduler.
-
Select Task Scheduler Library in the left column.
-
Click on Create Task in the right-hand Actions pane.
-
On the General tab of the Create Task box, enter a descriptive Name
for the task, enter the SyncMan credentials by clicking Change User or Group,
and select Run whether user is logged on or not from the radial list.
Select Windows Server 2012 from the Configure for drop-down list. -
On the Triggers tab of the Create Task box, click New.
-
In the New Trigger box, select Daily from the radial list, and choose
a start time of 5 or 10 minutes in the future. Set Recur every to 1.
In Advanced settings, check Repeat task every and enter 1 minutes
in the text box. Leave for a duration of set to 1 Day. (Note: "1
minutes" is not a typo. Ensure that you leave "minutes" plural). -
On the Actions tab of the Create Task box, click New.
-
In Edit Action, select Start a program, and in Program/script,
enter C:\WDSync\WDSync.bat. Click OK. -
On the Conditions tab of the Create Task box, uncheck all the boxes.
-
On the Settings tab of the Create Task box, check Allow task to
be run on demand, and leave all other check boxes cleared. In the If the
task is already running, then the following rule applies drop-down list,
select Run a new instance in parallel. -
Click OK in the Create Task box.
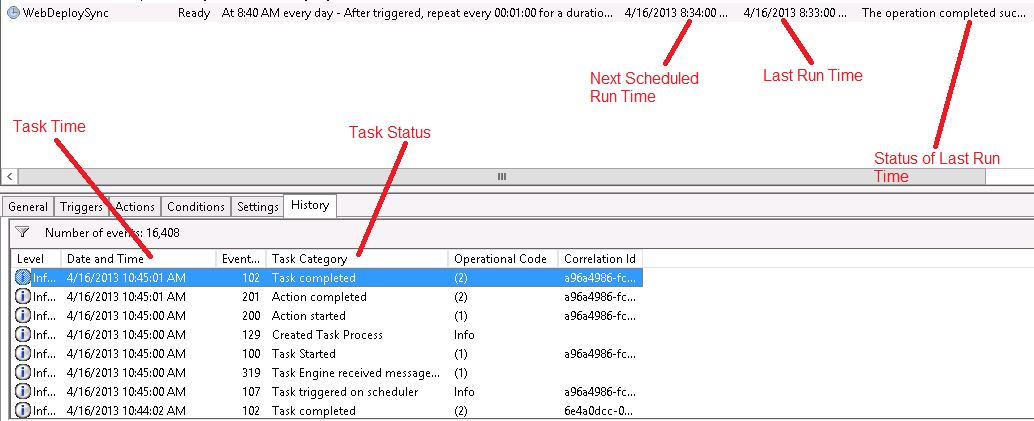
To ensure that the task runs, click Enable All Tasks History in the
Actions pane on the right side of the Task Scheduler. After the task starts
running, you can highlight it and click on the History tab to ensure that
it is running regularly every minute as shown in the following image:

Testing
After the script and scheduled task are complete, you can test this by
making a change on the primary server and ensuring that the change shows up
within IIS on the secondary servers. You should also be able to make a change
on the secondary servers in IIS or in the directories controlled by IIS and see
that your change on the primary server is overwritten in a minute or less.
Conclusion
This article shows you how to implement a web farm in Windows Server 2012 without
deploying Active Directory and without having to buy additional server.
Updated 3 months ago