Database Replication with Cloud Databases
This article describes how you create and manage read replicas for your Cloud Database instance. Replication is available for MySQL® 5.6, Percona® 5.6, and MariaDB® 10 databases. If you are using MySQL 5.1, you must upgrade to MySQL 5.6. For instructions on upgrading on how to migrate MySQL 5.1 to MySQL 5.6, see Upgrade a Cloud Databases instance from MySQL 5.1 to MySQL 5.6.
Replication Overview
Replication enables you to create a read replica of a primary database instance that you can use for scaling out read-heavy workloads or for ensuring availability of your database in case of instance failure. You can send only your read requests to your replica and only write requests to the source database instance. When you create a read replica, you must specify an existing database instance as the source of the replica.
Rackspace Cloud Databases uses asynchronous replication.
Read Replica Uses
The following are some common scenarios for the benefits of adding a read replica for your database instance:
-
Improve overall performance of your read-heavy application workloads by creating read replicas of your database instance and using them to distribute your application read traffic.
-
Many applications that use MySQL database technologies are used to perform analysis and business reporting. Run queries against your replica without affecting the performance of write requests and updates on the source database instance.
-
Use replication to create an updated copy of your database.
Create a Read Replica
-
Log in to the Cloud Control Panel.
-
In the navigation bar, click Select a Product > Rackspace Cloud.
-
Select Databases > MySQL.
-
On the instance list page, click the plus sign (+) in the Replicas column for the database instance that you want to replicate, as shown in the following image:

Tip: You can also click the gear icon next to the instance and select Create Replica or click the instance and then click Add Replica in the replication section of the instance page.
-
Enter a name and set the configurations for the read replica, then click Create Replica.
View the Replicas Attached to a Database Instance
After you have created a replica, you can visualize it as shown in the following image:
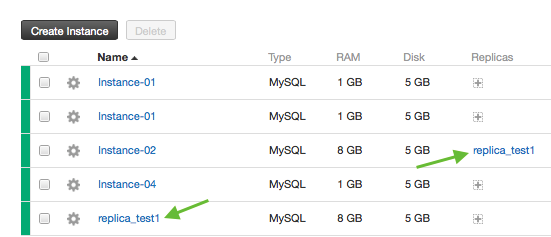
View the replica by clicking on it in the Name column or the Replicas column. The replication instance details page is displayed.
You can also view the replica in the Replications section of the instance details page.
Detach a Replica
-
On the details page for the replication instance, click the Actions and select Detach from master.
-
In the popup dialog box, click Detach Instance.
There could be situations where detaching the replica will be useful, here are some common scenario:
-
In case you are experiencing a performance impact due to replication.
-
If your source database instance becomes unavailable, you can use the replica as the source database instance and point your application to the replica. To accomplish this, you must detach the replica from the source database instance and change the endpoint for your application.
Delete a Replica
-
Click the gear icon next to the replica and select Delete Instance. You can also click the replica in the instance list, and on the instance page, click the gear icon in the top right corner.
-
In the popup dialog box, click Delete Instance.
After you delete the replica instance, your data is no longer replicated. You can delete the replica without detaching it from the source database instance, but you cannot delete the source database instance if it has replicas attached.
Create and Manage Replicas with the Cloud Databases API
All following functions are also available in the Cloud Databases API documentation. You can find more information about how to manage replicas with the API in the Cloud Databases Developer Docs.
Monitoring Read Replicas
After setting up replication, you should periodically monitor your replicas to ensure that they are in a healthy state. All the variables mentioned in this section for monitoring replication are present in the monitoring agent running on your replica database instance. You can monitor these variables and also set up alarms to be notified of the state of your replica. You can also monitor these variables by executing the SHOW GLOBAL STATUS and SHOW SLAVE STATUS
commands from within MySQL.
slave_running: This is a global status variable, and its value can be ON or OFF. If the value is ON, the replica is connected to the source database instance and both the SQL thread and IO thread are running. If the value is
OFF, you look at Last_SQL_Errno and Last_SQL_Error for more error information. You can create an alarm to monitor the status of replica with the following criteria.
if (metric['replication.slave_running'] != "ON") {

  return new AlarmStatus(CRITICAL, 'Replica is disconnected');

}
return new AlarmStatus(OK, 'Replication slave_running is OK');
slave_IO_running: This variable is a part of the Show Slave status and its value can be Yes, No, or Connecting.
If the value is No, the replica I/O thread is not running, and you can look at Last_IO_Errno and Last_IO_Error for more error information. You can create an alarm to monitor the status of replica IO with the following criteria:
if (metric['replication.slave_io_running'] != "Yes") {

  return new AlarmStatus(CRITICAL, 'Replica I/O thread is not running');
}
return new AlarmStatus(OK, 'Replication slave_io_running is OK');
slave_SQL_running: This variable is a part of the Show Slave status and its value can be Yes or No. It indicates whether the SQL replica thread has started and is working well. If the value is No, you can look at Last_SQL_Errno and Last_SQL_Error for more error information. You can create an alarm to monitor the status of replica IO with the following criteria:
if (metric['replication.slave_sql_running'] != "Yes") {

  return new AlarmStatus(CRITICAL, 'Replica SQL thread is not running');

}
return new AlarmStatus(OK, 'Replication slave_sql_running is OK');
seconds_behind_master: This variable is a part of the Show Slave status and is an integer that measures the time difference in seconds between the replica SQL thread and the replica I/O thread. This field is an indication of how late the replica is. When the replica is actively processing updates, this field shows the difference between the current timestamp on the replica and the original timestamp logged on the source for the event currently being processed on the replica. When no event is currently being processed on the replica, this value is 0. In the following example, we send an alarm if the replica is > 30 minutes behind the primary.
if (metric['replication.seconds_behind_master'] > 1800) {

  return new AlarmStatus(CRITICAL, 'Replication Lag of Over 1800 Seconds');

}
if (metric['replication.seconds_behind_master'] > 600) {

  return new AlarmStatus(WARNING, 'Replication Lag of Over 600 Seconds');

}
return new AlarmStatus(OK, 'Replication seconds_behind_master is OK');
Updated about 2 months ago