Using dedicated load balancers with RackConnect v3.0
Applies to: RackConnect v3.0
Load balancers distribute workloads across two or more servers, network
links or other resources. This distribution maximizes throughput,
minimizes response time and helps avoid overload. This article discusses
the options that are available when you use dedicated load balancers
with RackConnect v3.0.
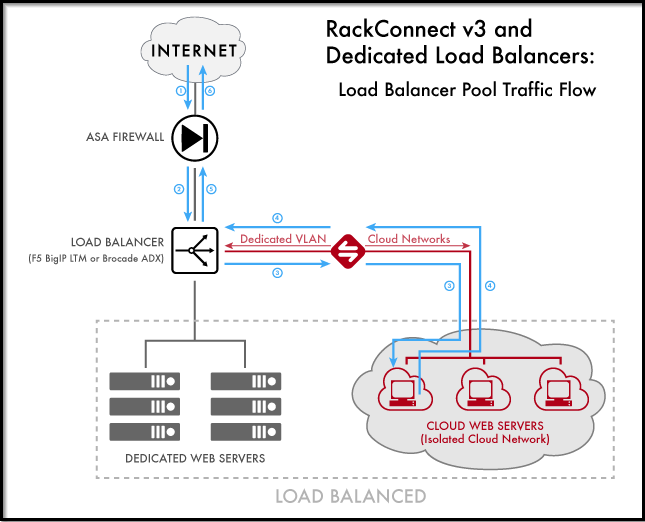
Supported load balancers
With RackConnect v3.0, the dedicated F5 BIG-IP Local Traffic Manager
(LTM) and Brocade ADX Series load balancers are now supported for use
with the RackConnect automated pool membership management capabilities.
When your cloud servers host an application that scales up and down (for
example, the web tier of an application), it is important to have a
method for adding and removing cloud servers from their associated load
balancer pools. If you use a dedicated load balancer with RackConnect,
you can specify the load balancer pool that a cloud server should be
placed in when it is created. When you delete the cloud server, it will
automatically be removed from the pool.
RackConnect provides the following ways for you to associate your cloud
servers with one or more load balancer pools:
- Use the Cloud Control Panel
- Use the RackConnect v3.0 API
Use the Cloud Control Panel
After you initially create your cloud server by using the Cloud Control
Panel, the details page for the
newly created cloud server is displayed. On this page, you can see
details regarding your server.
In the RackConnect Details section (located directly below the Server
Details section), you have the option to manage (add or remove) the
cloud server from a list of automation-compatible load balancer pools.
To add a server to a load balancer pool
-
In the RackConnect Details section of the cloud server's details page, click Select Pools.
-
In the pop-up dialog box, select the check box for each load balancer pool to which you want to add the cloud server.

-
Click Save Selected Load Balancer Pools.
To remove a server from a load balancer pool
- In the RackConnect Details section of the cloud server's details page, click Select Pools.
- Clear the check box for each load balancer pool from which you want to remove the cloud server.
- Click Save Selected Load Balancer Pools.
Automation-compatible load balancer pools
For load balancer pools to be recognized by RackConnect automation, the
following requirements must be met:
- At least one pool member exists. A disabled pool member (existing,
but not actively used) is used as a placeholder by default. - All pool members use the same forwarding port.
When you are adding pool members from the control panel (in the Load Balancer pools section under
RackConnect Details), if you do not see any available pools, RackConnect automation was not able to detect
any automation-compatible load balancer pools on your dedicated load
balancer. If this is the case, contact Rackspace Network Security to
request the creation of one or more load balancer pools that are
RackConnect automation-ready.
Use the RackConnect v3.0 API
After you initially create a cloud server, you can use the following
RackConnect v3.0 API load balancer pool operations:
- Retrieve a list of load balancer pools
- Retrieve pool details for a given load balancer pool
- Retrieve a list of all pool member nodes for a given load balancer
pool - Retrieve details for a given pool member node (servers) within a
given load balancer pool - Add a pool member node to a given load balancer pool
- Remove a pool member node from a given load balancer pool
- Bulk add multiple pool member nodes to one or more load balancer
pools - Bulk remove multiple pool member nodes from one or more load
balancer pools
The RackConnect v3.0 API is region-specific and returns results only for
the region specified in the URL of the API call itself.
For more information about using the RackConnect v3.0 API to manage load
balancer pool memberships, see the RackConnect v3.0
API.
If you have any questions, we are here to help. Our contact information
is available on the Contact Us page.
Updated about 2 months ago