
Rackspace CDN Edge Rules
Rackspace CDN enables you to create rules for content that is served over the content delivery network (or CDN). You create the rules after you create the Rackspace CDN service.
Edge rules are a set of policies that tell the CDN how to handle your traffic. They are called edge rules because these policies are applied at the edge servers, meaning that you don't need logic on your web server to enforce the behavior. Rackspace currently supports the following types of edge rules: caching rules, origin rules, and restrictions. This article describes each of these rule types and provides guidance on setting them up.
Caching Rules
Caching rules control the time to live (TTL) for your site's content. Setting the TTL for content tells the edge servers how long to cache content before checking the origin (the web server) for a fresh copy of the content. We recommend using low TTL for content that changes frequently and higher TTL (for example, 24 hours) for more static content, like images.
For example, a user sets a TTL of three hours for some content that is updated every hour. The edge server serves the content from a cache for the three-hour period without communicating with the origin server. When the user updates the content, the updates are not seen by the website visitors until the end of the three-hour period.
TTL for Dynamic Content
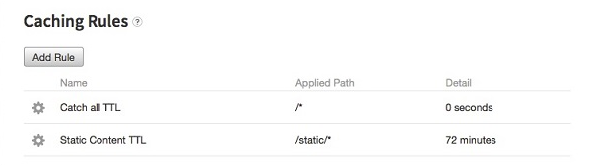
If your site has dynamic content or uses cookies to alter the experience per visitor, set that content's TTL to 0 (zero) seconds. You can still set a higher TTL for your static content while setting the rest of your content's TTL to 0. For sites with dynamic content, your rules might be set up as shown in the following image:
Default TTL Values
If no TTL is set, Rackspace CDN sets default TTL values for your content as follows:
- Error responses are cached for 10 seconds.
- Cache redirect responses are not cached.
- If you do not set up any caching rules, all content is cached for 1 day.
Origin Rules
Origin rules are used when you need to pull content from two or more origins (web servers, load balancers, and so on) for the same CDN service. For example, all your images might be stored in a Cloud Block Storage volume attached to one server, and your web code might be stored on another server. You must create an origin rule in order to add an origin to an existing CDN service.
The default caching rules listed in the preceding section apply to all origins.
To setup a new origin, perform the following steps:
-
Log in to the Cloud Control Panel.
-
In the top navigation bar, click Select a Product > Rackspace Cloud.
-
Click Storage > CDN, and then click the name of your service.
-
On the details page for the service, under Service Details, click Add Origin.
-
Enter a domain name or an IP address for the origin.
Rackspace recommends that you specify a domain name because an IP address can change over time. When entering the domain name or IP address, do not enter https://.

Note: Verify that the origin can accept traffic from the domain listed in your CDN service. For example, if your CDN service has a domain of cdn.customer1.com, you might need to alter your origin server's .htaccess file to allow traffic for that domain.
-
Tell the service when to fetch content from the new origin by specifying a content path. For example, if you want all of the images requested from the new origin, set the path to /images/*. With this rule, any time your your domain gets a request that contains /images/ in the path, the CDN fetches that content from the new origin if it can't be found on the edge.
The path must include a wildcard character. For example, /images/ is not a valid path, but /images/* is a valid path.
-
Click Save Origin.
Note: Requests are passed to the origin by using the original hostname in the header. If your CDN domain is cdn.mysite.com and the origin is mysite.com, you might expect that the CDN would change the hostname to mysite.com when fetching from the origin. However, that is not the case.
Restrictions
Rackspace CDN enables you to specify the following types of restrictions:
- Referrer, which specifies the HTTP host from which requests must come.
- Geography, which specifies the geography to which requests are allowed or from which requests are restricted.
- Client IP address, which specifies a single IPv4 or IPv6 address to which the restriction applies. Note: Classless Inter-Domain Routing (CIDR) or network ranges are currently not supported.
To create a restriction, perform the following steps:
- In the Cloud Control Panel, go to the details page for the CDN service.
- Under Restrictions, click Add Rule.
- Choose the type of restriction that you want to define. For more information about each type and additional values to add, see the sections following these steps.
- Specify whether to allow or block requests.
- Click Save Rule.
Referrer Restrictions
Referrer restrictions enable you to limit access to your site's content by checking the referrer header of the incoming request. Users typically implement this type of access control to prevent their images, videos, and other content from being linked to from other sites. For example, a malicious user can check the source code for your site www.yoursite.com and see that one of your car images has the source /images/cars/smartcar.png. That user could then create a URL from your domain, www.yoursite.com/images/cars/smartcar.png, and reference that URL in their own website code. As a result, you get charged for usage from another website, and in some cases, those charges can add up.
To protect your images or other files, you can implement referrer restrictions. To set this up, you need the following information:
- The referrer, which tells the CDN what domain to expect in the referrer header in the request. You specify which referrer headers to allow. Requests with all other referrer headers are denied.
- The path, which tells the CDN which content should enforce the restriction.
To implement multiple referrer domains to a single path, you can use a space to separate the list of domains that you want to have access in the Referrer field. Following is an example:
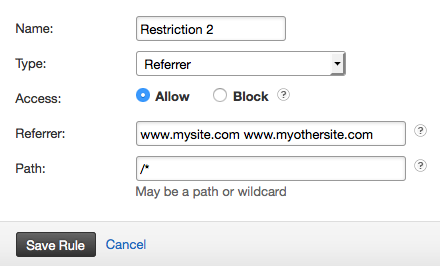
Note: Rackspace does not recommend implementing referrer restrictions for an entire domain. For the referrer information, most browsers insert the referrer header automatically for every request. For example, if an image is requested from your site, the browser automatically inserts the header as www.yoursite.com. If your images are being requested from another site, the browser inserts the referrer header of that site (for example,
www.malicioussite.com) into the request. The CDN verifies that this referrer header does not match the restriction that you set up and denies the request. In this case, you would have entered www.yoursite.com
into the Referrer field.
Note: Some browsers might not insert a header automatically. When referrer restrictions are enabled, requests without a referrer header are denied by the CDN. We recommend using a test domain (for example, test.yoursite.com) to test all rules before implementing them on your production domain.
Geography Restrictions
You can restrict content based on geographical regions. For a list of the Rackspace CDN geographical regions and the countries and territories within them, see Rackspace CDN geography mapping.
Client IP Address Restrictions
You can restrict content by specifying the IP address to which the restrictions applies.
Rule Setup
The information in this section applies to setting up all types of edge rules.
Path Information
Each type of edge rule is enforced based on a path. This path tells the network which portion of content should enforce a rule. This path directly relates to the structure of your files on your origin server (or web server). For example, if you have content stored in the /logos directory on your server, you can apply a rule to that content by setting the path to /logos/*.
If you want rules to apply to all of the content within a directory (including subdirectories), you must include a wildcard (*) after the path. Using the path /logos/* tells the network to apply your rule to anything with /logos in the path, including files in different subdirectories, such as /logos/partnerA/image.jpg and /logos/partnerB/image.png.
Rule Ordering
Users commonly create multiple rules with the same rule type. For example, when setting up caching rules, you might want one TTL for static content, and another TTL for dynamic content. When creating multiple rules within the same rule type, the order of your rules matters.
To properly enforce your rules, you must order them from least specific to most specific. For example, your least specific caching rule is the Catch All TTL, which applies a TTL of 0 seconds to your entire site, identified by the / path. Your most specific rule is the .png rule, which applies a TTL of 3 days to all files that have the .png extension, and which are identified by the path .png. Your least specific rules must appear first in the list of rules in your control panel, and the most specific rules must appear last in this list. If your rules are not ordered correctly, you can delete your existing rules and re-create them in the correct order.
Use the following examples to help you plan your list of rules. These rules are in order from least specific to most specific.
- Whole-site wildcard, such as /*
- URL path, such as /images/*
- Detailed URL path, such as /images/logos/partnerA/*
- File extension, such as /*.png
Updated 3 months ago