
Cloud Backup Backup Actions
Previous section: View backup information with Cloud Backup
This article describes the actions that you can perform during a single backup.
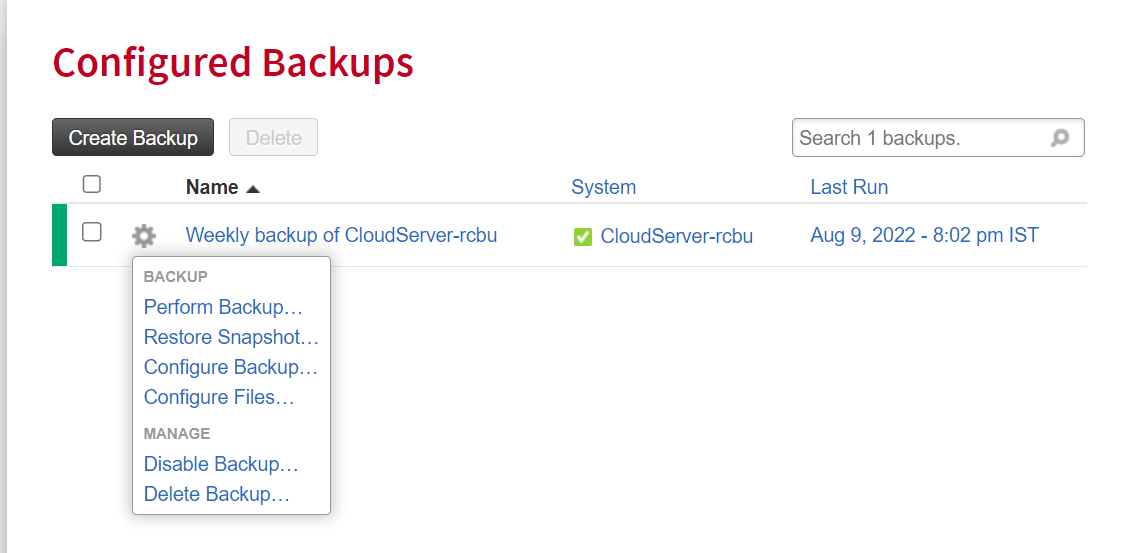
You can access the Backup Actions menu in the following ways:
-
Log in to the Cloud Control Panel, click the Select a Product drop-down menu in the top navigation bar, then select Rackspace Cloud. Next, select Backups and then click on the gear icon next to the backup name on the Configured Backups page.

-
Click on the Actions menu at the top of the Configuration Details page for a configured backup.

From the Actions menu, you can perform the following actions:
- Perform a backup
- Restore a snapshot
- Configure a backup
- Configure files
- Disable a backup
- Delete a backup
Perform a Backup
When you select Perform Backup from the Actions menu, you trigger a manual backup on your system, based on the configurations that are currently set for that configured backup. If you are looking at the Configuration Details page, the backup progress bar is displayed until the backup is completed.

Restore a Snapshot
-
From the Actions menu, select Restore snapshot.
-
On the first page of the Restore a snapshot wizard, select the backup date to restore from, and then click Next Step.
-
On the next page, select the destination system, and then click Next Step.
- You can limit the list of systems by using the search box.
- You can restore your backup to the system that was backed up, or to another system.
-
On the next page, select the folders and files to restore.
- On the Browse Files & Folders tab, select the check boxes of the files and folders that you want to restore. You can move through your folders by clicking Up or an individual folder name at the top of the file or folder list.
- After you have selected your files, you can confirm your selection by clicking the Selected & Excluded Items tab. The files included in the restore and specifically excluded are listed.
- When you are done, click Next Step.

-
On the next page, select the destination folder.
You can choose to restore the files to their original folder or to restore to a selected restore destination. You can also select whether to overwrite files with the same name. Then, click Next Step.
-
Confirm your restore settings and then click Start Restore.
The Activity page is displayed when the restore is complete.
Configure a Backup
You can change the name, recurrence, and notifications for your backup job.
From the Actions menu, select Configure Backup.
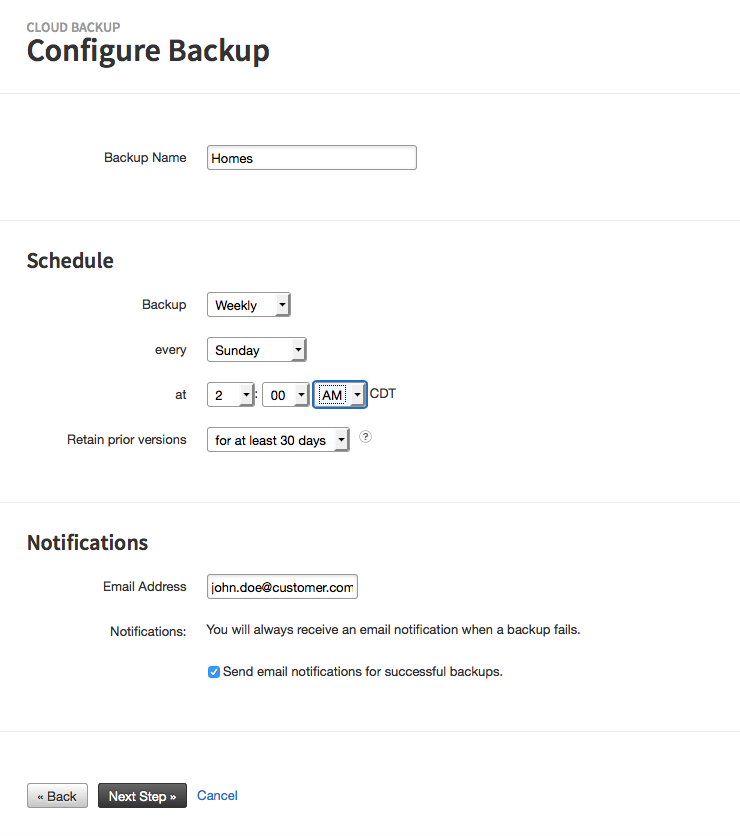
-
Enter a new name for your backup job, and under Schedule, select how often you want to run the backup. All times are Central Time.
You can schedule your backups to occur as often as you expect your files to change. Cloud Backup uses block level deduplication, which means only those parts of a file that have changed are saved. In this way, a unique piece of data is saved only once, which maximizes the effectiveness of the backup, while minimizing your storage overhead. Another benefit of using this method is that you can retrieve previous versions of files, up to the limits specified by the customer-defined retention settings.
To save additional overhead, Cloud Backup might compress the files if it reduces the size of the block. You can expect compression rates equivalent to those of gzip. You should not try to manually compress or encrypt your data before running backups; if you do, deduplication does not work, and you will create larger backups than you need. If you want to encrypt your backups, see the "Encrypting your System" section in this article.
For advanced Linux® users, if you create tarballs with
gzipthat get backed up, use the--rsyncableoption, which enables Cloud Backup to use deduplication on those files as well. -
Select how long you want to keep your backups: 30 days, 60 days, or indefinitely.
-
Under Notifications, enter the email address where you want to receive notifications of failed backups. You can also elect to have emails sent for successful backups.
-
When you are satisfied with your settings, click Next Step.
-
Select the folders and files for the backup, along with any files you want to exclude. Then click Next Step.
-
Review your backup configuration settings. If the settings are correct, click Save. Otherwise, click Back to make changes.
Configure Files
You can change the files and folders that are saved in your backup.
-
From the Actions menu, select Configure Files.
-
On the Browse Files & Folders tab, select the folders and files by clicking the folder name to view which files are inside. Select the check boxes of the files and folders that you want to back up.
-
Confirm your selection by clicking the Selected & Excluded Items tab. The files included, as well as those specifically excluded, are listed.
-
Click Next Step.
-
Confirm the settings on the next page and click Save to save your file configuration.
Disable a Backup
You can prevent a backup from running by selecting Disable Backup from the Actions menu.
When you disable a backup, the following actions occur:
- The backup status changes to
Disabled. - The Perform Backup button is not available.
To re-enable your backup, from the Actions menu, select Enable Backup. Your backup returns to Active status with all its previous settings.
Delete a Backup
You can delete your backup by selecting Delete Backup from the Actions menu.
Confirm that you want to delete the backup.
After a backup is deleted, it cannot be recovered.
Next step: Cloud Backup system actions
Updated 2 months ago