Monitor Entities with Rackspace Intelligence
Rackspace Intelligence lets you create, edit, and view entities.
Like Rackspace Monitoring, Rackspace Intelligence uses entities to represent any object or resource you want to monitor. An entity can be a set of servers or non-server objects, but an entity often refers to an individual server.
You can define an entity in Rackspace Intelligence that is something other than a Rackspace cloud server, a Rackspace cloud database, or a Rackspace dedicated device. You can create an entity to represent any server or website that you want to monitor, even if Rackspace does not host it.
As you create new Rackspace cloud servers or cloud databases, Rackspace Intelligence automatically creates entities representing them.
To see a list of the entities known to Rackspace Intelligence, select Monitor at the top of the Rackspace Intelligence interface and click Entities.
From the Monitor Entities section, you can perform the following actions on the list of entities:
Sort Entities
You can sort the list of monitored entities by entity name, by the number of alarms reported for each entity in the Critical, Warning, and OK categories, and by the number of monitoring checks reported for each entity.
View the Details of an Entity
Rackspace Intelligence links all the entity labels to an entity details page. To view the details page for an entity, click on the entity's name. The following information about the entity is displayed:
- Monitoring details, such as IP addresses and RAM configured for the entity
- Monitoring checks, listing numbers of critical, warning, and OK alarms fired for each check activated for the entity
- Suppressions, showing any alarms currently muted for this entity
If the entity is a cloud server, the details page provides the same information that you can get about the server by using the Cloud Control Panel or by logging in to the server itself.
Create an Entity
To create a new entity:
-
On the Monitoring page, click Create Entity.
-
Type a name for your entity and click Create Entity.
Rackspace Intelligence creates the entity and displays the information on the entity details page. You can now update the entity by adding an IP address or a check. See the next section for instructions.
Update an Entity
You can update an existing entity by clicking the Actions menu at the top of the entity details page.
You can perform the following updates on an entity:
Rename an Entity
To rename an entity:
- Select Rename Entity from the Actions menu.
- Type a new name in the Rename Entity box, and then click Rename.
The new name appears on the entity details page.
Add an IP Address to an Entity
You can add one or more IP addresses to an entity. You can reference these IP addresses by the checks on the entity.
To add one or more IP addresses:
- Select Add IP from the Actions menu.
- On the IP Addresses page, specify a label for the IP address, type the numbers for the IP address, and then click Add.
- To add another IP address, repeat the preceding step.
- After you have added all your IP addresses, click Save.
The IP addresses that you added appear on the entity details page.
Delete an Entity
To delete an entity:
- Select Delete Entity from the Actions menu.
- To confirm that you want to delete the entity permanently, click Delete.
The entity is permanently deleted from the database and Rackspace no longer monitors it.
Create a Check for an Entity
To create a check for an entity:
-
Select Create Check from the Actions menu.
-
Select a check from the Check Type list, and then enter all the required information.
Different check types require different values of input. For more information, see Working with checks. -
Click Create Check.
Rackspace Intelligence creates the check and displays the details on the check details page. If your check requires you to install a monitoring agent to collect metrics, a message displays in the Check Details section.
Create a Suppression
To create a suppression:
-
Select Create Suppression from the Actions menu.
On the Create a Suppression page, your entity is displayed in the Suppression Targets section.
-
Type a name for your suppression and specify the start and end dates.
-
To add an additional entity to this supression, click Add Entities and select one or more entities.
-
Click Create Suppression.
-
When asked to confirm that you want to create a suppression, click Create Suppression Now.
For more information about suppressions, see Working with notification suppressions.
Visualize an Entity
In the list of entities, click in the Visualize column of the row for an entity to launch a Default Graphs presentation for the entity. The page shows any graphs that are available for checks configured for the entity, such as the one shown in the following image:
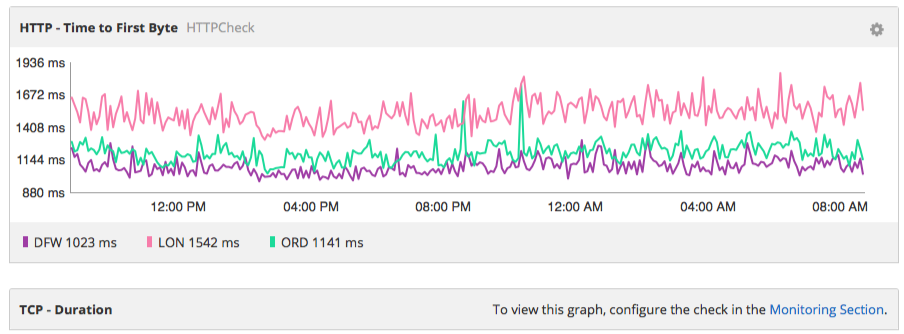
For checks that are defined but not configured, click the link to begin configuring the check.
Updated about 2 months ago