Use Swiftly to upload an image
For Cloud Files to provide high availability and data resiliency, we limit all files
to 5 GB in size, which is smaller than most
VM images and many other files that people might want to store. To get
around this limit, you can split any Large Object—any file larger than 5 GB—
into segments bound together by a manifest.
There are two types of manifest objects in Cloud Files: Dynamic Large Objects
and Static Large Objects. For image uploads, we recommend that you use a Static Large Object.
With a Static Large Object, the manifest is an explicit listing of the
size, MD5 checksum, and location of each segment that makes up the Large
Object. The Swiftly® tool divides your local file into segments, uploads
the segments in parallel, and automatically creates a manifest for you.
This article describes how to use Swiftly to upload a file larger than 5 GB
to Cloud Files as a Static Large Object.
For more information about Cloud Files Large Objects, see the
Cloud Files Developer documentation.
Note: If you prefer to use the API to manage large files, see
Use the API to manage large files,
and if you prefer Swift, see Use Swift to manage large files.
Prerequisites
This article assumes you have already properly prepared an image for import into
the public cloud and have already installed the Swiftly client. If you need help
with either of these prerequisites, see the following articles:
- Preparing an image for import into the Rackspace open cloud
- Install the Swiftly client for Cloud Files
Set environment variables
In a Bash shell, set the following environment variables:
CF_USERNAME=       # your Rackspace Cloud username
CF_API_KEY=        # your Rackspace Cloud API key
CF_REGION=         # Three character region code for your upload location (for example, `ORD`)
SOURCEFILE=        # the local file you are uploading
CONTAINER=         # the container in Cloud Files where the image should go
IMAGEFILENAME=     # the name you want to call the image in Cloud Files
SWFLY_SEG_BYTES=134217728
SWFLY_CONCURRENCY=20
To view information about viewing your Rackspace API key, see
View and reset your API key.
Ensure that the container into which you want to upload your object
already exists in the appropriate region in Cloud Files. (You can create
it in the Cloud Control Panel, if necessary.)
As mentioned earlier, Swiftly automatically segments your image file and
uploads the segments in parallel. The two SWFLY environment variables
listed in the preceding example control this.
SWFLY_SEG_BYTESspecifies the size, in bytes, that Swiftly uses
for each segment (except for the last segment, which could
be smaller). The value shown in the preceding example is 128 MB,
expressed in bytes. We recommend that you use this value. You can
experiment with different values to see if you get better
performance, but avoid using a smaller value (certainly no smaller
than 100 MB) and avoid a value larger than 1 GB.SWFLY_CONCURRENCYspecifies the maximum number of parallel threads
that Swiftly uses to upload the object. The author of Swiftly suggests
the value shown in the example. You can experiment with the value, but
your parallel uploads might saturate your network card and actually
slow down the overall file transfer if you set it too high.
Invoke Swiftly
After you set the environment variables, invoke Swiftly from the command
line to perform the upload, as shown in the following example:
Note: Consider using a screen session to perform this task. If
you're not familiar with the GNU Screen program, you can find an
introduction in Install the Swiftly client for Cloud Files.
swiftly
  --auth-url=https://identity.api.rackspacecloud.com/v2.0
  --auth-user=$CF_USERNAME
  --auth-key=$CF_API_KEY
  --region=$CF_REGION
  --concurrency=$SWFLY_CONCURRENCY
  put
    --segment-size=s${SWFLY_SEG_BYTES}
    --input=$SOURCEFILE
  ${CONTAINER}/${IMAGEFILENAME}
If you are importing a file from a cloud server already in the
Rackspace Cloud, add the --snet option to the command so that the
system transfers the file over the internal cloud network. Additionally,
if you want Swiftly to notify you about what it's doing as it uploads
your image file, you can add the --verbose option. If you add these
options, your invocation looks similar to the following example:
swiftly
  --auth-url=https://identity.api.rackspacecloud.com/v2.0
  --auth-user=$CF_USERNAME
  --auth-key=$CF_API_KEY
  --region=$CF_REGION
  --snet
  --verbose
  --concurrency=$SWFLY_CONCURRENCY
  put
    --segment-size=s${SWFLY_SEG_BYTES}
    --input=$SOURCEFILE
  ${CONTAINER}/${IMAGEFILENAME}
Note that the Swiftly invocation contains the following line:
--segment-size=s${SWFLY_SEG_BYTES}
The s after the equals sign tells Swiftly to create a Static Large
Object. As mentioned earlier, we highly recommend that you upload your
image as a Static Large Object.
Check your upload
Suppose that you used the following the environment variable settings
you used for your upload:
CF_REGION="DFW"
SOURCEFILE="my-awesome-image.vhd"
CONTAINER="uploaded-images"
IMAGEFILENAME="my-custom-image.vhd"
And this was the image you uploaded:
$ ls -l
total 2524008
-rw-rw-r-- 1 joeuser joeuser 2584576512 Apr 24 03:01 my-awesome-image.vhd
To check your upload, view the manifest for the Static Large Object that
was created in Cloud Files:
# get the manifest
swiftly
 --auth-url=https://identity.api.rackspacecloud.com/v2.0
 --auth-user=$CF_USERNAME
 --auth-key=$CF_API_KEY
 --region=$CF_REGION
 get
 --query=multipart-manifest=get
 --output=my-manifest.json
 ${CONTAINER}/${IMAGEFILENAME}

# look at the manifest
$ cat my-manifest.json | python -m json.tool
[
    {
        "bytes": 134217728,
        "content_type": "application/octet-stream",
        "hash": "bc5dc9c7f93b214e648e3ce2b9ee4bd1",
        "last_modified": "2014-04-24T03:46:16.000000",
        "name": "/uploaded-images_segments/my-custom-image.vhd/1398308466.19/2584576512/00000000"
    },
    {
        "bytes": 134217728,
        "content_type": "application/octet-stream",
        "hash": "c4a2dbe171bd60a3a23198baa916879c",
        "last_modified": "2014-04-24T03:46:23.000000",
        "name": "/uploaded-images_segments/my-custom-image.vhd/1398308466.19/2584576512/00000001"
    },
# etc
    {
        "bytes": 134217728,
        "content_type": "application/octet-stream",
        "hash": "9acffa882c4bf8beb3025e856f6e9d01",
        "last_modified": "2014-04-24T03:47:52.000000",
        "name": "/uploaded-images_segments/my-custom-image.vhd/1398308466.19/2584576512/00000018"
    },
    {
        "bytes": 34439680,
        "content_type": "application/octet-stream",
        "hash": "dd594916413c2e1ef05875606b813528",
        "last_modified": "2014-04-24T03:47:55.000000",
        "name": "/uploaded-images_segments/my-custom-image.vhd/1398308466.19/2584576512/00000019"
    }
]
Alternatively, you can look at your Cloud Files account in the Cloud Control Panel.
The following example shows the Containers page in the
Control Panel, which displays the containers in the DFW region.
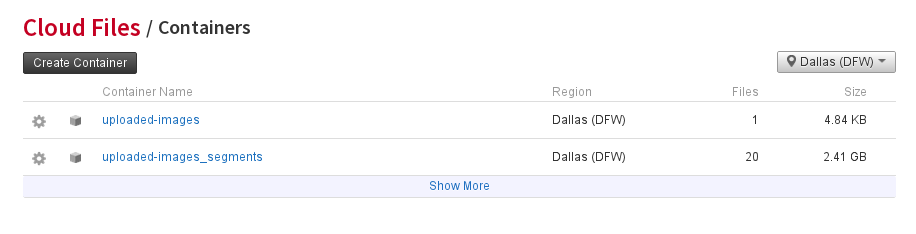
The uploaded-images container existed before the upload, and
the invocation to Swiftly identified it as the container to hold the
manifest. The size of this container is small because it contains only
the Static Large Object manifest file, which is a text file in JSON
format. (The content of this file is shown in the preceding example.)
The uploaded-images_segments container, which Swiftly created,
contains the actual image data divided into segment files. The size of
this container is 2.41 GB, which is the size of the uploaded image.
The uploaded-images container holds the manifest file, and the
uploaded-images_segments container holds the parts that merge
to make the image file. Each segment file ends with a number
sequence identifying the segment, such as 00000000, 00000001,
00000002, and so on.
Note that while the manifest in uploaded-images depends on the image
segments in uploaded-images_segments, Cloud Files won't prevent you
from deleting segments. If you delete any of those segments, you get
an error when you attempt to download the Static Large Object that
comprises the image file.
If you look inside the uploaded-images container, the image file that
the manifest describes displays rather than the manifest itself. In this
example, the display shows my-custom-image.vhd. The file size Cloud Files
displays in the container view reflects the overall size of the
Large Static Object because that's the size of the object you'd get if
you downloaded the file. The actual storage used in that container is
the few kilobytes used by the manifest file because the system stores
the actual image data in the uploaded-images_segments container.
Summary
- To download the image from the example above, request the
object named my-custom-image.vhd from the uploaded-images
container in the DFW region of your Cloud Files account. - To import the example image using Cloud Images, create an
import task, specifying the value for import_from as
uploaded-images/my-custom-image.vhd - Do not delete any of the segments in the uploaded-images_segments
container, or you corrupt your image. - Swiftly takes care of dividing your image file into segments,
uploading the segments to their own container, and creating the
Static Large Object manifest automatically in the container you
requested. But it's important to know what it's doing
and how your data is stored so that you don't corrupt your image
by mistake.
Use the Feedback tab to make any comments or ask questions. You can also start a conversation with us.
Updated over 1 year ago