Manage Backups for Cloud Databases
Cloud Databases offers multiple ways to back up and restore your database. Backup files are stored in Cloud Files and are subject to standard Cloud Files charges. The files remain in your Cloud Files account until you delete them, except for scheduled backup files, which are automatically deleted based on a set retention period.
This article describes how to create a backup for your database, view details about a backup, and delete or restore a backup. You can also schedule automatic backups of your databases. For more information, see Scheduled backups for Cloud Databases.
Create a Backup
To create a backup of a database instance, use the following steps:
-
Log in to the Cloud Control Panel.
-
In the top navigation bar, click Select a Product > Rackspace Cloud.
-
Select Databases > MySQL.
-
Click the gear icon next to the name of the instance that you want to back up and select Create Backup.
A dialogue box displays.
-
Enter a name for the backup and a description, and then click Create Backup.
The backup name is required and cannot exceed 64 characters.
The behavior of your instance during a backup depends on the storage engine that you are using for tables. If you use only InnoDB, write access to your database instance is not suspended. If you have MyISAM tables, those databases are write-locked during the backup process.
Things to Consider
- While the instance is being backed up you will not be able to add/delete databases, add/delete users, or delete/stop/reboot the instance.
- You can only run one backup at a time. Duplicate requests will receive a 422 error.
- Backups are not deleted when the instance is deleted. You must delete any backups that are not required.
- During a backup, the backup files will be saved directly to your Cloud Files account. The process creates a container called z_CLOUDDB_BACKUPS and places all the files in it. In order for the restore and deletion of backups to work properly, you should not move, rename, or delete any of the files from this container.
View all backups for your account
In the top navigation bar click Backups > MySQL Backups to view all backups for databases in your account. The following details are displayed:
- The backup name assigned by the user
- The instance that was backed up
- The region where the instance was created
- The type of database that was backed up
- The date the backup was created
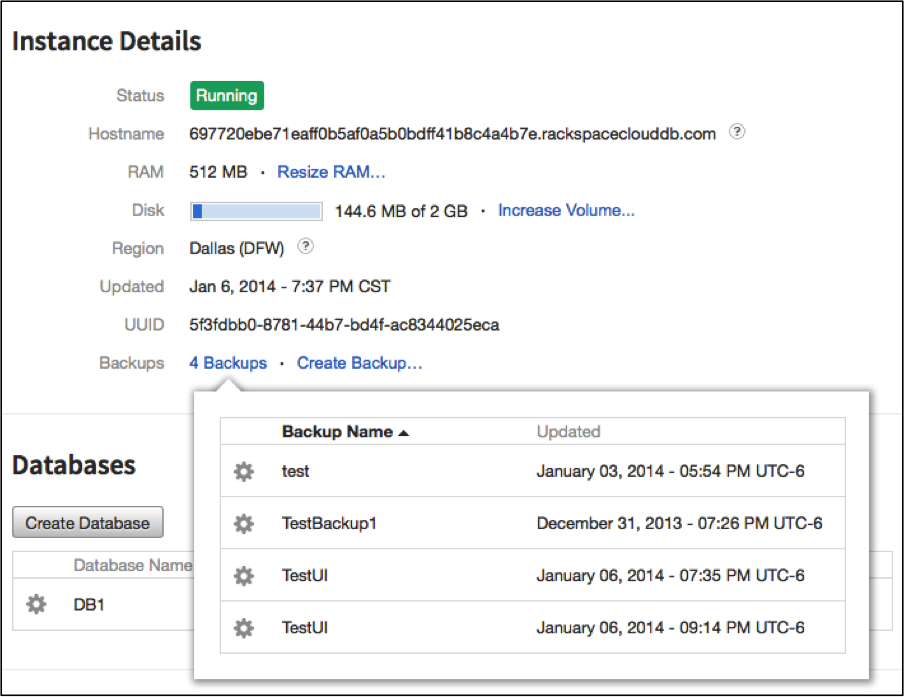
View all backups for an instance
To view all the backups created for a specific instance, use the following steps:
-
In the top navigation bar, click Databases > MySQL.
-
Click the name of the instance for which you want to view backups.
The Instance Details page displays. The number of backup files is displayed next to Backups in the details list.
-
Click the number of backups and a dialogue box displays with a list of all backups created for that instance.
You can hover over the backup name for additional details or click the gear icon to copy, restore, or delete the backup.
Delete a backup
Use the following steps the delete a backup:
-
Click the gear icon next to the name of the backup that you want to delete and select Delete Backup.
A dialogue box displays, asking for confirmation to delete the backup.
-
Click Delete Backup.
You can also delete any backups for an instance from the Instance Details page.
Restore a Backup
To restore a backup to a new instance, use the following steps:
-
Click the gear icon next to the name of the backup that you want to restore and select Restore. A dialogue box display.
-
Enter a name for the new instance, select the amount of RAM and disk that you want.
The volume size is set by default to the value of the original size of the database before the backup. You must specify a volume greater than that of the original size of the database.
RAM amount and disk size affect the cost of the instance.
-
Click Create Instance.
All user accounts, credentials, and access permissions that were saved on the instance at the time of the backup are restored along with the databases. Once restored, you can create new users or databases, but they cannot be the same as the ones from the instance that was backed up.
Updated over 1 year ago