High Performance Computing Cluster in a cloud environment
High Performance Computing (HPC) enables scientists and researchers to
solve complex problems that require many computing capabilities. HPC
typically uses a message passing interface (MPI) to communicate
between different nodes.
HPC in the cloud
Currently, most projects requiring HPC are still running on legacy UNIX®
systems. Migrating these projects to a cloud-based installation is very
simple and does not require much additional setup. This tutorial builds
an HPC cluster with Open MPI on the Rackspace Cloud and runs an Open MPI
application on top of the cluster. By the end of this tutorial, you should
know how to leverage the cloud to rapidly build and scale an HPC cluster
for real-time data processing while removing the dependency on physical
infrastructure.
Open MPI
To achieve high performance clustering in the cloud, you can use Open
MPI, which is an Message Passing Interface (MPI) project. It provides parallel
processing, thread safety and concurrency, dynamic process spawning, and
network and fault tolerance. The world's fastest super computers use this
library, and the library powers many petaflops. To find out more about the
Open MPI library, visit their site.
Objective
This tutorial shows you how to build an HPC cluster by using the
following tools:
- Four Rackspace Cloud Servers
- Open MPI
The tutorial sets up a four-node cluster, runs an application on it, and
gauges the performance, as shown in the following image:
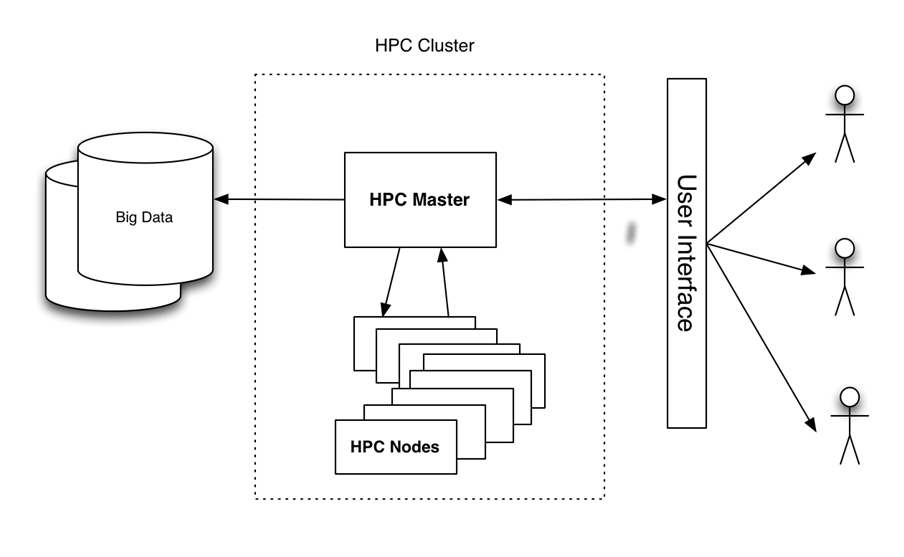
Figure 1 - HPC on the Cloud High Level Architecture
Prerequisites
You need the following three items to successfully complete this tutorial:
- A Rackspace Cloud account.
- An Secure Shell (SSH) client. Windows® users can use PuTTY.
- A basic knowledge of Linux® and Open MPI.
Tutorial
The tutorial covers the following tasks:
- Create a Cloud Server.
- Install Open MPI.
- Enable clustering.
- Configure HPC.
- Create and deploy a Cloud Server image.
- Install and run a sample Open MPI enabled application.
Create a Cloud Server
Log in to the Cloud Control Panel and create a
Cloud Server from the web interface with the following attributes:
- Server name: yourname-HPC-node-01
- Region: Dallas (DFW)
- Image (Rackspace): Ubuntu 12.04 LTS (Precise Pangolin)
- Size: 2GB of RAM or higher
Click Create Server and the Cloud Server build process begins. While it builds,
a popup window displays your Cloud Server password. Record the password for future
reference. Dismiss the popup window and wait for the server build to complete.
After the IP address of the new server becomes available, record it.
Install Open MPI
After the server finishes building and is in Available status, SSH into
the server and log in by using the IP address and password that you recorded earlier.
ssh root@<Your Server IP>
After logging in, execute the following commands to install Open MPI:
apt-get update
apt-get install build-essential -y
apt-get install openmpi-bin openmpi-checkpoint openmpi-common openmpi-doc libopenmpi-dev -y
Enable clustering
Open MPI facilitates communication between nodes by using SSH, so you need to enable
key-based logins for SSH.
To do this, run the following commands:
chmod 700 ~/.ssh
echo "StrictHostKeyChecking no" >> /etc/ssh/ssh_config
ssh-keygen -t rsa -b 2048 -f ~/.ssh/id_rsa -C "Open MPI"
The output of these commands should look similar to the following example:
Generating public/private rsa key pair.
Enter passphrase (empty for no passphrase):
Enter same passphrase again:
Your identification has been saved in /root/.ssh/id_rsa.
Your public key has been saved in /root/.ssh/id_rsa.pub.
The key fingerprint is:
35:85:97:3c:98:89:8d:bc:58:96:97:41:ad:0b:a6:c8 Enter an optional comment about your key
The key's randomart image is:
+--[ RSA 2048]----+
|       . *oX..   |
|        B O.*    |
|       + ooo .   |
|      . +...     |
|   . . oS. .     |
|    E .   .      |
|                 |
|                 |
|                 |
+-----------------+
Note: You are prompted for a passphrase during this process. Leave it blank.
Run the following commands to copy the key to the authorized key folder and change
the permissions to allow SSH logins:
cat ~/.ssh/id_rsa.pub >> ~/.ssh/authorized_keys
chmod 600 ~/.ssh/authorized_keys
Configure HPC
Now configure the primary HPC node by creating a host file. To do this, ensure
that you are logged in to the first node over SSH and create the following file,
where <Your Server IP> is the IP address that you used to SSH into the machine:
cd ~/
echo <Your Server IP> >> mpi_hosts
To verify the file, run the following command:
cat mpi_hosts
You should see the following result:
<Your Server IP>
To verify your configuration, use hello_c.c from the examples included with
Open MPI.
To do this, follow these commands:
mkdir /root/samples
cd /root/samples
wget https://svn.open-mpi.org/svn/ompi/tags/v1.6-series/v1.6.4/examples/hello_c.c
mpicc hello_c.c -o hello
mpirun ./hello
This should output the following result:
Hello, world, I am 0 of 1
Now that it works, run the following commands to test connectivity:
wget https://svn.open-mpi.org/svn/ompi/tags/v1.6-series/v1.6.4/examples/connectivity_c.c
mpicc connectivity_c.c -o connectivity
mpirun ./connectivity
You should see the following output:
Connectivity test on 1 processes PASSED.
This confirms that the first node is online and operational.
Create and deploy a Cloud Server image
With the first node created, you are ready to set up a cluster. To begin,
make copies of the node that you just created. Follow these steps to create an
image:
- Log in to the Cloud Control Panel.
- In the top navigation bar, click Select a Product > Rackspace Cloud.
- Select Servers > Cloud Servers.
- In the servers list, select the server you created for the first node.
- Click on the Actions drop down menu.
- Click Create Image.
- When prompted, provide a meaningful name.
- Finally, click Create Image and wait a few minutes for the image
to be created.
After the image is created, deploy a new Cloud Server by using the previous procedure with
the following exception: when prompted for the image, click the Saved tab and select your image.
Again, provide a meaningful server name and record the password and IP address of the new server.
To add the new node to the cluster, run the following commands (assuming that
the IP of your new server is 10.20.30.40 and the IP/hostname of your first
server is <Your Server IP>):
SSH to your first server
cd ~/
cat >> mpi_hosts <<EOF
10.20.30.40
EOF
Now, your host file should resemble the following example:
<Your Server IP>
10.20.30.40
To test the connectivity between the nodes, execute the following
command:
mpirun -v -np 2 --hostfile ~/mpi_hosts /root/samples/connectivity
If you don't get any errors, you have just successfully created and
tested your own cloud cluster. To increase the size of the cluster,
add two more nodes by using the same procedure.
To test the connectivity within the four-node cluster, execute the
following command:
mpirun -v -np 4 --hostfile ~/mpi_hosts /root/samples/connectivity
Install and run a sample Open MPI-enabled application
Now that you have an Open MPI cluster, check how it performs. Use a simple
ray tracing application that can run on a single node or on
an Open MPI cluster to compare the performance.
First, install the application on all nodes of the
cluster. To do this, SSH into the primary node and run the following command:
for i in `cat mpi_hosts`; do ssh root@$i "curl -l https://openstack.prov12n.com/files/tachyon.sh | bash"; done
cd ~/tachyon/compile/linux-mpi
The Tachyon Parallel/Multiprocessor Ray Tracing System comes with
multiple sample data files in the scenes folder, which you can use
to run your tests. First, run the test on one node by using the following command:
cd ~/tachyon/compile/linux-mpi
./tachyon ../../scenes/teapot.dat
You should see the following output:
Tachyon Parallel/Multiprocessor Ray Tracer   Version 0.99
Copyright 1994-2011,    John E. Stone <[email protected]>
------------------------------------------------------------
Scene Parsing Time:     0.0221 seconds
Scene contains 2330 objects.
Preprocessing Time:     0.0052 seconds
Rendering Progress:       100% complete
  Ray Tracing Time:     2.1399 seconds
    Image I/O Time:     0.0174 seconds
Run the following command and notice the ray tracing time so that you can
compare it to your parallel run:
mpirun -np 4 --hostfile ~/mpi_hosts ./tachyon ../../scenes/teapot.dat -format BMP
You should see the following output:
Tachyon Parallel/Multiprocessor Ray Tracer   Version 0.99
Copyright 1994-2011,    John E. Stone <[email protected]>
------------------------------------------------------------
Scene Parsing Time:     0.0230 seconds
Scene contains 2330 objects.
Preprocessing Time:     0.0052 seconds
Rendering Progress:       100% complete
  Ray Tracing Time:     0.6048 seconds
    Image I/O Time:     0.0182 seconds
Your cluster consists of four nodes and one CPU for each. Therefore, the
performance improvement is almost four times greater. You should see
significant improvements even if you don't have multiple nodes and instead
run your application on only one node with OpenMPI using both CPUs.
It is important that you created your server with at least
2 GB of RAM because sizes of 2 GB and higher have access to at least 2 CPUs.
For more information on sizes,
see Cloud Servers.
Execute the following command to run this code on multiple CPUs of a single server:
mpirun -np 2 ./tachyon ../../scenes/teapot.dat -format BMP
You should see the following output:
Tachyon Parallel/Multiprocessor Ray Tracer   Version 0.99
Copyright 1994-2011,    John E. Stone <[email protected]>
------------------------------------------------------------
Scene Parsing Time:     0.0222 seconds
Scene contains 2330 objects.
Preprocessing Time:     0.0050 seconds
Rendering Progress:       100% complete
  Ray Tracing Time:     1.0888 seconds
    Image I/O Time:     0.0181 seconds
Notice that even when running on a single node but utilizing Open MPI,
the performance has almost doubled. To read more about this ray tracing
application, visit https://jedi.ks.uiuc.edu/~johns/raytracer/.
Summary
In this tutorial, you learned how to create and image Cloud Servers. You
also learned how to set up an HPC cluster using Open MPI. After setting
up and configuring the cluster, you installed a small ray tracing
application to demonstrate the benefits of using multiple nodes instead
of one node.
Updated 4 months ago