Create a Grafana dashboard for Rackspace Metrics
Rackspace Metrics lets you build a Grafana® dashboard to visualize your metrics. Instead of using a stand-alone Graphite back end, you can point your Grafana instance to the Rackspace Metrics service. You can complete all of these steps directly from the Rackspace Cloud Control Panel by importing a custom template, and then creating a stack from this template.
This article describes how to deploy a Grafana instance for Rackspace Metrics by using a custom Cloud Orchestration template. It also provides instructions about how to upload a Grafana dashboard for a database instance.
If you prefer to deploy Grafana without the custom Cloud Orchestration template or upgrade your existing Grafana instance, see Grafana 3.0 with Blueflood datasource.
Deploy the Grafana instance for Rackspace Metrics
To create a Grafana dashboard, complete the following steps:
-
Log in to the Cloud Control Panel with your username and password.
-
In the top navigation bar, click Select a Product > Rackspace Cloud.
-
Click Orchestration > Stack Templates, and then click Create Custom Template.
-
Go to https://bitly.com/heat-grafana and copy the content on the page. This is the template that you use to create your stack.
-
Return to the Cloud Control Panel.
-
On the Create Custom Template page, perform the following steps:
-
Enter a name for the template.
-
Paste the template content that you just copied.
-
Click Validate Syntax at the bottom of the page.
After the template is successfully validated, an
It works!message displays beside the button.
-
-
Click Create Template.
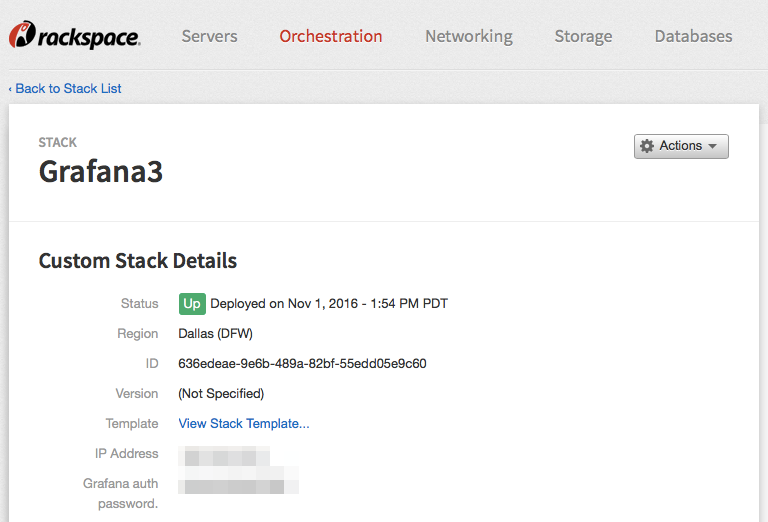
Your template is created. This process might take a few minutes. After the template is complete, a details page displays that shows information about your custom template, as shown in the following image:

-
From the Actions menu, select Create Stack from Template.
-
On the Create Stack page, enter a name for the stack and then enter values for the following fields under Server Settings. Use the values for your Rackspace account, and overwrite the not valid values that are populated by default:
- API key
- username
- tenant ID (your account number)
-
Click Create Stack. The stack details page displays. While the stack is being built, the Status is Building.
When the stack is finished building, the Status field changes to Up. The page also displays an IP address, a Grafana authentication password, and a Grafana authentication username that you can use to access your Grafana dashboard. Ensure that you record this information.
Use the Grafana dashboard
After you create your stack, you can access the Grafana dashboard, which provides all of the relevant information about your stack.
To access the Grafana dashboard, perform the following steps:
-
Open a web browser.
-
Type the IP address in the address bar.
You are prompted to authenticate.
-
Enter the username and password that displayed after you created the stack and click Log In.
-
Create your Grafana dashboard from Rackspace Monitoring data by pasting the JSON code found in the Rackspace Cloud Orchestration template for Grafana.

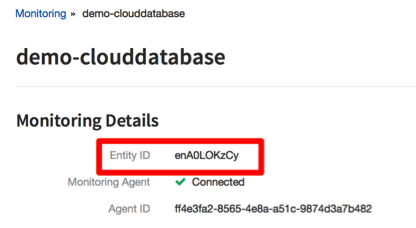
All of the metrics that Rackspace Monitoring submits display in the following format:
rackspace.monitoring.entities.<entityid>.checks.<checktype>.<checkid>.<metricname>
This example URL shows that Rackspace Monitoring generates an entity ID and a check ID to guarantee the uniqueness of the metrics. You can use the entity ID and check ID to identify the format of the metric that you want to see.
You can locate the entity ID and check ID in the Cloud Control Panel on the Rackspace Intelligence Monitoring Details and Check Details pages.
For more information, see the following articles:
The following screenshot shows where you can locate the entity ID on the Monitoring Details page:
You can also locate the monitoring and check IDs by looking at the Rackspace Intelligence URL for a particular check. The following link provides an example of this URL:
https://intelligence.rackspace.com/cloud/entities/enrmO7n1hX/checks/ch6fvLIaMC
The entity ID directly follows the entities parameter. Entity IDs always start with the letters en. The check ID directly follows the checks parameter. Check IDs always start with the letters ch.
Upload a Grafana dashboard for database instances
Rackspace has created a Grafana dashboard to help you set up your Cloud Databases MySQL® instances.
To upload a Grafana dashboard that shows your MySQL instances, complete the following steps:
-
Download the Grafana dashboard JSON file.
-
Modify the JSON code to match your instance by replacing all of the instances of
\_rax\_entity\_id\_in the file with the entity ID of your database instance, as shown in the following image:
-
On the Grafana dashboard, click the folder icon in the top-right corner, click Import > Choose File, and then upload the file to Grafana.
The dashboard automatically appears and displays your MySQL database instances, as shown in the following image:

Use annotation (optional)
Annotation support enables you to submit change events to show along with the graph. Taking this step adds information to the graph on the dashboard. For more information, see Use annotation metrics.
Grafana FAQ
The following FAQ provides more information about using Grafana.
How much does Grafana cost?
You pay only for the cost of the server that you create.
Grafana is an open-source metrics dashboard and graph editor. There is no cost for the software itself. You can choose to deploy it anywhere, and you are responsible only for maintaining and paying for the server that it runs on.
We want you to have access to your metrics so that you can make informed decisions about your infrastructure. Our monitoring service and metrics storage are available at no cost.
Should I use Rackspace Intelligence or Grafana?
Rackspace Intelligence is a no-cost option that we provide to help you make your infrastructure choices. It is designed to answer basic questions about your servers. Rackspace Intelligence covers many use cases and offers limited customization options. For full customization, you might want to use Grafana.
Also consider that Rackspace Intelligence does more than display graphs. It is a control panel that enables you to manage your Rackspace Monitoring configuration. Although Grafana might give you total control over your graphs, Rackspace Intelligence gives you total control over creating, deleting, and editing your monitoring configuration.
Rackspace Intelligence and Grafana use the same metrics that are stored in the Rackspace Metrics service. As a result, you can try both services and choose the one that works well for you. For more information, see Getting started with Rackspace Intelligence for the cloud.
Updated about 1 year ago