Attach a Cloud Block Storage Volume to a Windows OnMetal Server
If you want more than 32 GB of storage but do not need the fast I/O normally provided by an OnMetal server, you can connect an OnMetal server to a Cloud Block Storage volume. Using an OnMetal server with Cloud Block Storage is particularly useful for OnMetal Compute and Memory v1 flavors.
This article covers creating a Cloud Block Storage volume, attaching the volume to a server, and connecting the volume in a Microsoft® Windows® server.
Before you can delete an OnMetal server, you must detach the volume. See Detach and delete Cloud Block Storage volumes for instructions.
Create a new Cloud Block Storage volume
If you don't already have a Cloud Block Storage volume, use the following procedure to create a new a volume by using the Cloud Control Panel.
-
Log in to the Cloud Control Panel.
-
In the top navigation bar, click Select a Product > Rackspace Cloud.
-
Select Storage > Block Storage Volumes.
-
Click Create Volume and fill in the fields.
-
Click Create Volume again.
Attach an existing Cloud Block Storage volume to a server
Use the following procedure to attach a Cloud Block Storage volume to your OnMetal server by using the Cloud Control Panel. The procedure assumes that the server instance already exists.
-
Log in to the Cloud Control Panel.
-
In the top navigation bar, click Select a Product > Rackspace Cloud.
-
Select Storage > Block Storage Volumes.
-
Click the cog beside the volume that you want to attach and select Attach Volume.
-
Select a server from the list and click Attach Volume.
You can attach more than one volume to a server.
A window opens with the following information:
# set initiator name
echo InitiatorName=iqn.2008-10.org.openstack: ae9f0492-d19d-45d3-9eac-6987b07f145a > /etc/iscsi/initiatorname.iscsi
# discover targets for a given portal
iscsiadm -m discovery --type sendtargets --portal 10.190.142.197:3260
# connect to the target
iscsiadm -m node --targetname=iqn.2010-11.com.rackspace: ae9f0492-d19d-45d3-9eac-6987b07f145a --portal 10.190.142.197:3260 –login
From this output, take note of the two
nodevalues that are needed to connect your Cloud Block Storage volume to your Windows OnMetal server: thetargetname(iqn), which is the initiator and the target for your volume, and theportalIP address and port, which are your address. In the preceding example, these nodes have the following values:targetname=iqn.2010-11.com.rackspace: ae9f0492-d19d-45d3-9eac-6987b07f145aportal 10.190.142.197:3260
Connect the volume in Windows
With the preceding information noted, perform the following steps:
-
Log in to the Windows instance as a user with Administrator privileges and open the Services Management console.
-
Select Microsoft iSCSI Initiator Service > Properties.
-
Set the service to start automatically, and then start the service.

-
Next, open the Administrator control panel by selecting Start -> Control Panel -> Administrator Tools.
-
Open the iSCSI initiator, click on the second tab, Discovery, and then click Discover Portal.

A window opens where you can enter the Cloud Block Storage node address.
-
Enter the IP address (the
portalIP address and port, which you noted earlier), and click OK.
The target server appears in the list on the Discovery page.
-
Click the Targets page, and enter the target ICQ (the
targetname, which you noted earlier).
-
In the Target field, enter the target IQN value (the
targetnamevalue, which you noted earlier), starting withiqn. Then click Quick Connect. -
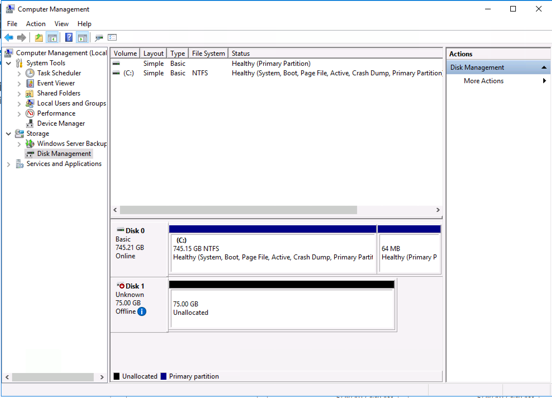
Open the Administrator control panel by selecting Start -> Control Panel -> Administrator Tools, and click Computer Management.
-
Select Storage -> Disk Management to see all of your drives.
Because the Cloud Block Storage volume is attached, a second disk, the target, is listed and can then be prepared and brought online.
Updated over 1 year ago