Migrate a Java web application from Amazon Web Services
Previous section: Provision cloud resources when migrating from Amazon
Web
Services
This article shows you how to migrate an Apache® Tomcat® and
Java™-based Spring web application from Amazon® Web Services®
(AWS) to Rackspace Cloud. This example takes about 30 minutes to complete.
The example uses the Spring PetClinic Sample
Application.
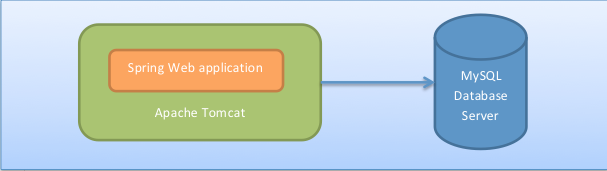
The following figure shows the application's topology:
Prerequisites
The following prerequisites are required to follow the example
in this article:
- An Amazon Elastic Compute Cloud (EC2) instance on AWS with root access
that's running the Spring web application on Apache Tomcat. - A valid and enabled account on Rackspace Cloud.
Preparation
Take the following steps before you attempt to follow the steps in the
exercise:
- Identify the resources that you want to migrate, including application and
database resources. - Create a list of all of the necessary software packages that are
installed on your EC2 instance, other than your Spring application. - Create a list of all additional Amazon servers that the application
uses (for example, Simple Email Server (SES) for email
or Relational Database Service (RDS) for databases). - If you haven't already, create a Cloud Server
instance and any supporting Rackspace Cloud services.
Install software packages
Install the following software packages:
- Oracle® Open Java Development Kit (OpenJDK™)
- Apache Tomcat
- OpenStack® Swift (optional)
Install OpenJDK on the cloud
Complete the following steps to install OpenJDK on the cloud:
-
Using Secure Shell (SSH), connect to the Cloud Servers instance by using
the Rackspace
PublicNet URL and
the root password. -
Enter the root password to log in.
-
Install OpenJDK 7 by entering the following command:
sudo yum install java-1.7.0-openjdk-devel -
Determine the location of
JAVA_HOMEby
entering the following command:ll /etc/alternatives/javaIn the following example output,
JAVA_HOMEis located at
/usr/lib/jvm/jre-1.7.0-openjdk.x86_64:/etc/alternatives/java -> /usr/lib/jvm/jre-1.7.0-openjdk.x86_64/bin/java
Install Tomcat on the Cloud Server
Use the following steps to install Tomcat on the Cloud Server:
-
Right-click the version of Tomcat that you want to use from the Tomcat 7
Software Downloads page and copy
the URL of thetar.gzfile (for example,
https://www.us.apache.org/dist/tomcat/tomcat-7/v7.0.39/bin/apache-tomcat-7.0.39.tar.gz). -
Enter the following commands to change directory to
/usr/share(or the
directory that you want to use) and download the binary file:cd /usr/share sudo wget https://www.us.apache.org/dist/tomcat/tomcat-7/v7.0.39/bin/apache-tomcat-7.0.39.tar.gz -
Change permissions by entering the following command:
sudo chmod 775 apache-tomcat-7.0.39.tar.gz -
Extract the file contents by entering the following command:
sudo tar zxvf apache-tomcat-7.0.39.tar.gz -
After you extract Tomcat, use the following command to remove the
tar.gzfile and free up space:sudo rm apache-tomcat-7.0.39.tar.gz -
Set the environment variables in the
catalina.shfile by entering the
following commands:cd /usr/share/apache-tomcat-7.0.39/bin sudo vi catalina.sh -
Add the following line to the
catalina.shfile immediately after
\#!/bin/sh:JAVA_HOME=/usr/lib/jvm/jre-1.7.0-openjdk.x86_64 -
Save your changes and exit the file.
-
Automate Tomcat startup by entering the following commands:
cd /etc/init.d sudo vi tomcat -
Add the following information to the file. Ensure that
JAVA_HOME,
TOMCAT_HOME,START_TOMCAT, andSTOP_TOMCATrefer to the correct
directories:#!/bin/bash # chkconfig: 234 20 80 # description: Tomcat Server basic start/shutdown script # processname: tomcat JAVA_HOME=/usr/lib/jvm/jre-1.7.0-openjdk.x86_64 export JAVA_HOME TOMCAT_HOME=/usr/share/apache-tomcat-7.0.39/bin START_TOMCAT=/usr/share/apache-tomcat-7.0.39/bin/startup.sh STOP_TOMCAT=/usr/share/apache-tomcat-7.0.39/bin/shutdown.sh start() { echo -n "Starting tomcat: " cd $TOMCAT_HOME ${START_TOMCAT} echo "done." } stop() { echo -n "Shutting down tomcat: " cd $TOMCAT_HOME ${STOP_TOMCAT} echo "done." } case "$1" in start) start ;; stop) stop ;; restart) stop sleep 10 start ;; *) echo "Usage: $0 {start|stop|restart}" esac exit 0 -
Save your changes and exit the file.
-
Set file permissions, set up Tomcat as a system service, and test the
setup by entering the following commands:sudo chmod 755 tomcat sudo /sbin/chkconfig --add tomcat sudo /sbin/chkconfig --level 234 tomcat on sudo /sbin/chkconfig --list tomcatThe output should be similar to the following example:
tomcat 0:off 1:off 2:on 3:on 4:on 5:off 6:off -
Because Tomcat is running on port 8080, you need to ensure that iptables
doesn't interfere with connectivity. -
To test Tomcat, look up the Internet Protocol (IP) address for the Cloud
Server in the Cloud Control Panel and open the URL in a browser
(for example,https://<ipAddress>:8080/). The Apache Tomcat landing page
should appear.Note: You can stop and start Tomcat by using the following commands:
sudo /sbin/service tomcat stop
sudo /sbin/service tomcat start
Install OpenStack Swift (optional)
If you plan to use Cloud Files to transfer your data,
you need to use OpenStack Swift to enable access from your server. Follow the
steps in this section to install and configure OpenStack Swift.
-
Use the following command to install the OpenStack Swift client:
sudo yum install python-novaclient python-glanceclient swift -
Set the necessary environment variables by running the following commands,
substituting your Rackspace Cloud account username and API key:export ST_USER=<yourLoginUsername> export ST_KEY=<yourApiKey> export ST_AUTH=https://identity.api.rackspacecloud.com/v1.0/You might want to define these variables in your
.bashrcor
.bash\_profilefile. If you perform this step, you must reload the file
with the followingsourcecommand, substituting.bash\_profilefor
.bashrcif necessary:source .bashrc -
Type
swift listand ensure that you can see the container that you
created to hold your data.
Back up data from AWS to Rackspace Cloud Files
Retrieve your data from AWS EC2. You can use one of the following methods to
transfer the data:
- Transfer the data directly by using rsync or SSH File Transfer Protocol
(SFTP). - Use the OpenStack Swift client to transfer your data to Cloud Files, and
then transfer the data from Cloud Files to the Cloud Server.
Complete the following preparatory steps to use Cloud Files:
-
Use the following commands to connect to your EC2 instance by using SSH:
ssh -i yourPrivateKey.pem [email protected] -
Perform a database dump by using the following command:
mysqldump -h <rdsHostname> -u <rdsUsername> -p --triggers --routines --databases petclinic | gzip > ~/petclinic.sql.gz -
Use the following command to back up your application and any other
resources that the application needs, including logs and other directories:# Ensure that you have the correct tomcat7 directory sudo tar cvzf ~/tomcat.tar.gz /usr/share/tomcat7/webapps/* -
If you're using Cloud Files to transfer your files, use one of the
following methods to perform the transfer. If you're transferring files
directly by using rsync or SFTP, skip to the final section of this article.-
Enter the following commands to upload your archives to the Cloud
Files container (Tomcatin this example) by using the
Swift client:swift upload Tomcat petclinic.sql.gz swift upload Tomcat tomcat.tar.gz -
Use the following steps to upload your data to Cloud Files through the
Cloud Control Panel:-
From the Select a Product drop-down menu, select Rackspace
Cloud > Storage > Files > containerName to open your container. -
Click Upload Files.
-
Click Browse, select the file or files that you want to
upload, and click Open, Select, or Choose (depending
on the browser and system that you're using). -
Click Upload File.
-
-
Restore data from Cloud Files to Cloud Servers
If you uploaded your data to Cloud Files, use the following steps to transfer
it to your Cloud Server:
-
Using SSH, connect to the Cloud Servers instance by using the PublicNet
URL and the root password. -
Install and configure the Swift command-line interface (CLI) by following
the steps in the "Install software packages" section of this article. -
Ensure that you can execute the
swift listcommand and see the new
container that you created in the results. -
Use the following commands to download the database dump from the backup
that you took in the "Back up data from AWS to Rackspace Cloud Files"
section of this article and restore it locally:swift download Tomcat petclinic.sql.gz gunzip < petclinic.sql.gz | mysql -u <cloudDatabaseUsername> -p -h <cloudDatabaseHostname> -
Use the following commands to stop Tomcat and download and extract the
application files:sudo /sbin/service tomcat stop swift download Tomcat tomcat.tar.gz tar -zxvf tomcat.tar.gz -
Copy the extracted web application contents to the local Tomcat
webappsdirectory and modify the application properties (including
jdbc.url, the database user name, database password, and other
properties). -
In the Spring Framework Petclinic sample, comment out the following files:
petclinic/WEB-INF/classes/db/mysql/initDB.sql petclinic/WEB-INF/classes/db/mysql/populateDB.sql -
Use the following command to restart Tomcat:
sudo /sbin/service tomcat start
Test your application
Access the web application in your browser at
https://<cloudServerIPAddress>:8080/petclinic.
Next step
Post-migration considerations when migrating from Amazon Web
Services
For other migration scenarios, see the following articles:
Updated 4 months ago