Migrate from a POP server to Rackspace Email IMAP using Outlook
POP email typically stores messages locally on a computer and removes them from the mail
server after a client downloads them. In many cases, you can't migrate this data
with our migration tool when it does not exist on your source mail
server. This article walks you through performing a manual migration
of POP data by using Outlook® to a Rackspace Email account via IMAP.
You accomplish this task by adding your new Rackspace Email IMAP account to the
same profile that your POP account is on. This change enables you to move all of
the locally stored email messages to your new Rackspace Email account.
To learn more about the differences between POP and
IMAP, see IMAP and POP mail protocol comparison.
Prerequisites
Before performing the steps, ensure that you have already created mailboxes on
the Rackspace environment and updated the MX records so that email routes correctly to Rackspace.
Change settings
For increased security, we recommend that you use our secure (SSL) servers. If
your internal system configurations require non-SSL ports, those settings are
available in the previously referenced article, IMAP and POP mail protocol comparison.
-
In Outlook, navigate to Account Settings. For example, in Outlook 2013/2016, go to File > Account Settings > Account Settings.
-
To add your IMAP account, click New.
-
Enter your name and email address,
IMAPfor the account type,
secure.emailsrvr.comfor the incoming and outgoing mail servers, and
your user name and password.
-
Select the Remember Password check box if you don't want to type your
password each time you launch Outlook. -
Click More Settings.
-
Click the Outgoing Server tab.
-
Select the My Outgoing Server (SMTP) Requires Authentication check box.
-
Leave the default setting, Use Same Settings as My Incoming Mail Server.
-
Click the Advanced tab.
-
Set the incoming port to
993and the outgoing port to465, and
enable SSL encryption.
-
Navigate to your Inbox. Your new IMAP account link displays in the
left folder pane. Click on the account to expand the folders. You should see
mail items for that account start to appear.
-
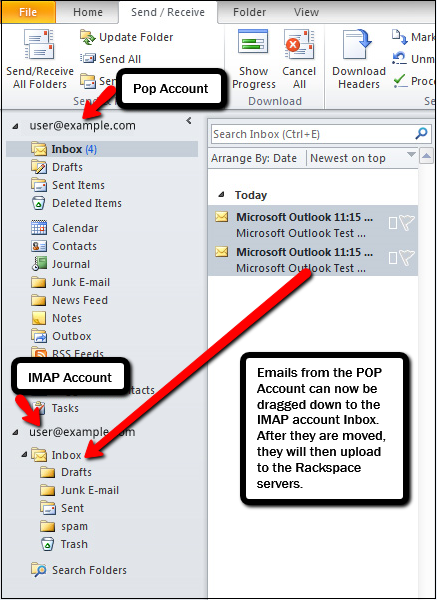
Now that you have added your Rackspace account via IMAP, you can
drag emails from your POP inbox to your IMAP inbox. As items start moving
over, those emails automatically upload to our server and are
visible across all of your devices connected via IMAP to that account.NOTE: Depending on the number of emails in your POP account, this
process can take a while. You can also consider moving emails over in
batches by selecting groups of email messages. After you've confirmed that
all emails have moved to the new account, you can remove the configuration
for the POP account because you no longer need it.
After the change, your email looks similar to the following screenshot.
Updated over 1 year ago