
Configure multi-factor authentication
- Set up multi-factor authentication by mobile phone
- Set up multi-factor authentication by OTP device
- Authenticate from a multifactor-enabled user account
- Add multi-factor authentication enforcement policy
- Manage multifactor-enabled accounts
To improve security, customers can configure Rackspace Cloud accounts to support multi-factor authentication which requires users to authenticate in two steps:
- Submit an initial POST tokens request to the Identity service endpoint, with username and password credentials.
The response body returned by the Identity service includes a session ID header and a request for additional credentials.
- Submit a second POST tokens request that includes the session ID header and a passcode retrieved from a device associated with the user’s account.
If the credentials are valid, the Identity service returns an authentication token and service catalog that includes the API service endpoints available to the user.
The following figure shows the multi-factor authentication process work flow.
Figure: Multi-factor authentication process flow
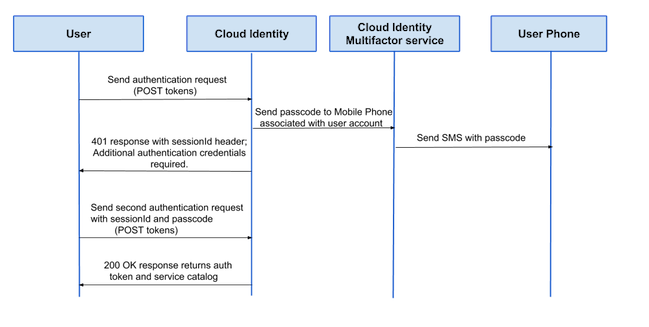
Multi-factor authentication process flow
To enable multi-factor authentication, users must update the account settings to add and verify a device that can be used to supply the multi-factor authentication passcode. You can configure account settings from the Cloud Control panel , or by using the Identity service API.
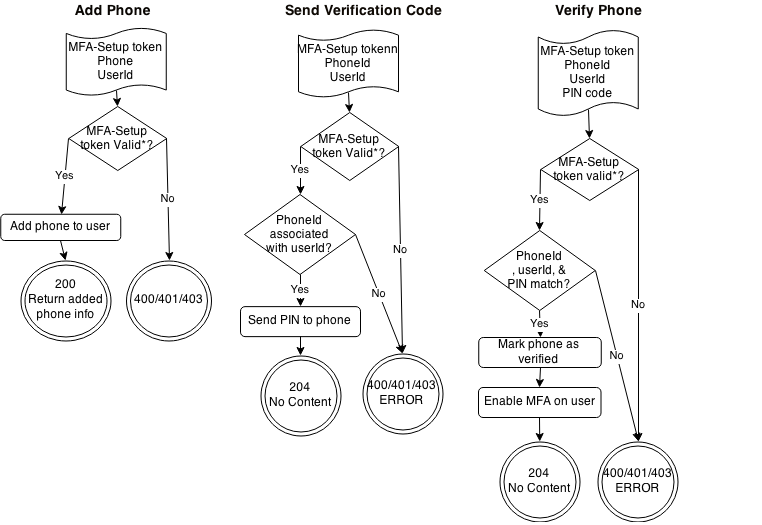
The following figure shows the work flow to set up multi-factor authentication on an account.
Figure: Multi-factor authentication user account set up work flow
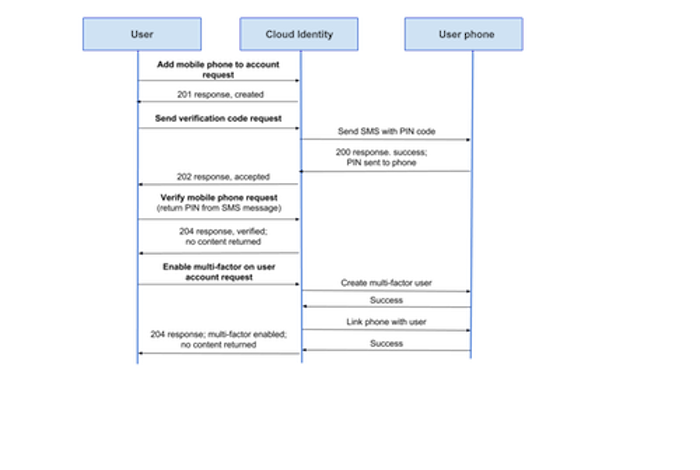
Multi-factor authentication user account set up work flow
Additionally, Identity and user administrators can define multi-factor authentication policy for a domain by configuring the domain enforcement setting. For example, if the domain enforcement setting is Required, users who have not set up multi-factor authentication are required to enable it before they can access their account.
Set up multi-factor authentication by mobile phone
Use these instructions to add a mobile phone to a Rackspace Cloud account and configure it for multi-factor authentication by using the Identity service API. You can also complete this process through the Cloud Control panel.
Note
- Multi-factor authentication applies only to username and password credentials. You cannot use it to secure username and API key credentials.
- Users with a multi-factor authenticated account can only use OpenStack or Rackspace CLI tools that support username and API key authentication or token authentication, like the Nova client.
For token authentication, submit an authentication request. Then, export the returned token to the CLI environment variable, OS_TOKEN or OS_AUTH_TOKEN for example. After you set the token, you can submit API requests by using the CLI.- When multi-factor is enabled on an account, any existing tokens for that user are immediately revoked.
- Multi-factor authentication requires the Identity service, version 2.0 or later. User accounts that have been configured for multi-factor authentication cannot authenticate using Identity API version 1.1 or earlier.
- If the authentication response returns a 403 Forbidden error message with a request to setup multi-factor authentication, your account has been restricted. To regain access, submit a request for a multi-factor scoped authentication token that you can use to set up your account.
-
Authenticate to the Identity service to obtain an authentication token.
Request
$ curl <https://identity.api.rackspacecloud.com/v2.0/tokens>
       -X POST
       -H "Accept: application/json"
       -d '{"auth": {"passwordCredentials": {"username":"jqsmith", "password":"Password1"}}}'
       -H "Content-Type: application/json"
Response
The Identity service returns a 200 response code that includes the authentication token ID.
< HTTP/1.1 200 OK < Vary: Accept, Accept-Encoding, X-Auth-Token < Content-Type: application/json < Content-Length: 375 < Server: Jetty(6.1.25) < { "access": { "serviceCatalog": [], "token": { "RAX-AUTH:authenticatedBy": [ "PASSWORD" ], "expires": "2013-12-17T22:47:04.253-06:00", "id": "xxxxxxxxxxxxxxxxxxx" }, "user": { "RAX-AUTH:defaultRegion": "IAD", "RAX-AUTH:federated": false, "id": "a64ee2047fc14cc7bc977caa3cfff35f", "name": "jqsmith", "roles": [ { "description": "User Admin Role.", "id": "3", "name": "identity:user-admin" } ] } } } -
Add a mobile phone to your account.
Request$ curl $AUTH_URL/v2.0/users/$USER_ID/RAX-AUTH/multi-factor/mobile-phones -X POST -H "Content-Type: application/json" -H "X-Auth-Token: $AUTH_TOKEN" -d '{"RAX-AUTH:mobilePhone": { "number": "+1 512-555-1000" }}' | python -m json.toolNoteSpecify the phone number in E.123 notation, for example:
+1 235 435 6234or+44 42 1123 4567.Response
The Identity service returns a 201 response that includes the
system-generated phone ID.< HTTP/1.1 201 Created < Vary: Accept, Accept-Encoding, X-Auth-Token < Location: <http://localhost:8083/idm/cloud/v2.0/users/a64ee2047fc14cc7bc977caa3cfff35f/RAX-AUTH/multi-factor/mobile-phones/889a7245f49e4ab789ebaebf91c0f1eb> < Content-Type: application/json < Content-Length: 93 < Server: Jetty(6.1.25) < { "RAX-AUTH:mobilePhone": { "id": "1234321245f49e4ab789ebaebf91c0f1eb", "number": "+1 512-555-0100" } }TipExport the phone
idvalue to an environment variable, so you can use it to complete the phone verification process.
$ EXPORT PHONE_ID=""1234321245f49e4ab789ebaebf91c0f1eb" -
Send a verification code to your phone to confirm that you possess the phone associated with your account.
Include the phone id value (or the $PHONE_ID environment variable that you exported) from the add mobile phone operation response in the API request.
Request
$ curl $AUTH_URL/v2.0/users/$USER_ID/RAX-AUTH/multi-factor/mobile-phones/$PHONE_ID/verificationcode
     -X POST
     -H "Content-Type: application/json"
     -H "Accept: application/json"
     -H "X-Auth-Token: $AUTH_TOKEN"
     | python -m json.tool
Response
Identity service returns a 201 response and sends a message like this to the designated phone number:
To verify this mobile device for your Rackspace profile used for multi-factor authentication enter the PIN 1732.
-
Return the verification PIN code to complete the phone verification process.
Response
 $ curl $AUTH_URL/v2.0/users/$USER_ID/RAX-AUTH/multi-factor/mobile-phones/$PHONE_ID/verify
     -X POST
     -H "Content-Type: application/json"
     -H "Accept: application/json"
     -d '{"RAX-AUTH:verificationCode": { "code": "1732" }}'
     -H "X-Auth-Token: $AUTH_TOKEN"
     | python -m json.tool
Response
The Identity service returns a 202 response.
< HTTP/1.1 202 Accepted < Vary: Accept, Accept-Encoding, X-Auth-Token < Content-Type: application/json < Server: Jetty(6.1.25) -
Update your account to enable multi-factor authentication support.
Request
$ curl $AUTH_URL/v2.0/users/$USER_ID/RAX-AUTH/multi-factor
    -X PUT
    -H "Content-Type: application/json"
    -H "Accept: application/json"
    -d '{"RAX-AUTH:multiFactor": {"enabled": true }}'
    -H "X-Auth-Token: $AUTH_TOKEN"
    | python -m json.tool
Response
The Identity service returns a 204 response.
< HTTP/1.1 204 No Content
< Vary:  Accept, Accept-Encoding, X-Auth-Token
< Content-Type: application/json
< Server: Jetty(6.1.25)
After you set up and enable multi-factor authentication, follow the steps to Authenticate from a multifactor-enabled user account.
Set up multi-factor authentication by OTP device
Use these instructions to configure a Rackspace Cloud account for multi-factor authentication by using an OTP (one-time password) device.
During the set up process, use the QR code generated by the Rackspace Identity service to register the OTP device with a mobile passcode application. If you don’t have an application available, download and install one of these:
Run the following sequence of API operations to create, enable, and use an OTP device for multi-factor authentication.
-
Authenticate to the Identity service.
NoteIf you have multi-factor authentication configured on your account, follow the multi-factor authentication process to get the authentication token.
Request
$ curl <https://identity.api.rackspacecloud.com/v2.0/tokens>
      -X POST
      -H "Accept: application/json"
      -d '{"auth": {"passwordCredentials": {"username":"jqsmith", "password":"Password1"}}}'
      -H "Content-Type: application/json"
The Identity service returns a 200 response that includes the authentication token ID.
Response
< HTTP/1.1 200 OK < Vary: Accept, Accept-Encoding, X-Auth-Token < Content-Type: application/json < Content-Length: 375 < Server: Jetty(6.1.25) < { "access": { "serviceCatalog": [], "token": { "RAX-AUTH:authenticatedBy": [ "PASSWORD" ], "expires": "YYYY-MM-DDT22:47:04.253-06:00", "id": "xxxxxxxxxxxxxxxxxxx" }, "user": { "RAX-AUTH:defaultRegion": "IAD", "RAX-AUTH:federated": false, "id": "123452047fc14cc7bc977caa3cfff35f", "name": "jqsmith", "roles": [ { "description": "User Admin Role.", "id": "3", "name": "identity:user-admin" } ] } } } -
Export the authentication token to an environment variables for use in subsequent operations.
$ EXPORT AUTH_TOKEN="9b830c07c29f4d17a7e53d2341302218" -
Add an OTP device to your account.
 $ curl $AUTH_URL/v2.0/users/$USER_ID/RAX-AUTH/multi-factor/otp-devices
      -X POST
      -H "Content-Type: application/json"
      -H "X-Auth-Token: $AUTH_TOKEN"
      -d '{"RAX-AUTH:otpDevice": { "name": "NewOTPDevice" }}'
      | python -m json.tool
The Identity service returns a 201 response that includes a system-generated device ID and a QR code that you can use to add the device to the mobile passcode application.
< HTTP/1.1 201 Created < Vary: Accept, Accept-Encoding, X-Auth-Token < Location: <http://identity.api.rackspacecloud.com/cloud/v2.0/users/92bb036af5b0467198cded345597f6b4/RAX-AUTH/multi-factor/otp-devices/922e1bc14a0f4c9d94b2f26032312345> < Content-Type: application/json < Content-Length: 93 < Server: Jetty(6.1.25) < { "RAX-AUTH:otpDevice": { "id": "94a1edf3bbe24cbc959512d46c112345", "keyUri": "otpauth://totp/Rackspace:myMobilePhone%20OTP1%20otp2?secret=SEIMNMGTH44S3ECHINDPU6OO7Y5IMJZM&issuer=Rackspace", "name": "myMobilePhone OTPdevice", "qrcode": "data:image/png;base64,iVBORw0KGgoAAAANSUhEUgAAAoAAAAKAAQAAAAAktvSOAAADPUlEQVR42u3dQXLqMAwAULPiGByVHjXHYIV/hyaO5MSt6XT157HpQMljp4lkSSn1j18FCAQCgUAgEAgEAoFAIBAI/M/BR9lfl9cnH5fXh/f1f+u7Z7l+/e/1lXDRDQgEAufA7ZMv6bZdVBuR3RK+Ei8HAoHAH8GPcvK1jS+f7tIiVQPbrwCBQOAvwBCpSnmFrz201U/3foxpQCAQ+AvwdVEiMv+RsjcgEAh8D4yp2Zp+xSzssReJ6vu5HhAIBJ6UnWNO9t2f6To2EAgEDk7Gl3Zf1L4d6s1r+HrnjB4IBAJz+GpBab1ZKpfuipahrfWgVhYCAoHAKfAWasrxnql0764hGVslIBAInAbrfl+015RrCFF1LwQt6Z5pv4MCAoHASfC0Abn1IV+/zrrCu/UcrAKBQOBb4HZ0VbqA9dgLQeUSo9h+zg4EAoGT4DpjFYYfthmIEn+lhNSsbDdSqaMQCAQCfwDPT8j70k9O4lr1uYz7D4FAIPDkZukaMq3UEpgHr/aB8woEAoFvg93UQ25HTmXn0spCoXkQCAQCZ8HWuRPbcp5du2AoEm2p2WXQfwgEAoGjQtAjjVP15+zxkCtOY31TdgYCgcBjIag+97pObheM116P/YXDuVEgEAg8ZlJLGn5YBqlZOOvqMzQgEAicAmvoNT4eqceSdLut2r9yPgoBBAKBp/02keh3Gm8RLi/ySn+AQCBwAqxdGFq6EFXT3Hl97gfsZZSaAYFA4GB3333g9onaEk63ZkYhgEAg8GSFxcmcQ5+a3Y6tyt/sxAACgcBDapY2kN5zV0+IYv3DZca5HhAIBA7B2BlYDk92yDu77nmEAggEAqfBPOdQu0OupaVm/a5SIBAInATzK2wZzXGrO2dPGRoQCAROgP0jY/KW0RIejpeHJh6j1aNAIBA4XJhT20X12CeYN3j1uVwd330BgUDg4ZArzFj1T2+o9SSmlZN9XkAgEPgWWNIKi3KWmpWwrOvn8AUEAoGD8FXbCVZrQC7dg8UPZSEgEAicAWso9tzC6tHH/iyqvFY9DpwDgUDgJJjLznn3Vtw5WrpNFsPwBQQCgYMZ8D95AYFAIBAIBAKBQCAQCAQCgf8r+A/urJ6oeL", "verified": false } } -
Export
idandqrcodeto environment variables for use in subsequent operations.$ EXPORT DEVICE_ID="94a1edf3bbe24cbc959512d46c112345 $ EXPORT qrcode="data:image/png;base64,iVBORw0KGgoAAAANSUhEUgAAAoAAAAKAAQAAAAAktvSOAAADPUlEQVR42u3dQXLqMAwAULPiGByVHjXHYIV/hyaO5MSt6XT157HpQMljp4lkSSn1j18FCAQCgUAgEAgEAoFAIBAI/M/BR9lfl9cnH5fXh/f1f+u7Z7l+/e/1lXDRDQgEAufA7ZMv6bZdVBuR3RK+Ei8HAoHAH8GPcvK1jS+f7tIiVQPbrwCBQOAvwBCpSnmFrz201U/3foxpQCAQ+AvwdVEiMv+RsjcgEAh8D4yp2Zp+xSzssReJ6vu5HhAIBJ6UnWNO9t2f6To2EAgEDk7Gl3Zf1L4d6s1r+HrnjB4IBAJz+GpBab1ZKpfuipahrfWgVhYCAoHAKfAWasrxnql0764hGVslIBAInAbrfl+015RrCFF1LwQt6Z5pv4MCAoHASfC0Abn1IV+/zrrCu/UcrAKBQOBb4HZ0VbqA9dgLQeUSo9h+zg4EAoGT4DpjFYYfthmIEn+lhNSsbDdSqaMQCAQCfwDPT8j70k9O4lr1uYz7D4FAIPDkZukaMq3UEpgHr/aB8woEAoFvg93UQ25HTmXn0spCoXkQCAQCZ8HWuRPbcp5du2AoEm2p2WXQfwgEAoGjQtAjjVP15+zxkCtOY31TdgYCgcBjIag+97pObheM116P/YXDuVEgEAg8ZlJLGn5YBqlZOOvqMzQgEAicAmvoNT4eqceSdLut2r9yPgoBBAKBp/02keh3Gm8RLi/ySn+AQCBwAqxdGFq6EFXT3Hl97gfsZZSaAYFA4GB3333g9onaEk63ZkYhgEAg8GSFxcmcQ5+a3Y6tyt/sxAACgcBDapY2kN5zV0+IYv3DZca5HhAIBA7B2BlYDk92yDu77nmEAggEAqfBPOdQu0OupaVm/a5SIBAInATzK2wZzXGrO2dPGRoQCAROgP0jY/KW0RIejpeHJh6j1aNAIBA4XJhT20X12CeYN3j1uVwd330BgUDg4ZArzFj1T2+ourJ6oeLlkhwAAAABJRU5ErkJggg==" -
Add the QR code to the mobile passcode application by manually copying and pasting the
qrcodevalue.
For mobile passcode applications installed on a mobile phone, you can scan the QR code image into the application. To use this method, create a file with the following html code<html> <img alt="QR Code" src="$qrcode"/> </html>Replace the
$qrcodevariable with the value that you exported from the response to the create device API request.
Then, open the page in a browser window, and use the scan feature in the mobile passcode application to confirm the pairing of the OTP device and the mobile passcode generator.This example shows an OTP device added to the Google Authenticator application on a mobile phone.
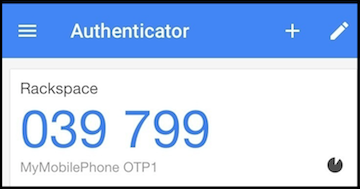
Rackspace Cloud OTP device configured in the Google Authenticator application
-
To verify the device, send the passcode generated by mobile passcode application to the OTP device.
$ curl identity.api.rackspacecloud.com/v2.0/users/$USER\_ID/RAX-AUTH/multi-factor/otp-devices/$DEVICE\_ID/verify
                -X POST
                -d '{"RAX-AUTH:verificationCode": { "code": "$MOBILE_PASSCODE" }}'
                -H "Content-type: application/json"
                -H "X-Auth-Token: $TOKEN" -| python -m json.tool
The Identity service returns a 204 response.
HTTP/1.1 204 No ContentIf you provide an invalid or expired passcode, the Identity service returns an error message.
400 The PIN provided is either invalid or expired/. To fix the problem, wait for the passcode in the mobile passcode application to refresh, then resubmit the verify request. -
Check account information and turn on multi-factor authentication if necessary.
$ curl $AUTH_URL/v2.0/users/$USER_ID
       -X GET
       -H "Content-Type: application/json"
       -H "Accept: application/json"
       -H "X-Auth-Token: $AUTH_TOKEN"
       | python -m json.tool
The Identity service returns the user account information.
< HTTP/1.1 200 OK
< Vary:  Accept, Accept-Encoding, X-Auth-Token
< Content-Type: application/json
< Content-Length: 375
< Server: Jetty(6.1.25)

"user":  {
    "rax-auth:domainId":"5830280"
    "id": "123456",
    "enabled": true,
    "username": "jqsmith",
    "email": "[email protected]",
    "rax-auth:defaultRegion":"DFW"
}
If the
rax-auth:multiFactorEnabledattribute is missing or set tofalse, update the account to enable it.$ curl $AUTH_URL/v2.0/users/$USER_ID/RAX-AUTH/multi-factor -X PUT -H "Content-Type: application/json" -H "Accept: application/json" -d '{"RAX-AUTH:multiFactor": {"enabled": true }}' -H "X-Auth-Token: $AUTH_TOKEN" | python -m json.tool -
Update the multi-factor authentication settings to use the OTP device for authentication.
$ curl identity.api.rackspacecloud.com/v2.0/users/$USER_ID/RAX-AUTH/multi-factor
     -X PUT
     -H "Content-Type: application/json"
     -H "Accept: application/json"
     -d '{"RAX-AUTH:multiFactor": {"factorType": "OTP" }}'
     -H "X-Auth-Token: $AUTH_TOKEN"
     | python -m json.tool
The Identity service returns a 204 response if the operation is successful.
HTTP/1.1 204 No ContentAfter you change the multi-factor authentication method, authenticate again to get a new token.
-
Submit an authentication request with username and passcode credentials.
$ curl identity.api.rackspacecloud.com/v2.0
     -X POST
     -H "Content-Type: application/json"
     -H "Accept: application/json"
     -d  '{"auth": {"passwordCredentials": {"username": "$USERNAME","password":"$PASSWORD"}}}'
     | python -m json.tool
The Identity service returns a 401 response with a
sessionIdheader and a message requesting additional credentials.< HTTP/1.1 401 Unauthorized < Content-Type: application/json < Transfer-Encoding: chunked < WWW-Authenticate: OS-MF sessionId='ABCDEtwrk4kUsZbPhiXrAD1uMR8B3fsTV6axb6XuddCRl1xsopPla6tSofC0wqWTuc39GzdeDnEUX9xTRM\_QA\_oYBaN2W9C782YY4-iyQUgqbCFrWbC5ezeEoDVWpWNyR6PARZJQsd7J5QktDQzB7zIwwFvwJVciFEb8kscU87-LNr-u8h7NwtYp30fqNLCZznPtbGWkGC2Pm', factor='PASSCODE' < X-NewRelic-App-Data: PxQDVVVTDAATV1BXBAACVUYdFGQHBDcQUQxLA1tMXV1dORYzVBJHNQFUZAQUFVFQVThOFlhaUggXER5jLTU3SxJOCEwIFAQcA1QLUwVNHlNIFAZZUgZaVlVUUAADUFYFVgYUbg==' < vary: Accept, Accept-Encoding, X-Auth-Token { "unauthorized": { "code": 401, "message": "Additional authentication credentials required" } } -
Submit a second authentication request with
sessionIdandpasscodecredentials.- Export the
sessionIdfrom the header in the initial authentication response.
$EXPORT SESSION_ID="AABCDEtwrk4kUsZbPhiXrAD1uMR8B3fsTV6axb6XuddCRl1xsopPla6tSofC0wqWTuc39GzdeDnEUX9xTRM\_QA_oYBaN2W9C782YY4iyQUgqbCFrWbC5ezeEoDVWpWNyR6PARZJQsd7J5QktDQzB7zIwwFvwJVciFEb8kscU87-LNr-u8h7NwtYp30fqNLCZznPtbGWkGC2Pm"- Include the session ID header and passcode from the mobile passcode application in the authentication request.
 $ curl identity.api.rackspacecloud.com/v2.0/tokens
       -X POST
       -H "Content-Type: application/json"
       -H "Accept: application/json"
       -d '{"auth": {"RAX-AUTH:passcodeCredentials": {"passcode":"$MOBILE_PASSCODE"}}}'
       -H "X-SessionId: $SESSION_ID"
       -H "X-Auth-Token: $AUTH_TOKEN"
       | python -m json.tool
In the authentication response, the token authentication method is
OTPPASSCODE.< HTTP/1.1 200 OK < Vary: Accept, Accept-Encoding, X-Auth-Token < Content-Type: application/json < Content-Length: 375 < Server: Jetty(6.1.25) < { "access": { "serviceCatalog": [], "token": { "RAX-AUTH:authenticatedBy": [ "OTPPASSCODE", "PASSWORD" ], "expires": "2015-04-04T14:17:51.918Z", "id": "$TOKEN", "tenant": { "id": "2014073001", "name": "2014073001" } }, "user": { "RAX-AUTH:defaultRegion": "IAD", "id": "xxxxxxxxxxxxxxxxxxx", "name": "jqsmith", "roles": [ { "description": "A Role that allows a user access to keystone Service methods", "id": "684", "name": "compute:default", "tenantId": "2014073001" }, { "description": "A Role that allows a user access to keystone Service methods", "id": "5", "name": "object-store:default", "tenantId": "StagingUS_2014073001" }, { "description": "User Admin Role.", "id": "3", "name": "identity:user-admin" } ] } }For more information, see the following topics:
- Export the
Authenticate from a multifactor-enabled user account
Use these instructions to authenticate to a Rackspace Cloud account that requires multi-factor authentication.
Prerequisites
- Valid username and password credentials for a Rackspace Cloud account that has been Set up multi-factor authentication by mobile phone.
- Access to the phone associated with the Rackspace Cloud account.
TipIf your account requires multi-factor authentication, make sure to generate bypass codes that you can use to authenticate if you do not have the phone associated with your account.
-
Send a POST tokens authentication request to the Identity service with your username and password:
$ curl <https://identity.api.rackspacecloud.com/v2.0/tokens> -X POST -d '{"auth":{"passwordCredentials":{"username":"myUserName","password":"thePassword"}}}' -H "Content-type: application/json" --verbose | python -m json.tool -
Retrieve the multi-factor authentication values generated by the Identity service.
- In the API response to the initial authentication request, locate the session ID value in the
WWW-Authenticateheader parameter:
< HTTP/1.1 401 Unauthorized < Server: Apache-Coyote/1.1 < vary: Accept, Accept-Encoding, X-Auth-Token < WWW-Authenticate: OS-MF sessionId='APU9ymMBWY5W-pTgnHuZEvjKsM5oG\_ler4lC0g\_EkCPYvPdUBHK55RWtsgpL5RZ22AyDNaVCNCz6mlDOwbJAI-RLFQywI7CgOvjH0MLhL5a6D-c4cd1x8BbZmy8uT8ejm7jzBUX_vDZ5R0Hcia5DkOB80yWNJ8XVKMxVYLg5Qwp0TPA2zx-HQOTM3xqVQE63u1mYDUqikrXQ', factor='PASSCODE' < Content-Type: application/json { "unauthorized": { "code": 401, "message": "Additional authentication credentials required." } }- Get the multi-factor authentication passcode value from the SMS message sent to the phone associated with the account.
Example: SMS message with passcode
Rackspace SMS passcodes (will expire in 10 minutes): 1411594 - In the API response to the initial authentication request, locate the session ID value in the
-
Send a second authentication request that includes the multi-factor authentication credentials:
sessionIdandpasscode.cURL POST token request with multi-factor authentication credentials
$ curl <https://identity.api.rackspacecloud.com/v2.0/tokens>
    -X POST
    -d '{"auth": {"RAX-AUTH:passcodeCredentials": {"passcode":"1411594"}}}'
    -H "X-SessionId: $SESSION_ID"
    -H "Content-Type: application/json" --verbose | python -m json.tool
The authentication response returns the authentication token ID and the service catalog with a list of available services. Note that the information returned in the RAX-AUTH:authenticated By object shows authentication by both passcode and password.
 < HTTP/1.1 200 OK
 < Vary:  Accept, Accept-Encoding, X-Auth-Token
 < Content-Type: application/json
 < Content-Length: 375
 < Server: Jetty(6.1.25)
 <
 {
     "access": {
         "serviceCatalog": [],
         "token": {
             "RAX-AUTH:authenticatedBy": [
                 "PASSCODE",
                 "PASSWORD"
             ],
             "expires": "2014-01-09T15:08:53.645-06:00",
             "id": "xxxxxxxxxxxxxxxxxxxxxxxxxxxxxxxxxxx"
         },
         "user": {
             "RAX-AUTH:defaultRegion": "IAD",
             "RAX-AUTH:federated": false,
             "RAX-AUTH:multiFactorEnabled": true,
             "id": "a64ee2047fc14cc7bc977caa3cfff35f",
             "name": "myUserName",
             "roles": [
                 {
                     "description": "User Admin Role.",
                     "id": "3",
                     "name": "identity:user-admin"
                 }
             ]
         }
     }
 }
After you authenticate successfully, use the information in the response to submit requests to Rackspace Cloud API services. For additional information, see the following topics:
Add multi-factor authentication enforcement policy
- Update user-level enforcement policy for multi-factor authentication
- Request to set up multi-factor authentication on a user account
Rackspace Cloud account administrators can configure enforcement settings for multi-factor authentication across a domain and customize them at the user level.
ImportantTo configure domain-level enforcement, your Administrator account must be configured to use multi-factor authentication by using a mobile phone or a one-time password device.
To set domain level enforcement, use the update domain settings for multi-factor authentication API operation to enforce multi-factor authentication requirements for all user accounts within a specified domain.
- Set the enforcement level to REQUIRED to make multi-factor authentication mandatory for accounts within a specified domain.
- Set the enforcement level to OPTIONAL to make multi-factor authentication optional for all users.
- Set the enforcement level to RACKSPACE_MANDATED to make multi-factor authentication mandatory for accounts within a specified domain.
Administrators can update the domain-level enforcement setting from the API or the Cloud Control Panel. The following figure shows the API work flow for updating domain enforcement settings.
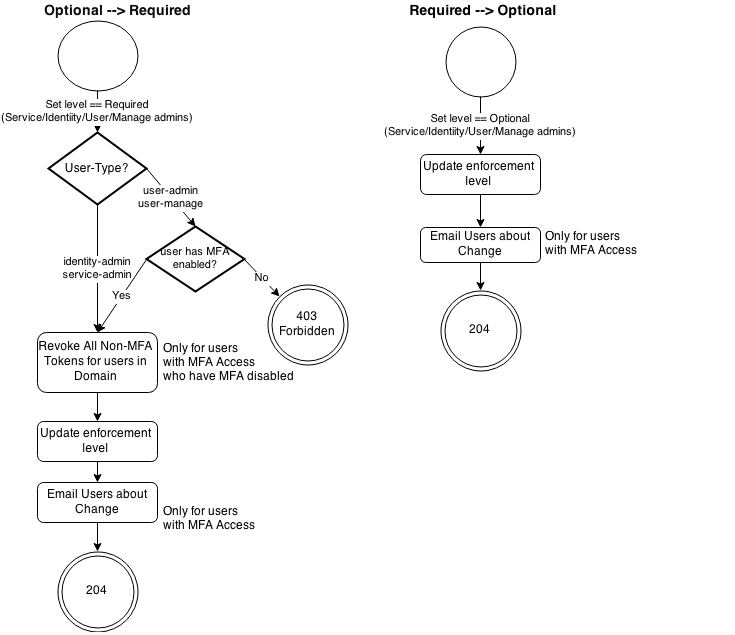
Figure: API workflow for domain-level enforcement policy for multi-factor authentication
The following example shows the API request to update domain enforcement settings for a domain. The example assumes the following credentials and account information: an authenticated user administrator with a valid admin token ($ADMIN_TOKEN) and the ID of the domain ($DOMAIN_ID) to update. Use the List domains operation to retrieve the domain ID.
Example: Update domain to require multi-factor authentication for all users: cURL JSON request
$ curl -X -i PUT <https://identity.api.rackspacecloud.com/v2.0/RAX-AUTH/domains/$DOMAIN_ID/multi-factor>
   -d '{"RAX-AUTH:multiFactorDomain": {"domainMultiFactorEnforcementLevel": "REQUIRED" }}'
   -H "Content-type: application/json"
   -H "X-Auth-Token: $ADMIN_TOKEN" | python -m json.tool
Successful requests return a HTTP 204 No Content message. To verify the change, submit a GET domain by id request, as shown in the following example.
Example: Verify domain settings after update: cURL JSON request and response
$ curl -X -i GET identity.api.rackspacecloud.com/v2.0/RAX-AUTH/domains/$DOMAIN_ID
   -H "Content-type: application/json"
   -H "X-Auth-Token: $ADMIN_AUTH_TOKEN" --verbose | python -m json tool

GET /v2.0/RAX-AUTH/domains//1234567 HTTP/1.1
Host: identity.api.rackspacecloud.com
Accept: _/_
Content-type: application/json
X-Auth-Token: 12365424dd864ab287a90f06a2069e81

HTTP/1.1 200 OK
Content-Type: application/json

{
  "RAX-AUTH:domain": {
     "domainMultiFactorEnforcementLevel": "REQUIRED",
     "enabled": true,
     "id": "6159798"
  }
}
As soon as the domain enforcement level changes to REQUIRED or RACKSPACE_MANDATED, the Identity service revokes all tokens that were not obtained by using the multi-factor authentication flow. To regain account access, users who have not enabled multi-factor authentication can request a scoped mfa-setup token that they can use to add multi-factor authentication to their account.
Next steps
- Request a scoped mfa-setup token to set up
multi-factor authentication - Log in to a multi-factor enabled user account
- Customize multi-factor authentication enforcement settings for specific users
Update user-level enforcement policy for multi-factor authentication
Identity and user administrators can customize the multi-factor enforcement level for specific users by using the update multi-factor authentication settings operation.
- Set the enforcement level to
REQUIREDto require multi-factor authentication on the account regardless of the domain level enforcement setting. - Set the enforcement level to
OPTIONALto allow the user to select or opt out of multi-factor authentication. - Set the enforcement level to
DEFAULTto allow the user account to inherit the domain level enforcement setting.
Administrators can update the user-level enforcement setting from the API or the Cloud Control Panel. The following figure shows the API work flow for updating the user enforcement setting with state transitions.
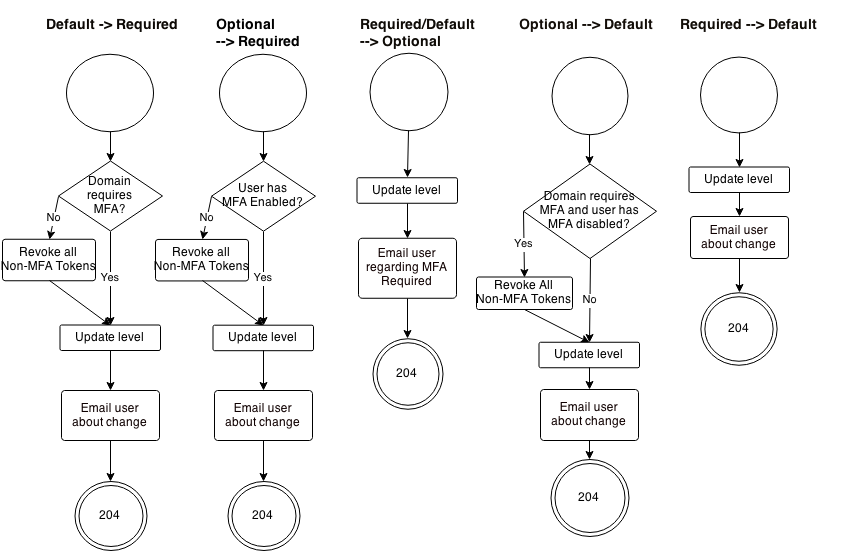
Figure: Workflow to set up a user account for multi-factor authentication
The following example assumes the following accounts and credentials: an authenticated User Administrator account with a valid authentication token and a user account within the same domain.
Example: Require user to log in by using multi-factor authentication: cURL JSON request and response
$ curl -X PUT <https://identity.api.rackspacecloud.com/v2.0/users/$USER_ID/RAX-AUTH/multi-factor>
       -d `{"RAX-AUTH:multiFactor": { "userMultiFactorEnforcementLevel": "REQUIRED" }}`
       -H "Content-type: application/json"
       -H "X-Auth-Token: $ADMIN_AUTH_TOKEN" --verbose | json

HTTP/1.1 204 No Content
Vary:  Accept, Accept-Encoding, X-Auth-Token
As soon as the user-level enforcement level changes to REQUIRED or if the value changes to DEFAULT and the domain-level enforcement setting is REQUIRED or RACKSPACE_MANDATED, the Identity service revokes all tokens for the user that were not obtained by using the multi-factor authentication process. Also, if the user wants to regain account access, users can request for a scoped mfa-setup token that they can use to update their account configuration.
The account user must submit another authentication request to retrieve a scoped authentication token that allows access to the Identity service to set up multi-factor authentication on the user account.
Request to set up multi-factor authentication on a user account
If a Rackspace Cloud account requires multi-factor authentication, users who have not set up and enabled multi-factor authentication get the following response when they authenticate:
HTTP/1.1 403 Forbidden
     Vary:  Accept, Accept-Encoding, X-Auth-Token
     Content-Type: application/json
    {
      "forbidden": {
      "code": 403,
      "message": "User must setup multi-factor"
       }
    }
To get account access, the user must request a scoped MFA-SETUP token that provides limited access to the Identity service for account configuration.
Example: User authentication request for a scoped mfa-setup token: cURL JSON request and response
$ curl -X POST $AUTH_URL/v2.0/tokens
      -d '{"auth": {"RAX-AUTH:scope": "SETUP-MFA", "passwordCredentials": {"username":"'$USER\_ADMIN\_USERNAME'", "password":"'$PWD'"}}}'
      -H "Content-type: application/json" --verbose | python -m json.tool
HTTP/1.1 200 OKVary: Accept, Accept-Encoding, X-Auth-Token
Content-Type: application/json
Transfer-Encoding: chunked
Server: Jetty(6.1.25)
{
"access": {
"token": {
"RAX-AUTH:authenticatedBy": [
"PASSWORD"
],
"expires": "2014-01-09T15:08:53.645-06:00",
"id": "449f04aca3594ce38e5b0b18fce6b"
}
"user": {
"RAX-AUTH:defaultRegion": "DFW",
"id": "161418",
"name": "mfaTestUser",
"roles": [
{
"description": "User Admin Role.",
"id": "3",
"name": "identity:user-admin"
}
]
}}}Note that the service catalog is not returned in the response. The MFA-SETUP token in the response provides users with limited access to their account so that they can set up multi-factor authentication. The following figure shows the permissions available to a user that authenticates using the scoped mfa-setup token.
Figure: Permissions available with a scoped mfa-setup token
After receiving the scoped mfa-setup token, users can export it to an environment variable as shown in the following example, and use it to configure their account for multi-factor authentication via mobile phone.
Example: Export scoped token
$ export MFA_SETUP_TOKEN="449f04aca3594ce38e5b0b18fce6b"As soon as the user has added a multi-factor authentication device to their account, the scoped mfa-setup token is revoked, and the user can follow the multi-factor authentication process to log in.
Manage multifactor-enabled accounts
Users and administrators can complete the following tasks to manage accounts that use multi-factor authentication.
- Unlock user account
- Recover account
- Generate bypass codes
- Check multi-factor status on user account
- List multifactor-enabled devices by user id
- Disable multi-factor authentication on a user account
- Remove multi-factor authentication from user account
ImportantMulti-factor authentication is supported only by Rackspace Cloud Identity service version 2.0 or later. After an account is enabled for multi-factor authentication, the user cannot authenticate using Identity service v1.0 or v1.1.
Unlock user account
If your account is locked as a result of failed login attempts, wait 10 minutes and then try to authenticate again using the passcode sent to your account. If you are still not able to access your account, contact the User administrator to unlock your account.
Recover account
If you cannot get the multi-factor authentication passcode from the device associated with your account or from the saved bypass codes generated for your account, contact Rackspace Support.
Generate bypass codes
Users can submit the following cURL request to generate bypass codes that can be used in place of the multi-factor authentication passcode if the phone associated with the account is not available.
$ curl $AUTH_ENDPOINT/v2.0/users/$USER_ID/RAX-AUTH/multi-factor/bypass-codes
       -d '{"RAX-AUTH:bypassCodes":{"validityDuration":"PT30M"}, "numberofCodes": "1"}'
       -H "Content-Type: application/json"
       -H "X-Auth-Token: $AUTHTOKEN" | python -m json.tool
Check multi-factor status on user account
Use the following cURL request to :ref: check the multi-factor authentication status on an account <multifactor operations>. If the account is enabled for multi-factor authentication, the user listing includes the multiFactorEnabled attribute.
$ curl $AUTH_ENDPOINT/v2.0/users/$USER_ID
       -X POST
       -H "Content-Type: application/json"
       -H "X-Auth-Token: $AUTHTOKEN" | python -m json.tool
List multifactor-enabled devices by user id
Users can use the following cURL request to list multifactor-enabled devices by user id. The operation returns all devices associated with the user account for the purpose of multi-factor authentication.
$ curl $AUTH_ENDPOINT/v2.0/$USER_ID/RAX-AUTH/multi-factor/mobile-phones
       -X PUT
       -H "Content-Type: application/json"
       -H "X-Auth-Token: $AUTHTOKEN" | python -m json.tool
Disable multi-factor authentication on a user account
Use the following cURL request to disable (enabled=false) multi-factor for the specified user account.
$ curl $AUTH_ENDPOINT/users/$USER_ID/RAX-AUTH/multi-factor
        -X PUT
        -d '{"RAX-AUTH:multiFactor": { "enabled": "false" }}'
        -H "Content-Type: application/json"
        -H "X-Auth-Token: $AUTHTOKEN" | python -m json.tool
Remove the multi-factor authentication setting and phone from a user account
Use the following cURL request to remove multi-factor authentication capabilities from a user account.
$ curl $AUTH_ENDPOINT/users/$USER_ID/RAX-AUTH/multifactor
       -X DELETE
       -H "Content-Type: application/json"
       -H "X-Auth-Token: $AUTHTOKEN" | python -m json.tool