Configure and manage networks
A virtual network works like a traditional physical network that enables communication between the internet, VMs, and virtual data centers (VDC).
Virtual networks can consist of an edge gateway, which controls traffic between VMs and the internet, and data center group networks that control network traffic between VMs located within different VDCs.
In Rackspace SDDC Flex, you set up your networking environment by configuring a default edge gateway that Rackspace has provided to you and defining data center group networks.
This chapter contains the following sections:
Understanding networking
This section includes basic networking concepts that you should understand before you create a network in Rackspace SDDC Flex.
Organization versus data center group networks
Organization virtual data center (VDC) networks enable vApps to communicate with each other or with external networks outside the organization. An organization virtual data center network provides connectivity for VMs in the current VDC.
Data center group networks are a type of organization VDC network that one or more VDCs share and to which vApps can connect. A data center group network provides connectivity for VMs from all VDCs participating in the data center group.
Isolated versus routed networks
Both isolated and routed networks are accessible only by the same organization VDC, and only VMs within this organization VDC can connect to these networks.
Isolated networks: VMs within the organization VDC can connect to and see traffic on the internal organization VDC network. The isolated network provides an organization VDC with an isolated, private network that multiple VM and vApps can connect to. This network provides no connectivity to VMs outside the organization VDC. Machines outside of the organization VDC have no connectivity to machines in the organization VDC.
Routed networks: A routed network also provides controlled access to an external network through a connected edge gateway. As a system administrator or an organization administrator, you can configure network address translation (NAT), firewall, and VPN settings to make specific VMs accessible from the external network. A routed network can be an IPv4 or an IPv6 network.
Gateway CIDR
A gateway CIDR is a way of listing the gateway IP addresses of a network with the subnet size of that network in the following format: 192.168.0.1/24. In this example, the network gateway is 192.168.0.1, and /24 indicates that it is a 24-bit address, which you can also show as 255.255.255.0.
Static IP pools
A static IP pool is an allocated range of IP addresses created within a network that the system dynamically assigns to devices that require an IP address.
Primary DNS
A primary DNS server is the first point of contact for a VM, application, or device that needs to translate a human-readable hostname into an IP address. The primary DNS server contains a DNS record that has the correct IP address for the hostname. The primary DNS server could be a public DNS server such as the Google 8.8.8.8 or 8.8.4.4 server, or it could be a private internal DNS server your company uses. See your Network Administrator for help accessing your private DNS servers.
Secondary DNS
A secondary DNS allows you to have the system back up your domain zone file onto a second set of nameservers automatically. If the first set of nameservers goes down, the request goes to the secondary nameservers, which have a zone file identical to the zone file on the primary nameservers. This could be a public DNS server like the Google 8.8.8.8 or 8.8.4.4 server, or it could be a private internal DNS server your company uses. See your Network Administrator for help accessing your private DNS servers.
Create an edge gateway firewall rule
The firewall for the edge gateway helps you meet the following key perimeter security requirements:
- Building DMZs based on IP/VLAN constructs
- Tenant-to-tenant isolation in multi-tenant virtual data centers
- Network Address Translation (NAT)
- Partner (extranet) VPNs
- User-based SSL VPNs
The edge gateway firewall rules control the so-called north-south traffic, such as traffic between your environment and the Internet. To control the traffic within your environment, refer to Create distributed firewall rules.
The NSX software provides the edge gateway firewall capability in the Rackspace SDDC Flex environment.
Note: Rackspace Technology deploys an edge gateway for you when we create your account. You are not required to create an edge gateway.
Steps
- Log in to the Rackspace SDDC Flex portal.
- Navigate to Networking > Edge Gateways.
- Click an edge gateway.
- Navigate to Services > Firewall in the menu.
- Click Edit Rules.
Create a data center group network
Data center group networks provide routed connections to external networks, or they can be isolated and only accessible to other data center group networks in the same data center group.
Routed connections require an edge gateway.
Before you begin
Before you begin, ensure that your:
- Environment does not already use the network address space.
You cannot have the same network address space in the same environments or separated environments that you intend to connect to. Contact your Network Administrator to verify network addresses presently used.
How to get started
- Log in to the Rackspace SDDC Flex portal.
- Click Networking.
- Click Networks.
- Click New.
Best practice guidelines
Consider the following guidelines when you create a data center group network.
| Field name | Guideline |
|---|---|
| Scope | Select Data Center Group and then select a data center group to which you want to add a network. |
| Network Type | Isolated: This type of network provides a fully isolated environment, which is accessible only by this organization VDC or VDC Group. Routed: This type of network provides controlled access to machines and networks outside of the VDC or VDC Group through an edge gateway. |
| General | Add the network scheme in CIDR format. |
| Static IP Pools | A static IP pool is a sequential range of IP addresses within a certain network. You typically enter the static IP pool as 172.16.0.100-172.16.0.199 by using the preceding IP scope to denote a pool of 100 IP addresses. |
| DNS | The primary DNS server contains a DNS record that has the correct IP address for the hostname. |
Create distributed firewall rules
Distributed firewall rules control the so-called east-west traffic, such as traffic within your environment. To control the traffic between your environment and the internet, refer to the Create an edge gateway firewall rule.
Before you begin
Before you begin, ensure that you assign an edge gateway to your data center group.
Steps
- Log in to the Rackspace SDDC Flex portal.
- Navigate to Networking > Data Center Groups.
- Click the name of the data center group for which you want to edit the distributed firewall rules.
- Select Distributed Firewall on the left.
- Click Edit Rules.
Increase the static IP pool
If you run out of IP addresses, you can increase the static IP pool size to accommodate the demand.
The network scope can be any size needed, from two addresses to the maximum useable IP addresses for the subnet.
Before you begin
Before you begin, ensure that you:
- Log in to the Rackspace SDDC Flex portal as a System Administrator or that you have a role with an equivalent set of rights.
- Create a data center group network.
How to get started
- Log in to the Rackspace SDDC Flex portal.
- Click Networking.
- Select a network for which you want to increase the static IP pool.
- Click Static IP Pools.
- Click Edit.
Best practice guidelines
Consider the following guidelines when you increase the static IP pool:
| Field name | Guideline |
|---|---|
| Static IP pool | You can modify an existing IP address range or add a new IP address range. IP address ranges in a static IP pool do not have to be contiguous. For example, an IP range of 192.168.100.10-192.168.100.20 with another IP range of 192.168.100.130-192.168.100.210 is acceptable. |
Edit network general and connection properties
Edit the network and connection properties to change the network name or change the edge gateway you attach the network to.
Before you begin
Before you begin, ensure that you Create a data center group network.
How to get started
- Log in to the Rackspace SDDC Flex portal.
- Click Networking.
- Click the name of the network you want to edit.
- On the General tab, click Edit.
Best practice guidelines
Consider the following guidelines when you edit network general and connection properties:
| Tab | Guideline |
|---|---|
| General | You can edit the name of the network and add or modify the description. |
| Connection | You can switch Connect to Edge Gateway to On or Off.Use On when you want to connect the network to an edge gateway and enable routing. This setting makes the network a routed network.Use Off when you want an isolated network connection. This setting makes the network an isolated network.You can also choose another edge gateway. |
Edit network IP properties
Edit the network IP properties to change configuration values to match infrastructure requirements, such as when you need to change the IP addresses of the DNS servers or expand or shrink the static IP pool.
Before you begin
Before you begin, ensure that you:
- Create a data center group network.
- Know how many IP addresses you need if you are editing the static IP pool.
How to get started
- Log in to the Rackspace SDDC Flex portal.
- Click Networking.
- Click Static IP Pools, DNS, or IP Usage.
- Click Edit.
Best practice guidelines
Consider the following guidelines when you edit network IP properties:
| Step | Guideline |
|---|---|
| Gateway CIDR | Lists the gateway IP of a network together with the subnet size of that network. |
| Static IP Pools | A static IP pool is a sequential range of IP addresses within a network. The static IP pool convention is 172.16.0.100-172.16.0.199, which uses the IP scope to denote a pool of 100 IP addresses. |
| Primary DNS | The primary DNS server contains a DNS record that stores the hostname IP address. |
| Secondary DNS | The secondary DNS server contains a backup DNS record that stores the hostname IP address. |
| DNS Suffix | The hostname element of the DNS name ends with the DNS suffix. |
Create a network security group
A security group is a collection of devices, such as virtual machines, organization virtual data center networks, or grouping objects such as security tags. You can edit security group membership by changing the membership criteria.
Before you begin
Before you begin, to use dynamic membership ensure that you add tags to the devices you want to include in a network security group.
How to get started
- Log in to the Rackspace SDDC Flex portal.
- Click Networking.
- Click Data Center Groups.
- Click the data center group network for which you want to create a network security group.
- Click Security Groups.
Best practice guidelines
Consider the following guidelines when you create a network security group:
| Action | Guideline |
|---|---|
| New | Enter a name for the security group. |
| Edit | Modify the name of the security group. |
| Manage Members | Add the networks that are associated with the data center group. |
| Associated VMs | Review all VMs that are associated with the security group. This option provides a way for you to verify that your VMs are tagged correctly. |
Edit an edge gateway
You can edit the edge gateway to add firewall rules, create VPN connections, change DNS settings and other network-related configurations.
Before you begin
Before you begin, ensure that you export the current edge gateway configuration.
How to get started
- Log in to the Rackspace SDDC Flex portal.
- Select a data center that contains the edge gateway you want to export.
- Click Networking > Edge Gateway.
- Select an edge gateway.
Best practice guidelines
Consider the following guidelines when you edit an edge gateway:
| Field name | Guideline |
|---|---|
| Firewall | Be sure to review the settings before you publish changes to firewall rules to avoid creating firewall rules that block you out of the environment. |
| VPN | When you create a VPN between sites, you must configure both sites and share the connection information for each connection. |
Export an edge gateway
You can export edge gateway configurations to a CSV file, which you can restore if you make an error when you edit the edge gateway. The CSV file contains all current settings of the edge gateway.
Steps
- Log in to the Rackspace SDDC Flex portal.
- Select a data center that contains the edge gateway you want to export.
- Click Networking > Edge Gateways.
- Click Export Edge Gateway.
Add an inbound public NAT IP
Before you begin
- Identify an unused public IP address
- Log in to the Rackspace SDDC Flex portal.
- Click Networking.
- Click Edge Gateways.
- Select the edge gateway you would like to manage.
- Under IP Management Click IP Allocations. This will display the public IP blocks allocated to your account and region. It also displays any of these IP addresses being used.
- If you need more public IP blocks, see Request additional public IP blocks.
How to get started
- Log in to the Rackspace SDDC Flex portal.
- Click Networking.
- Click Edge Gateways.
- Select the edge gateway you would like to manage.
- Under Services, Click NAT
- Click New
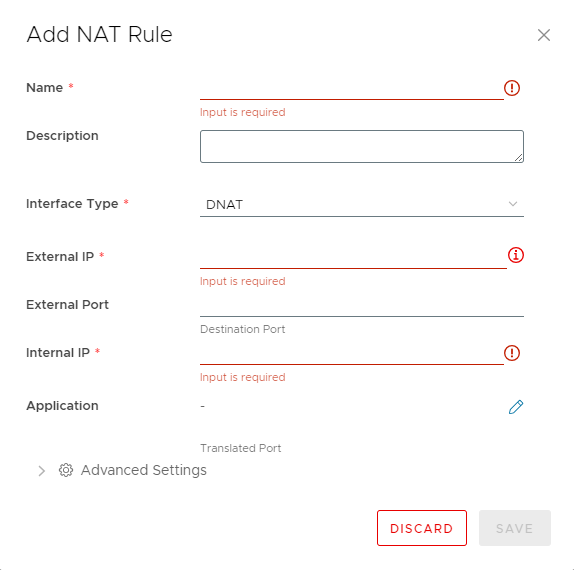
- Fill in the required information, making sure that the Interface Type is DNAT
Leaving the External Port field blank will forward all TCP ports to the internal destination IP.
- Make sure to add any necessary Firewall rules to allow traffic ingress Create an edge gateway firewall rule.
VPN Services
For VPN services you will deploy OpenVPN and configure it for access to your VDC. We recommend you use the OpenVPN appliance you can find on the OpenVPN website: https://openvpn.net/downloads/openvpn-as-latest-vmware.ova.
How to install and Configure OpenVPN
OpenVPN Remote Access uses the provided OVA that can be found in your content library. You will deploy this VM per the steps below and configure access for your client connections through the UI. For an OpenVPN Site-to-Site connection you will need to deploy a Linux VM first and then install the binaries for OpenVPN and configure.
Before you begin
Before you begin, ensure that:
- You have Organization Administrator privileges.
- You have a license for the OpenVPN product. To obtain a license, go to: https://openvpn.net/vpn-server-resources/purchasing-and-activating-a-license-key/.
Best practice guidelines for configuring your VDC for OpenVPN
- Create a new routed VDC network dedicated for OpenVPN.
- Configure the Edge Gateway:
- Add a Source NAT to allow outbound access to the internet for the OpenVPN appliance.
- Add a Destination NAT to allow inbound access from the internet to the OpenVPN appliance.
- Add a firewall rule to allow inbound 443 traffic from the internet to the OpenVPN appliance.
- Add firewall rules to allow NATed IP’s from the network created for the OpenVPN appliance to access VM’s on your desired networks.
- Add firewall rules to allow access your target networks to the network created for OpenVPN.
How to deploy OpenVPN
- Log in to the Rackspace SDDC Flex portal.
- Select the VDC from which you want to deploy the OpenVPN appliance.
- Click Data Centers > Virtual Data Center.
- Click Compute > vApps > New > Add vApp from OVF.
- Choose the OpenVPN OVA and click Next.
- Review the details and click Next.
- Choose a vApp name and description if desired and click Next.
- Name the OpenVPN VM and choose the storage policy. Capacity is tier 2 storage and Standard is tier 1 storage. Select a storage policy and click Next.
- Configure the networking by checking the box next to Advanced Networking Workflow.
- Choose the OpenVPN network you created earlier and choose the IP Assignment Manual IP. Type the chosen IP address and click Next.
- On the Custom Properties page click Next.
- Choose vCPU, cores per socket and memory and click Next.
- Review your settings and click Finish. The OpenVPN and vApp will deploy.
How to Configure OpenVPN
Complete the following tasks to configure OpenVPN.
Obtain the Password
After the OpenVPN vApp is deployed you will need the generated password.
- Click Details on the OpenVPN vApp tile.
- Click General > Virtual Machines and then click on the OpenVPN VM.
- Click Guest OS Customization > Edit. The password will be shown in the Specify Password field.
Open a Console to the OpenVPN VM
- Click Details on the OpenVPN vApp tile.
- Click General > Virtual Machines and then click on the OpenVPN VM.
- Verify the VM is powered on. If not, power on the VM.
- To open a console to the VM click All Actions > VM Console > Launch Web Console.
- Login with root for username and use the password you obtained in the steps above.
Configure OpenVPN
-
Once logged in the configuration process will start automatically.
-
Type Yes to accept the License Agreement.
-
Type Yes to accept this OpenVPN VM to be the primary access server.
-
Type the number next to the correct network interface.
-
Press Enter to accept the default port 943 for the Admin Web UI.
-
Press Enter to accept the default port 443 for the OpenVPN daemon.
-
“Should client traffic be routed by the default through the VPN?” – Choosing Yes will not allow VPN clients to access any other networks other than the OpenVPN network. It is advised to type No so users can access the other networks you permit.
-
Since No was used above you should type No for the “Should client DNS traffic be routed by default through the VPN.”
-
Type Yes to use local authentication.
-
Type Yes to allow private subnets to be accessible to clients by default.
-
Type Yes to create a local user account “openvpn”. Type No to change the username and password.
-
Type your Activation key if you have obtained one already or leave blank to specify one later.
-
Now the setup wizard will complete.
When it is complete you can choose a password for the openvpn user by typing: # passwd openvpn
Next you create local user accounts for all your VPN users and add their passwords.
Configure Admin Options
This is where you change setting for the OpenVPN appliance and add user accounts.
- Login to the appliance administrator console: https://<ip_address:943/admin>.
- Set the Hostname click Configuration > Network Setting. From there you can set the Hostname and IP address or change to a fully qualified domain name or public IP address.
- To set additional subnets your VPN user can access click Configuration > VPN Settings > Routing.
- To create new users accounts click User Management > User Permissions.
- To enable two-factor authentication click Authentication > General > Enable Google Authenticator.
Download the OpenVPN Client
- To download the OpenVPN client navigate to the OpenVPN appliance https://<OpenVPN_Appliance_IP>/.
- The client software includes a certificate that is required authentication.
- After installing the OpenVPN client you start the VPN connection from the client program.
To get more detailed information for advanced configurations of OpenVPN visit their website: https://openvpn.net.
OpenVPN Site-to-Site Configuration
Before you begin
Before you begin, we assume the following:
- You have an OpenVPN Access Server installation working.
- That it is installed in your private network behind a router with Internet access and has a private IP address.
- That it has port forwarding set up so that it can be reached from the outside, and with appropriate settings so that it is reachable with an OpenVPN client program from the outside.
In other words, that you have an OpenVPN Access Server installation that works and lets OpenVPN clients connect.
Best practice guidelines for configuring your VDC for OpenVPN
- Create a new routed VDC network dedicated for OpenVPN
- Configure the Edge Gateway:
- Add a Source NAT to allow outbound access to the internet for the OpenVPN Client Gateway VM.
- Add a Destination NAT to allow inbound access from the internet to the OpenVPN Client Gateway VM appliance.
- Add a firewall rule to allow outbound internet traffic from the OpenVPN Client Gateway VM.
- Add static routes to the destination networks you will be accessing on the NSX Edge (T1) via the OpenVPN Client Gateway VM. (Ticket required for this step)
Configure the OpenVPN Access Server for Site-to-Site
In this task you change settings for the OpenVPN appliance and add user accounts.
- Login to the appliance administrator console: https://<ip_address:943/admin>.
- Click Configuration > VPN Settings > Routing.
- In ‘Should VPN clients have access to private subnets (non-public networks on the server side)?’ set the selection to Yes, using routing (advanced).
- In ‘Specify the private subnets to which all clients should be given access (one per line):’ provide the OpenVPN Access Server subnet, and all source subnets that should be routed.
- Create a new site-to-site user.
- Click User Management.
- In User Permissions, create a new user and password.
- Click Advanced User Settings.
- Set VPN Gateway to Yes.
- Allow client to act as VPN gateway for these client-side subnets > Provide all client side subnets, including the OpenVPN Client Gateway VM subnet.
- Click Save Settings and Update the running server.
How to deploy OpenVPN Linux Gateway client
- Choose Compute > vApps > NEW VAPP.
- Choose a vApp name and description.
- Select Power On, and then choose ADD VIRTUAL MACHINE.
- Name the OpenVPN Client VM and description, if desired.
- Select Type as Template, and then select the Ubuntu Template.
- Select the storage policy. Capacity is tier 2 storage and Standard is tier 1 storage. Choose storage policy and click Next.
- Configure the NICs, select VMXNET3 as the Network Adapter Type.
- Choose the OpenVPN network you created earlier and choose the IP Assignment “Static - IP Pool”, and the click OK.
- Click Create, and the OpenVPN Access Server VM and vApp will deploy.
How to Setup the OpenVPN Linux Gateway client VM
Open a Console to the OpenVPN VM
- Click Details on the OpenVPN vApp tile.
- Click General > Virtual Machines and then click on the OpenVPN Client Gateway VM.
- Verify the VM is powered on. If not, power on the VM.
- To open a console to the VM click All Actions > VM Console > Launch Web Console.
- Login with “root” for username and use the password you obtained in the steps above.
Install and configure OpenVPN on the Client Gateway VM
- On Ubuntu, run the apt-get install openvpn command. With the client program now installed, it is going to check for any *.conf files in the /etc/openvpn/ directory and at system startup try to connect them and keep them connected.
- Enable IP forwarding on the OpenVPN Client Gateway VM.
- Open /etc/sysctl.conf with a text editor like nano, and uncomment the line #net.ipv4.ip_forward=1. Uncommenting means you remove the # character. Then exit and save the file.
- Reboot the OpenVPN Client Gateway VM operating system.
- Go to the OpenVPN Access Server’s client UI using a web browser. Enter the user name and password of the user account you created for site-to-site connectivity and click go. You will be presented with a list of files available for this user account. Locate the auto-login profile and download it. It will be called client.ovpn.
- Transfer this client.ovpn file to OpenVPN Client Gateway VM client system (with SCP or WinSCP or copying and pasting contents of the file in a text editor (like nano) and place it in the /etc/openvpn/ directory. Rename the file to something like headquarters.conf. The filename is not important, but the extension must end with .conf for the OpenVPN daemon to pick it up.
- Reboot the OpenVPN Client Gateway VM operating system.
- The OpenVPN Client Gateway VM should now automatically connect and you should be able to see this connection appear on the OpenVPN Access Server’s Current Users overview.
Static routes will be required on the T-1 Edge which must by applied by the RSVC-Infrastrcture Team in order to route the Client networks via the OpenVPN Access Server and/or Client Gateway.
All destination networks must be identified, and the OpenVPN - AS or OpenVPN – CG IP address must be provided in order to create these static routes. Configuring the OpenVPN Access Server for site-to-site connectivity: https://openvpn.net/vpn-server-resources/site-to-site-routing-explained-in-detail
To get more detailed information for advanced configurations of OpenVPN visit their website: https://openvpn.net
IPSec VPN
Introduction (IPSec VPN))
Rackspace SDDC Flex Portal allows you to configure a policy-based IPSec site-to-site VPN.
Important Considerations for Configuring IPSec VPN
Before you proceed with configuring a policy-based IPSec site-to-site VPN, ensure that you have Organization Administrator rights.
Pre-requisite
- Before configuring a policy-based IPSec site-to-site VPN, you will need a Pre-Shared Key or Certificate for Authentication.
- You will need a Private IP, the IP Range, or a network CIDR for local and remote endpoint networks allowed on the VPN.
- You will need the details of available Public IP address assigned to your Edge Gateway. This public IP address will be used as the Local Endpoint IP Address for your IPSec VPN.
- You will need the details of your Remote site’s VPN configuration. This will include the Public IP address which you will use to connect to, and any specific VPN security configuration details.
Available Private IP, Range, or CIDR can be found in the Rackspace SDDC Flex Portal by using the following steps:
-
Login to the Rackspace SDDC Flex Portal.
-
In the top navigation menu, click Networking >> Networks. Select the required Network and it’s configuration page will appear next.
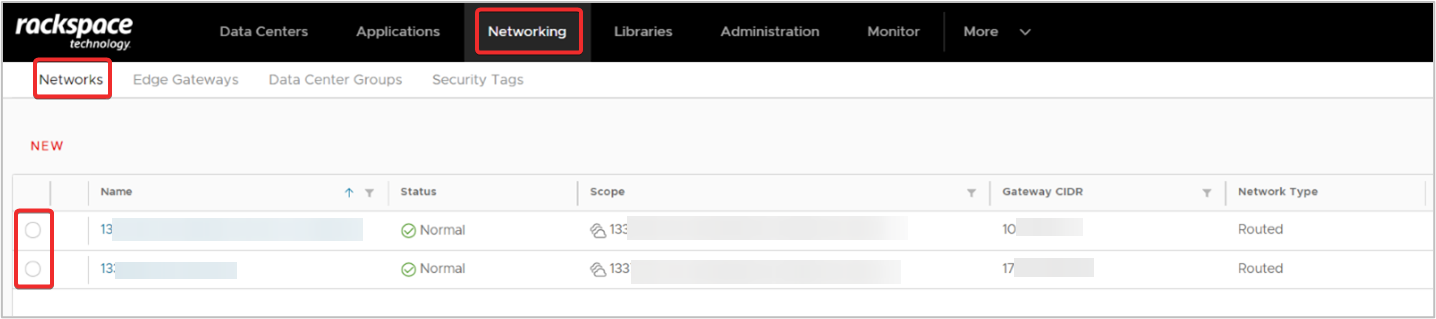
-
To identify an entire subnet Network CIDR, from the side navigation menu, click General. In the center pane locate Gateway CIDR and use this gateway address to determine the Network CIDR for the entire subnet network.
-
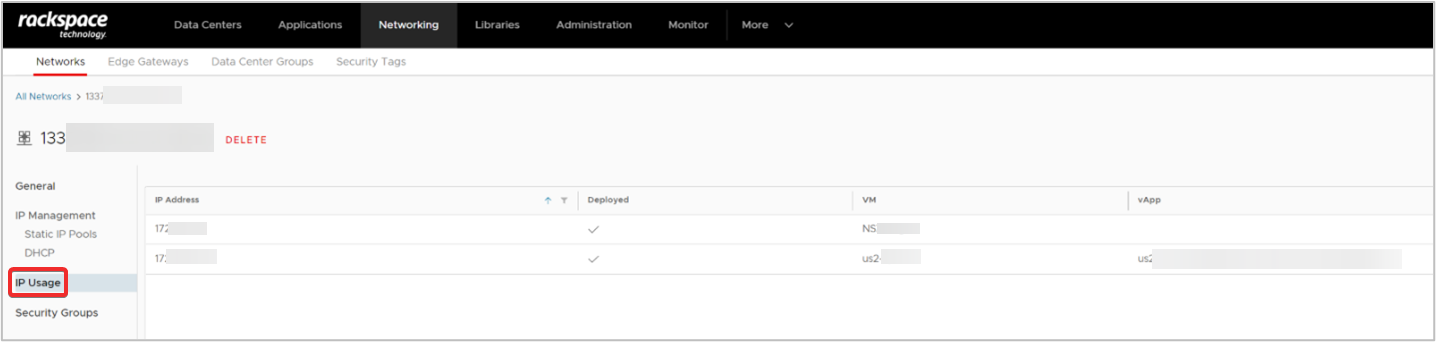
To identify an IP, from the side navigation menu, click IP Usage, and a list of assigned IP addresses will appear in the center pane. Identify the IP address or IP addresses for the local endpoint.
- To identify an IP Range, from the side navigation menu, under IP Management section, click Static IP Pools or DHCP, and it’s configuration page will appear next. Identify the IP Range or subset of this range for the local endpoint from either pool.
Static IP Pools
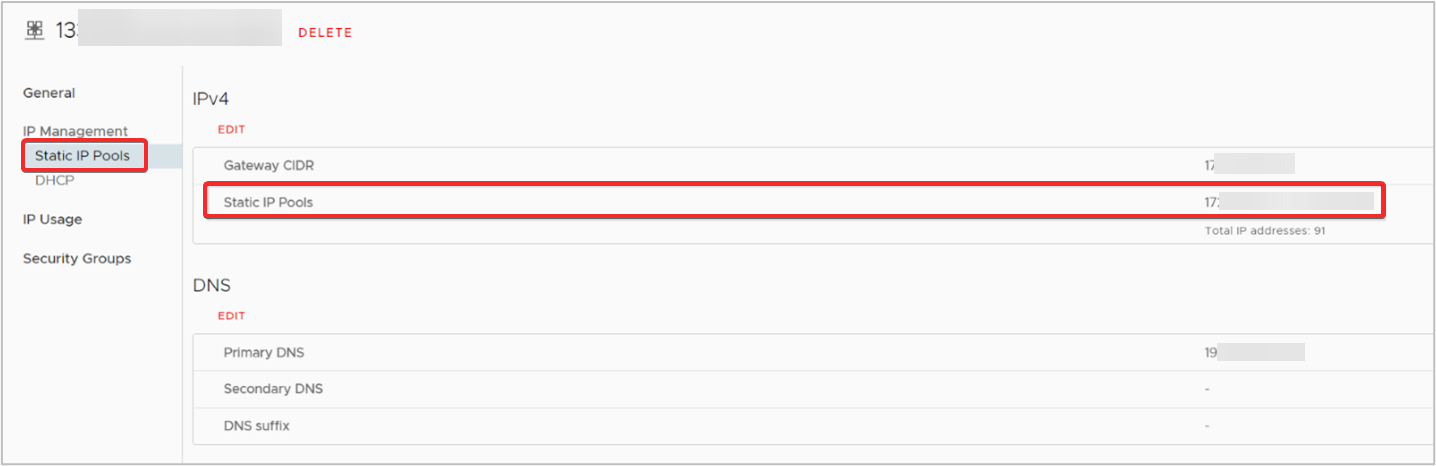
DHCP

Available Public IPs can be found in the Rackspace SDDC Flex Portal by using the following steps:
-
Login to the Rackspace SDDC Flex Portal.
-
In the top navigation menu, click Networking >> Edge Gateways. Select the required Gateway and it’s configuration page will appear next.
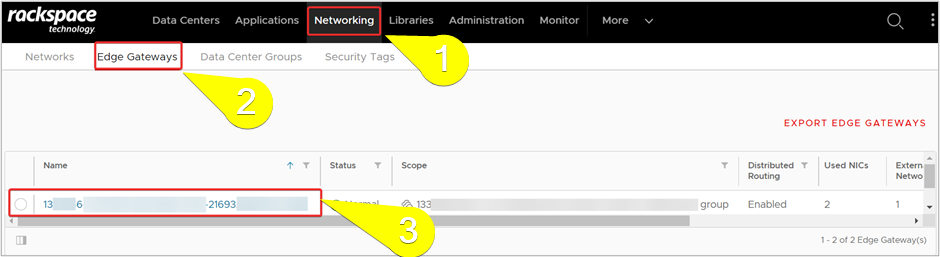
- From the side navigation menu, under IP Management section, click IP Allocations.

Review your in use IP Allocations and find an available one. If there are no free IPs available, an additional IP block can be added to your account using the Rackspace Customer Portal
Configure IPSec VPN
You can Configure IPSec VPN by using the following steps:
- Login to the Rackspace SDDC Flex Portal.
- In the top navigation menu, click Networking >> Edge Gateways. Select the required Gateway and it’s configuration page will appear next.

- From the side navigation menu, under Services section, click IPSec VPN. Click NEW to open the Add IPSec VPN Tunnel window.

- On the General Settings page of Add IPSec VPN Tunnel, enter the required details i.e. Name, Description (optional). Review the Default security configuration settings which will be applied to the VPN. Click NEXT.
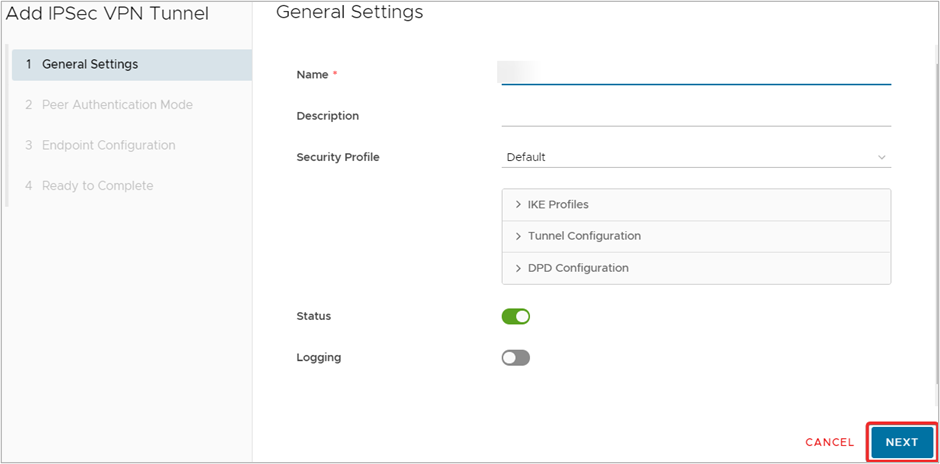
These default settings can be changed later.
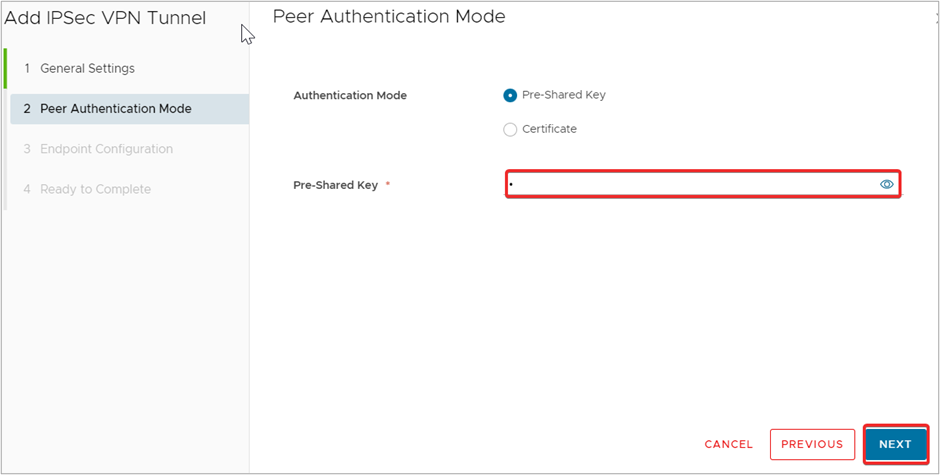
- On the Peer Authentication Mode page, enter a Pre-Shared Key or upload a Certificate to be used to authenticate to the Peer site. Click NEXT.
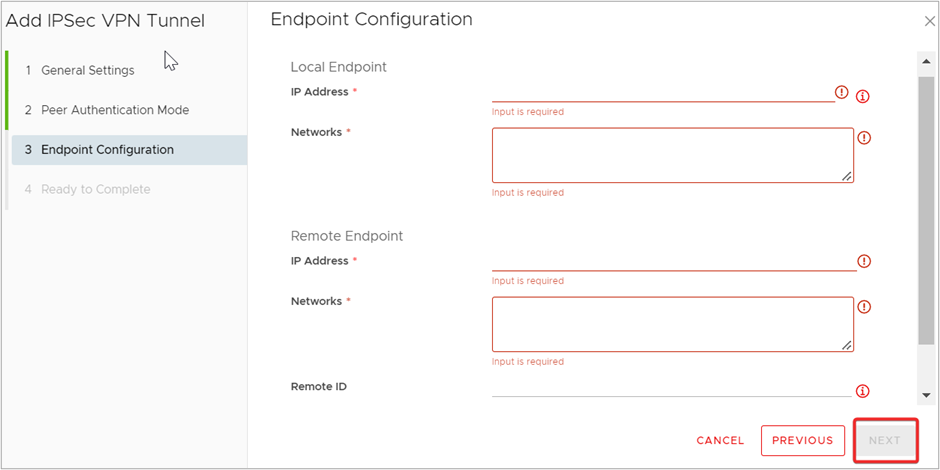
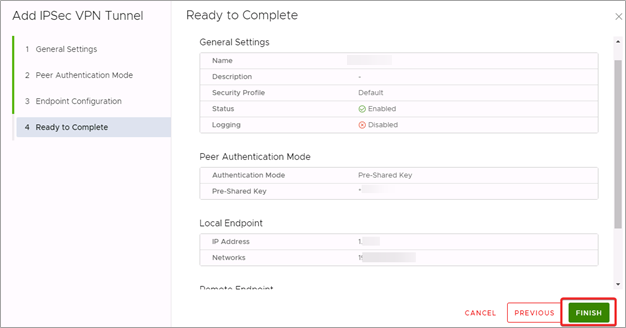
- On the Endpoint Configuration page, enter the Public IP Address details for the Local Endpoint (Public IP identified in the Pre-requisite section) and Remote Endpoint (the Public IP of your firewall at the Remote site). Also add the Local and Remote CIDRs for the networks you want to make accessible across the VPN. Click NEXT.
- On the Ready to Complete page, review your configuration and click Finish.
Check Status of Configured VPN
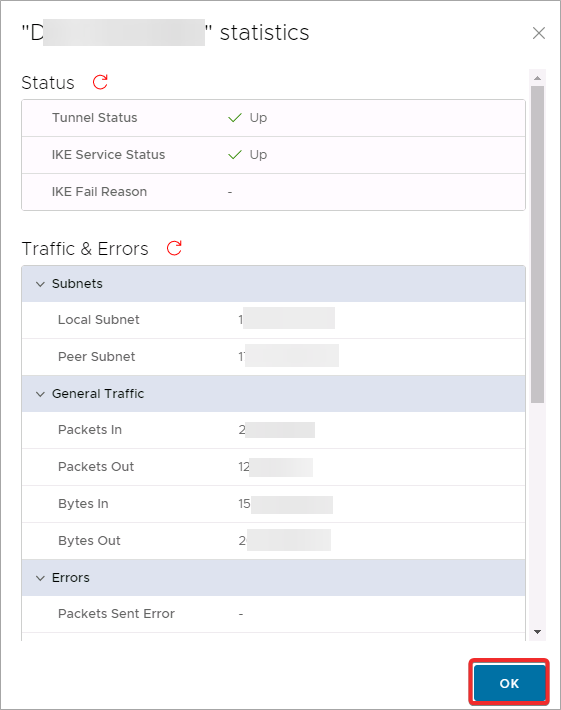
- It will take a few moments for the VPN to get configured after completing the process. You can check its status by selecting the checkmark of your VPN on the IPSec VPN page and then select View Statistics.
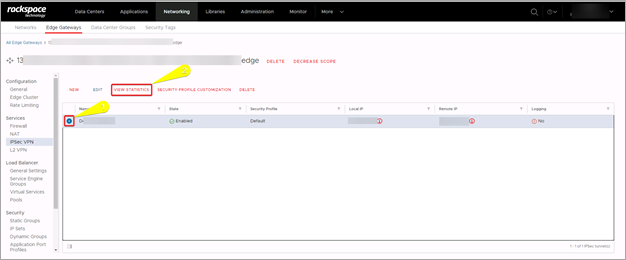
- Review the status of your configured VPN and click OK
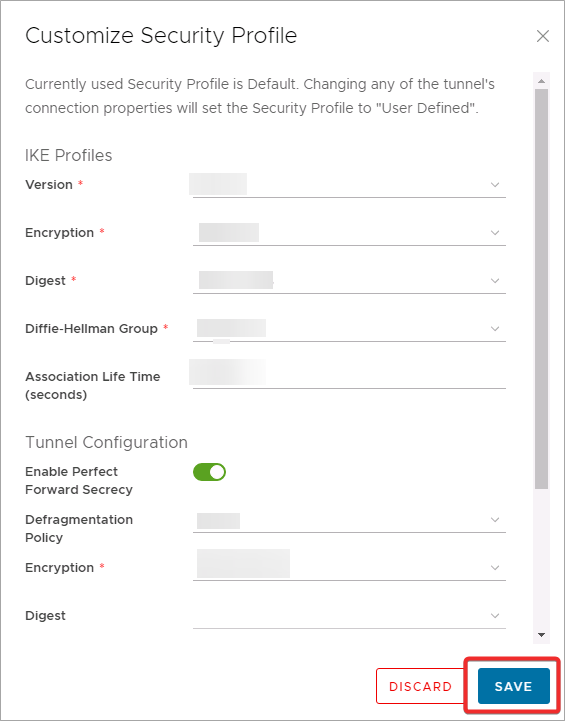
Security Profile Customization
The Security Profile Customization option can be used to customize the configuration details of your VPN.
Post completion, add rules to the Edge Gateway Firewall to allow your Private IP, IP Range, or CIDR local and remote networks to communicate. Details of how to create gateway firewall rules can be found in the Create an edge gateway firewall rule.
Note:
- Refer to Create a Network Security Group for creating Security Groups for the local and remote Private IP endpoints.
- You do not need to add Edge Gateway firewall rules to allow your Local and Remote Public IP Endpoints to communicate. It will be created automatically.
NSX Advanced Load Balancer
Overview
NSX Advanced Load balancer (ALB) allows you to use network load balancing. This article will go through a sample load balancing configuration. Basic load balancing is free and is enabled in your environment by default.
Self-Service NSX ALB Configuration
Before you start
Please check the following configuration before you begin.
- Navigate to Networking > Edge Gateways tab.
- Click your Edge Gateway.
- Under Load Balancer > General Settings, check that the State is Active.
- Under Load Balancer > Service Engine Groups, check that you see at least one entry.
If your environment isn’t configured as described above, please contact support.
Create Pools
You must first create a pool of servers that will hold the application that need to be load balanced. If you’re continuing from the previous set of steps, start at step 3.
- Navigate to Networking > Edge Gateways tab.
- Click your Edge Gateway
- Navigate to Load Balancer > Pools
- Click Add
- In the General Settings tab, configure the pool Name. Here’s where you can also enable or disable it as required.
- In the Members tab, add the IPs and define their ratio, specified in parts. If you want all servers to take equal load, set each entry’s Ratio value to 1.
- Click Save
- Continue with Virtual Service creation as described below.
Create Virtual Service
This contains IP address and ports advertised externally. If you’re continuing from the previous set of steps, start at step 3.
- Navigate to Networking > Edge Gateways tab.
- Click your Edge Gateway.
- Navigate to Load Balancer > Virtual Services
- Click Add
- Add a Service Name
- Select a Service Engine Group (as shown in the “Before you start” section)
- Select a Load Balancer Pool. You’ve created this in the previous set of steps.
- In the Virtual IP field, specify a public IP from your pool.
- You must configure at least one port.
- Within port settings, select the service and port number. If you selected SSL, you must also specify a certificate.
- Click Save
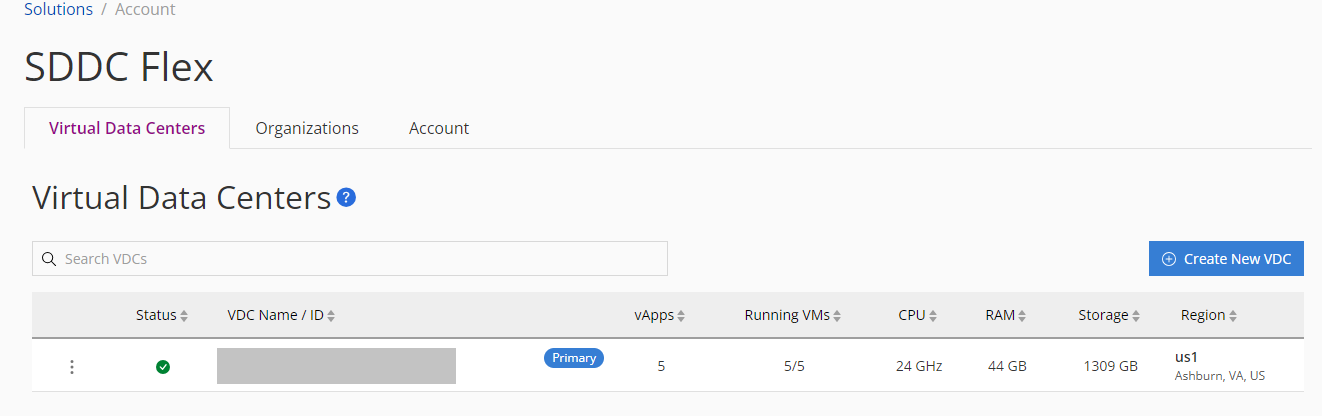
Request additional public IP blocks
Before you begin
- Login to the Rackspace SDDC Flex Portal.
- Under My Accounts, select the SDDC Flex account you want to manage.
- Click the Primary VDC for the region you want to manage.
- Click the Networking tab for the VDC
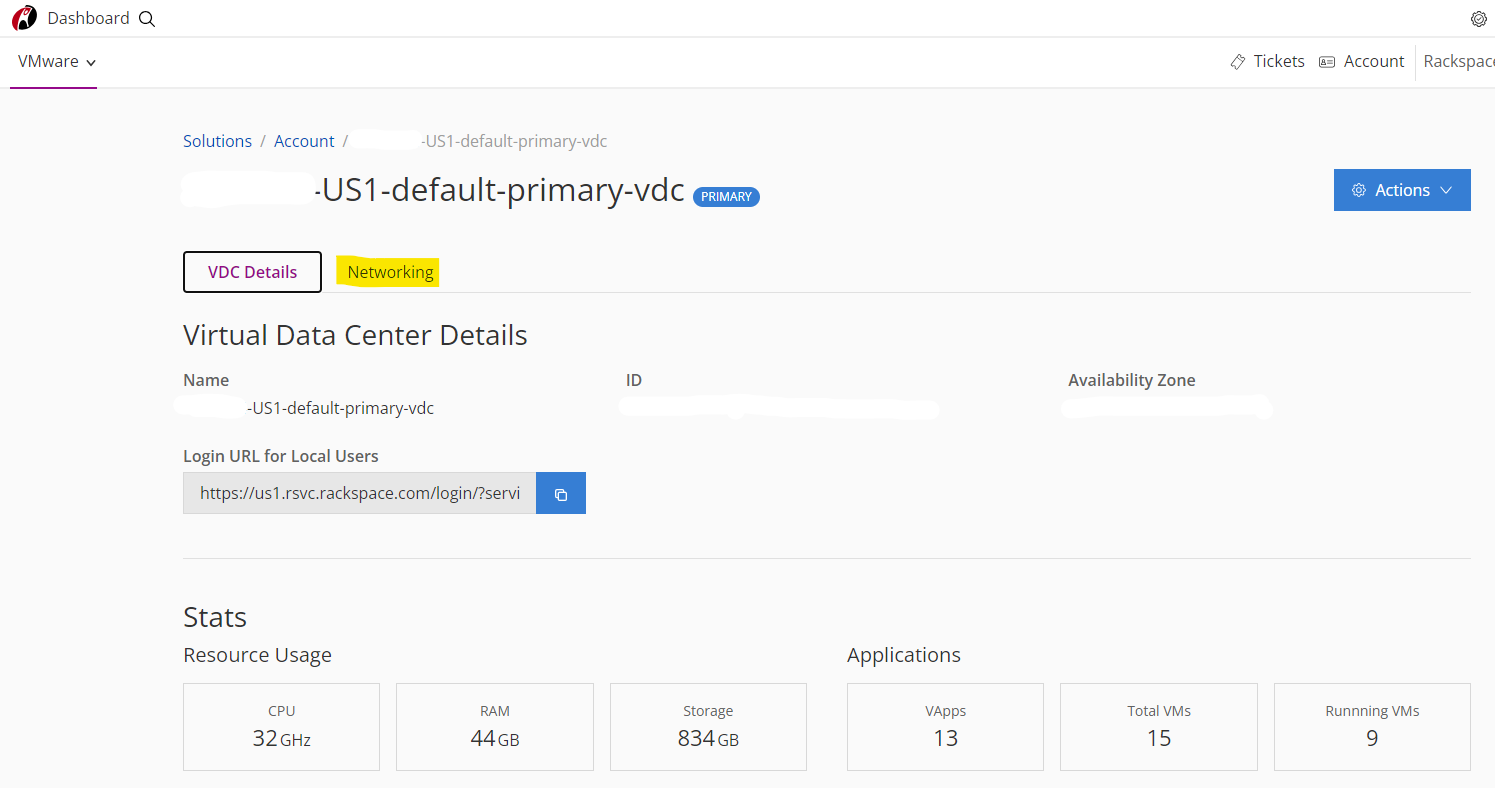
- Click Request New IP Block
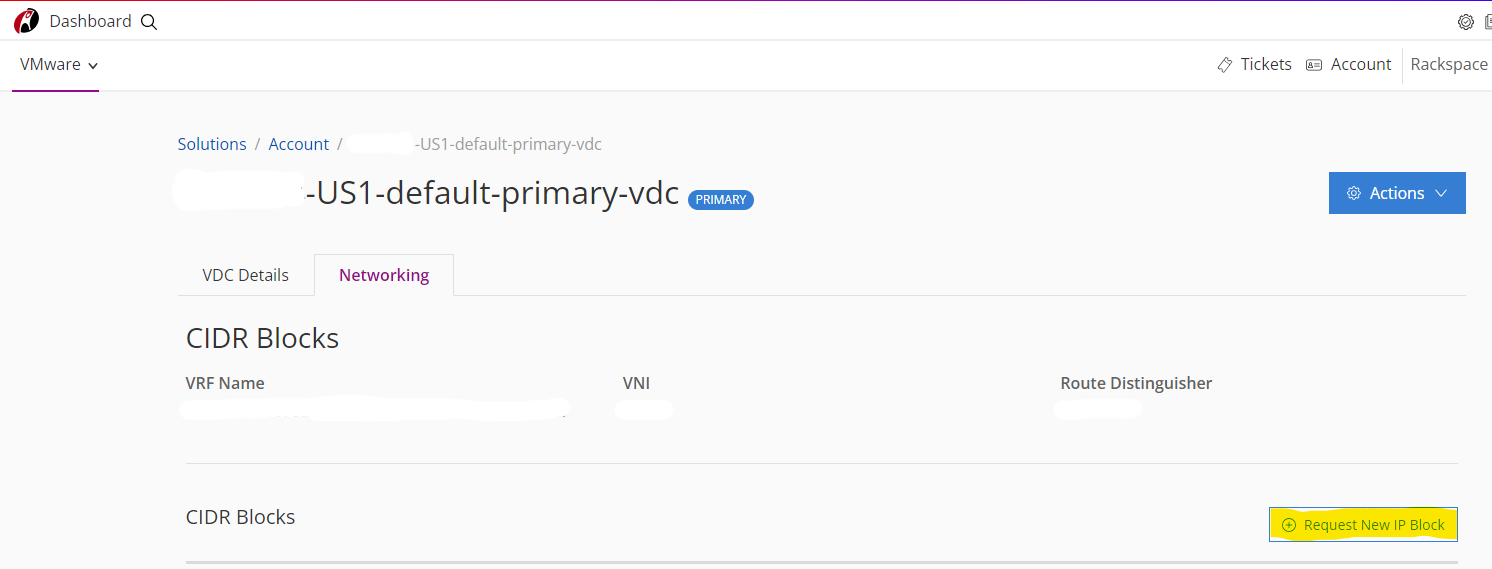
New IP blocks are available to all VDCs within the region.
Managing RackConnect Global
Overview
This procedure will walk through how to manage RackConnect Global (RCG) once it's been added to your SDDC Flex environment.
Pre-Requisites
This procedure assumes that:
- You have purchased RackConnect Global, and it has been configured to route traffic to SDDC Flex from a remote location.
- If you are not sure if this step has been completed or wish to purchase RackConnect Global, please speak to your Account Manager.
- Once RCG has been initial configured, it has also been activated on your SDDC Flex account. This step is performed by Rackspace.
- Necessary firewall rules have been configured on the remote end (relative to SDDC Flex) of your RCG connection to allow communication between the remote subnet(s) and your SDDC Flex subnet(s).
- If the remote location is managed by Rackspace, you can add the required firewall rules via the My Rackspace portal or request they are added by your Rackspace Support Team
Managing RCG in SDDC Flex
Enabling subnets for advertisement over RCG
Once RCG has been configured and activated on your SDDC Flex account, you must then enable your SDDC Flex networks for advertisement to the remote locations via RCG.
You will not see any change in the Cloud Director user interface itself to reflect whether a subnet (network) is enabled for RCG or not. RCG management and monitoring is entirely performed via the Rackspace Fabric portal.
- Login to your Rackspace Fabric Portal and navigate to your SDDC Flex account.
- From the Virtual Data Centers tab, click on the name of the VDC which hosts the subnets you wish to advertise over RCG.
- Click the Networking tab.
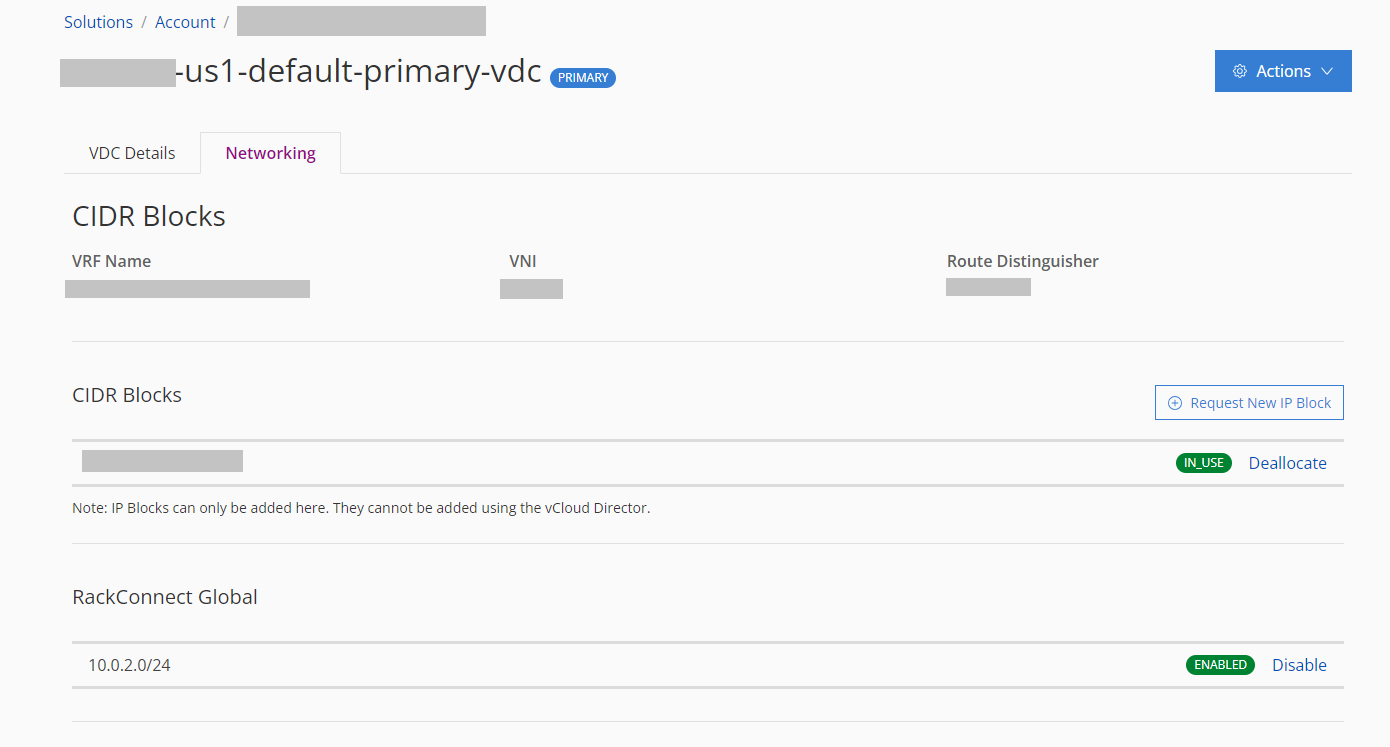
The RackConnect Global section at the bottom of the tab. If this section does not appear, RCG has not been enabled for your SDDC Flex account. Contact Rackspace Support and request it is enabled.
- Each of the subnets (networks) configured in your SDDC Flex organization will be listed in the RackConnect Global section and each will display either an Enable or Disable button alongside its current status (Enabled or Disabled). Use these buttons to enable the required subnets to be advertised over your RCG connection.
Add Edge Gateway Firewall Rules
Once your subnets are being advertised, you must then ensure you have relevant firewall rules on at the local and remote locations to allow communication between the required devices.
For example, if you wish to communicate between server 10.0.2.10 in SDDC Flex and server 192.168.100.11 at a remote location you must add firewalls in SDDC Flex and the remote location to allow communicate between those IP addresses on the required ports.
To do this in SDDC Flex, please see the Create an edge gateway firewall rule page in the SDDC Flex documentation.
Add NAT Rules
It may be necessary to add a NONAT network address translation rule to your Edge Gateway in order to exclude your RCG-enabled subnet from any other address translation.
For example, if a server is configured with 10.0.2.10 in your SDDC Flex organization and there is a source NAT (SNAT) rule in place to translate that server's private IP address to a public IP address (to allow it to reach the internet), you may find it is unable to reach devices at your remote location via RCG. This is due to the source IP in north-bound traffic coming from that server being translated to a different address (the public address) before the traffic is routed over RCG.
To prevent this, you can add a NONAT rule to your Edge Gateway to ensure that any north-bound traffic destined for the remote location's subnet is excluded from any source address translation. This allows the server to still get out to the internet using a public IP, but also route successfully to and from the remote location over RCG.
The default network configured in your SDDC Flex is also configured by default with a source NAT to allow devices on that network to connect to the internet. This can be changed or a NONAT rule added as required.
- Login to your SDDC Flex Cloud Director portal.
- Click Networking.
- Click Edge Gateways.
- Select the edge gateway you would like to manage.
- Under Services, Click NAT.
- Click New.
- Enter:
- Name: Provide a name for the rule.
- Interface Type: Set to NO SNAT.
- Internal IP: Enter the IP address of your server or subnet in SDDC Flex from which the traffic will be coming from.
- Destination IP: Enter the IP address of your server or subnet in the remote location to which the traffic will be sent over RCG.
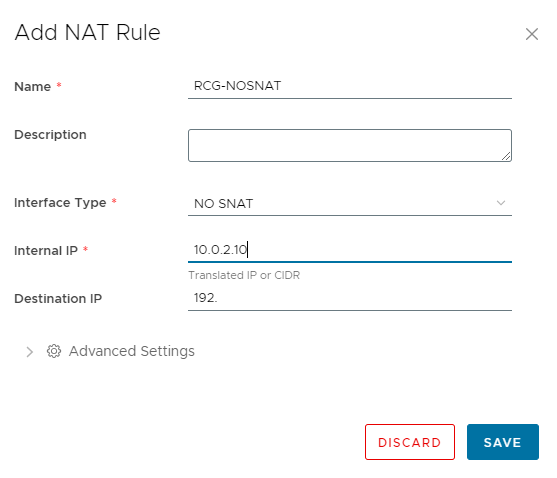
- Click Save.
Updated 5 months ago