Rackspace Auto Scale Control Panel User Guide - Concepts
The Introduction to Rackspace Auto Scale article outlines what you can do with Auto Scale and its setup requirements. This article discusses what Auto Scale does and the core concepts that drive it.
Servers
A server is a virtual machine (VM) instance in the Rackspace Cloud Servers environment. To create a server, you must specify a name, image reference, and flavor reference. This section explains server images and flavors.
Auto Scale works by creating servers based on server images that you have predefined. So, before you can use Auto Scale, you must have saved server images. If you create a server by using the Cloud Servers tab in the Cloud Control Panel and save the image, the image automatically appears in the Auto Scale tab.
Server image
A server image is a copy of a server's disk. It contains the operating system and all of the installed data and software on the server at the time you created the image. You can create several identical servers from the same server image by using a tool such as Auto Scale.
A server image can contain only a base operating system installation, which you would use to create a new cloud server before installing software on it. It can also contain all of the software necessary for a server to start operating, such as a web server set to respond to HTTP requests. A server image does not include configuration details, such as IP address, server flavor, server networks, or mounted volumes. As a result, you can apply a given server image to servers with different configurations than the primary server from which you created the image, as long as the instance type has as much or more disk storage as the original instance.
When you configure an image with software to use with Auto Scale, use dynamic elements instead of static elements. All of the files on cloned server images are identical, so if you are using hard-coded machine IDs in configuration files on the primary server image, multiple systems will use the same machine ID. Set up the server to use DHCP to obtain an IP address and other network parameters. The Rackspace Cloud Monitoring agent behaves correctly when installed on server images that use the same configuration file.
Server images are available only in the region in which you they were generated. You can create server images so that they update themselves at startup with the newest software version. Or you can create a new image and edit the scaling group to incorporate new software versions.
Server flavor
The server flavor is the amount of CPU, RAM, system disk, networks (the aggregate outbound bandwidth across all attached networks), and disk I/O that you assign when you configure a server. For example, the 512MB Standard Instance server flavor corresponds to 1 vCPU, 512 MB RAM, 20 GB system disk,
80 Mb/s network, and good disk I/O.
Server networks
The server networks that you choose are all of the networks on which your service operates.
Scaling groups
A scaling group is a set of identical servers and, optionally, a load balancer, defined by the launch configuration that you set. The group can scale up and down in response to load, as defined by the scaling policy you configure and bound by your scaling group configuration.
Cooldowns
Cooldowns enforce a time interval between possible actions. Auto Scale has
the following types:
- Minimum (group) Cooldown: Use to enforce a minimum amount of time for your servers to scale up. The complexity of the servers that you add, not the number of servers, determines how much time they need to fully deploy. A 10-minute minimum cooldown is sufficient for most server images.
- Policy Cooldown: Use to prevent a policy from being triggered too soon. For scale-up policies, a longer policy cooldown is usually acceptable, whereas you might want a short policy cooldown for scale-down policies, ensuring a gradual removal of servers.
Note: Cooldowns are mainly relevant to event-based scaling policies because those policies are triggered by events that could occur before a required cooldown period. Schedule-based policies that conflict with a cooldown period are not executed.
For more information about cooldowns, see How Auto Scale cooldowns work.
Scaling policies
The scaling policy determines what kind of scaling occurs - up or down - and when scaling occurs. You must define separate policies for scaling up and scaling down. You can have multiple scaling policies per scaling group.
For schedule-based policies, you can use a cron job to configure the schedule. At the specified time, Auto Scale adds servers or removes them as dictated by the policy.
You can also configure the scale-up and scale-down to be a set number or a percentage of your total scaling group.
And, you can use a webhook to respond to an event and trigger a policy. You can create the policy with the webhook by using the Cloud Control Panel, but you have to use the Auto Scale API to create and configure the webhook. You can learn more about webhooks in the Auto Scale API Developers Guide section on Webhooks.
The following diagrams illustrate some of the principles governing scaling policies.
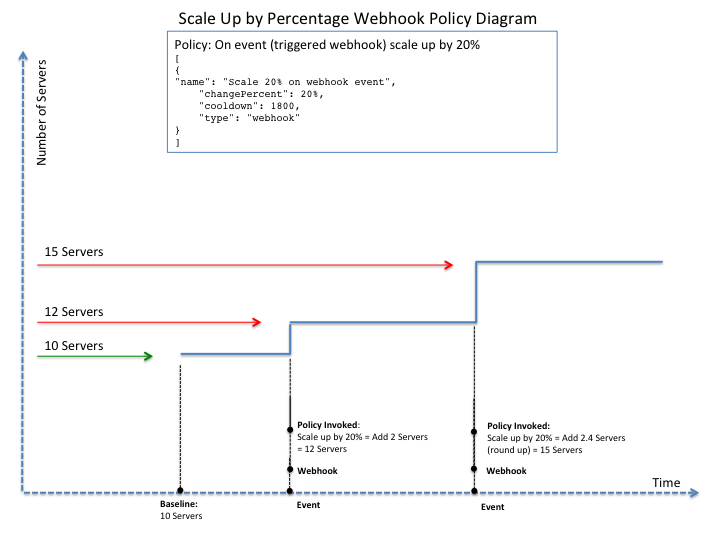
Percentage scale-up policy
The following diagram illustrates how a percentage scale-up policy translates into a different scaling amount each time it is invoked and changes the total number of servers.

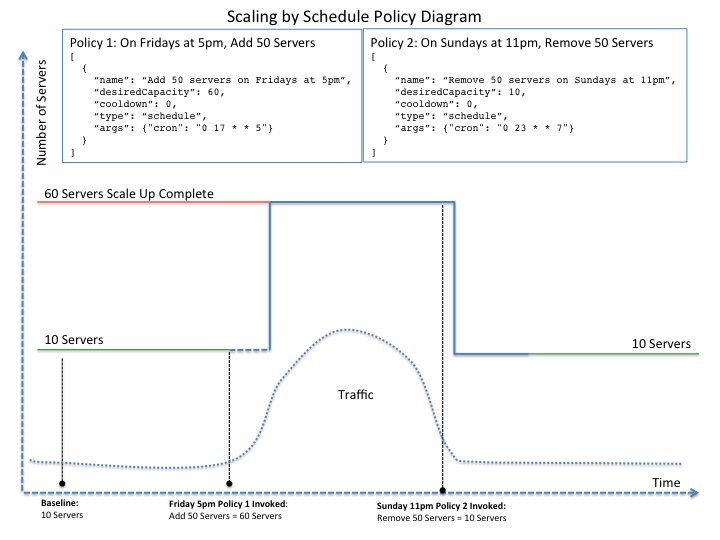
Schedule scale-up policy
The following diagram illustrates how you can configure a scheduled scale-up policy to respond to anticipated increases in traffic.

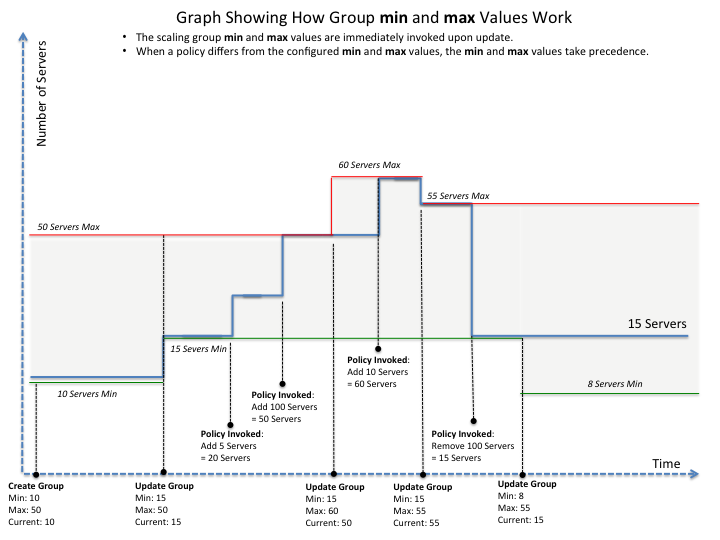
Scaling policies restricted by minimum and maximum values
The following diagram illustrates how the configured minimum and maximum number of servers in the scaling group restricts scale-ups and scale-downs.

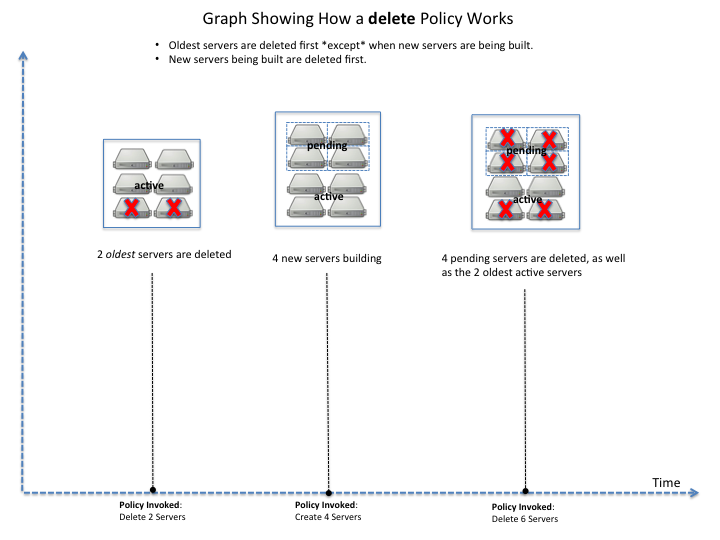
Delete servers policy
The following diagram illustrates how a scale-down policy operates first on pending servers (servers in the process of being added) and then on the scaling group's oldest servers.

Load balancers
A properly configured load balancer automatically distributes traffic to the least loaded servers. The load balancer configuration in your scaling group is optional. If you do configure a load balancer, choose from the load balancers you added to your cloud server account. The load balancer sends traffic to your cloud servers on the node port you configured.
User Guide sections
Updated over 1 year ago
