Load Balancing Internal IPs in the same region
Each Cloud Server automatically receive three IP addresses when you create it:
- A version 4 IP Address that provides public access to your server from anywhere on the Internet.
- A version 6 IP Address that also provides public access to your from anywhere on the Internet.
- An internal Rackspace Network (ServiceNet) IP address that enables you to access the server from other Cloud Servers or Cloud Load Balancers over the internal Rackspace Network.
The following screenshot shows the three IP addresses in the Networks and Security Groups section in the Cloud Control Panel:

Use regions and the Rackspace Network to manage bandwidth charges
If your Cloud Server (also known as a node within the Cloud Load Balancers product) and Cloud Load Balancer are set up in the same region, they can send traffic over the Rackspace Network without traversing the Internet and therefore incur zero bandwidth charges.
This not only saves you money, but speeds up performance of the load balancer. However, if the node is in the Chicago region and your Load Balancer is set up in Dallas, for example, traffic cannot go across the Rackspace Network only. It must traverse the Internet, which incurs normal bandwidth charges that appear on your monthly invoice.
Select a region for a load balancer
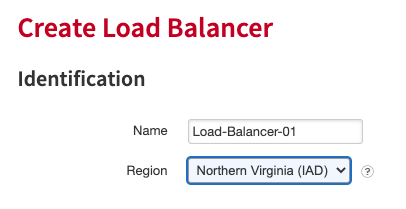
To take advantage of this cost savings and performance feature, you need to match the location of your Cloud Load Balancer with the node. The following screenshot shows you Configuration area of the Create Load Balancer page in the Cloud Control Panel.

Select the region in the Identification section of the Create Load Balancer
screen in the Cloud Control Panel.
Note: If you're load balancing an external node (one that is external to the Rackspace Cloud), choose the region that is geographically closest to the external node.
Updated over 1 year ago
