Retrieve CDN access logs on a per-customer, per-container basis
This article shows you how to monitor Rackspace Cloud Files usage so that you can bill
individual clients for the amount of bandwidth that they use to stream files
on your Cloud Files storage.
HyperText Transfer Protocol (HTTP) logs have functional limitations. The same
restrictions that apply to virtual host domains on web servers also apply to
Cloud Files. As a result, you should not put files belonging to
different customers in the same container, in the same way that you do not
put files belonging to different customers on the same virtual host.
This tutorial covers generating a different log set for each container for
each customer, and then downloading and processing those logs.
Functional limitations
If you are tracking which files belong to which customers, you can perform a
grep operation to get the content delivery network (CDN) access logs for a
file and output them to a new customer_file_requests.log file. However,
this option is impractical because it requires you to do a significant amount
of extra scripting.
Note: GoAccess and other log parsers separate file request hits and
bandwidth. However, we recommend that you use the approach in this tutorial
instead.
Think of Cloud Files CDN access logs in the same way that you would any
customer virtual host that is running on a Plesk® or cPanel® box.
In such cases, keeping the virtual hosts separate so that you
can bill each customer based on the log file for that virtual host is important.
You should also use the same approach for the container logs.
Step 1: Enable the CDN access logs for a Cloud Files container
Before you proceed, ensure that logging is enabled on
your Cloud Files CDN-enabled container. Logging is not turned on by default.
If you haven't created a container yet, you can create one by performing the
following steps:
- Log in to the Cloud Control Panel.
- In the top navigation bar, click Select a Product > Rackspace Cloud.
- Select Storage > Files.
- Click Create Container.
- Specify a name for the container, and then click Create Container.
- To enable the CDN access logs on that container, click the gear icon next
to the container and select Enable Logs.
Repeat these steps for all of the customers that you need to log individually.
All of the CDN access logs are stored in a Cloud Files container named
.CDN_ACCESS_LOGS/containername/. The HTTP request logs are split by
customer so that you can bill customers individually.
Step 2: Retrieve the CDN access logs recursively (all CDN container logs)
You can download the .CDN_ACCESS_LOGS by using cURL, but this
example uses Swiftly,
a Rackspace-developed client tool that
enables you to download from and upload to Cloud Files. This tool
simplifies the process and enables you to automate it.
You need the following pieces of information to use Swiftly:
- The user name that you use to log in to the Cloud Control Panel
- The API key that you use to log in to the Cloud Control Panel
- Your data center region
Install Swiftly dependencies
You need to install the dependencies in this section to use Swiftly.
CentOS systems
If you are using CentOS®, run the following commands to install Swiftly
dependencies:
yum install python-devel gcc python-pip
pip install swiftly eventlet
APT-based systems
If you are using Debian®, the Ubuntu® operating system, or another aptitude-based operating
system (OS), run the following commands to install Swiftly dependencies:
apt-get install python-dev gcc python-pip
pip install swiftly eventlet
Configuring Swiftly for Cloud Files
Configure Swiftly
Next, you need to configure Swiftly, which uses a configuration file named
.swiftly.conf. This file tells Swiftly what username, password, region,
and endpoint to use.
Swiftly automatically looks for the .swiftly.conf file in the home
directory of the current user. For example, if you are logged in as root, the
path is /root.
Edit the file to use your username, API key, and region as shown in the
following example, which assumes that you are the root user:
su root

touch /root/.swiftly.conf
echo "[swiftly]" > /root/.swiftly.conf
echo "auth_user = mycloudusernamehere" >> /root/.swiftly.conf
echo "auth_key = myapikeyhere" >> /root/.swiftly.conf
echo "auth_url = https://identity.api.rackspacecloud.com/v2.0" >> /root/.swiftly.conf
echo "region = LON" >> /root/.swiftly.conf
Note: You can find your API key in the My Profile & Settings area
under your username in the Cloud Control Panel. Click Show
next to the Rackspace API Key field to display it.
After you set your username, API key, and region in the .swiftly.conf
file, verify that it looks like the following example:
# cat .swiftly.conf
[swiftly]
auth_user = mycloudusernameshouldbeherenow
auth_key =  yourapikeyshouldbeherenow
auth_url = https://identity.api.rackspacecloud.com/v2.0
region = LON
After you verify that Swiftly is configured correctly, verify that it works by
running the following command:
$ swiftly get
.CDN_ACCESS_LOGS
customer1
customer2
customer3
customer4
Retrieving the CDN ACCESS LOGS with Swiftly
Download the CDN access logs
Next, create a folder for the access logs, move to that folder, and then
download the logs by running the following commands:
mkdir /root/.CDN_ACCESS_LOGS

cd /root/.CDN_ACCESS_LOGS

swiftly --verbose --eventlet --concurrency=100 get .CDN_ACCESS_LOGS --all-objects -o ./
Processing the CDN ACCESS LOGS
Swiftly has downloaded all of the access logs to folder
/root/.CDN_ACCESS_LOGS.
Process the CDN access logs
This section includes a small parser written in Bash that demonstrates one way
that you can process the CDN access logs. However, other National Center for
Supercomputing Applications (NCSA) or Common Log Format (CLF) parsers such as
AWStats, Matomo™ (formerly Piwik), and GoAccess also work.
The script uses GoAccess because it works on the Linux® command line, it's
simple, and it generates excellent HTML outputs. The script parses the CDN
access logs in bulk for thousands of different containers with a one-to-one
relationship (one customer per container).
You can use this script to process your own CDN log files:
#!/bin/bash

# Author : Adam Bull
# Title: Rackspace CDN log parser
# Date: November 7th 2018

echo "Deleting previous jobs"
rm -rf parsed;
rm -rf parsed-combined

ls -ld */ | awk '{print $9}' | grep -v parsed > alldirs.txt


# Create location for combined file listing for CDN logs
mkdir parsed

# Create location for combined CDN or access logs
mkdir parsed-combined

# Build a list of the CDN access logs
echo "Building list of Downloaded .CDN_ACCESS_LOG Files"
sleep 3
while read m; do
folder=$(echo "$m" | sed 's@/@@g')
echo $folder
        echo "$m" | xargs -i find ./{} -type f -print > "parsed/$folder.log"
done < alldirs.txt

# Concatenate the files and use the xargs command to produce all of the log output, then cut processing and redirect to parsed-combined/$folder
echo "Combining .CDN_ACCESS_LOG files for bulk processing and converting into NCSA format"
sleep 3
while read m; do
folder=$(echo "$m" | sed 's@/@@g')
cat "parsed/$folder.log" | xargs -i zcat {} | cut -d' ' -f1-10  > "parsed-combined/$folder"
done < alldirs.txt

# Process the log files by using GoAccess, generate HTML reports
echo "Generating GoAccess HTML logs"
sleep 3
while read m; do
folder=$(echo "$m" | sed 's@/@@g')
goaccess -f "parsed-combined/$folder" -a -o "/var/www/html/$folder.html"
done < alldirs.txt
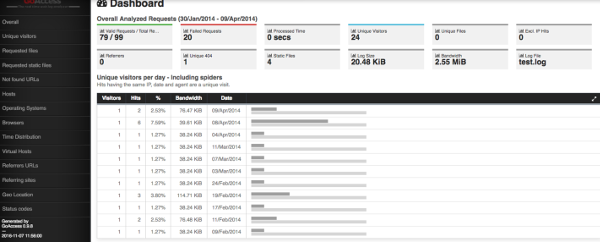
Your GoAccess CDN access logs should look like the following example:
Install httpd for the CDN log server
Run the following command to install the Apache® HTTP daemon (httpd) for the CDN log server:
yum install httpd awstats
If you do not have thousands of containers, you might want to generate an
index of the logs so that you can browse through them.
Important: If each container name is the host name of the CDN, you can
use the following commands to index your logs. If you are not using this
approach, the steps that you need to use might differ.
Index the logs by using the following commands:
[root@cdn-log-parser-mother html]# pwd
/var/www/html
[root@cdn-log-parser-mother html]# ls -al | awk '{print $9}' | xargs -i echo " {}
" > index.html
Updated 4 months ago