Manage public folders in the control panel for Hosted Exchange 2010
You can add public folders to your Hosted Microsoft® Exchange®
2010 domain. Each Exchange domain is allotted 25 folders, with up to 250
MB of storage per folder. You can manage your public folders within the
Cloud Office Control Panel and
create, rename, delete, and mail-enabled folders directly in the Control
Panel.
To begin working with public folders, navigate to the Microsoft Exchange
section of the Cloud Office Control Panel and click Folders. If you
do not already have public folders enabled, a prompt reminds you to enable
public folders.
This article provides information and instructions for working with
public folders in the Cloud Office Control Panel:
List public folders
When you click on Folders, a page that lists all of your public
folders displays.
The Folders page shows the following information about the public
folders that you created:
- Folder name
- Public folder type (Mail, Contact, Calendar, and so on)
- Whether the folders are mail-enabled
- The amount of storage that the folders are using

Manage public folders
Click the gear icons on the Public Folders page to manage your
folders. Clicking the gear icon displays a menu from which you can
choose to rename folders, edit mail settings, create subfolders, or
delete a specific folder. On this page, you can also bulk delete
folders, create new folders, and manage different components of the
folder.
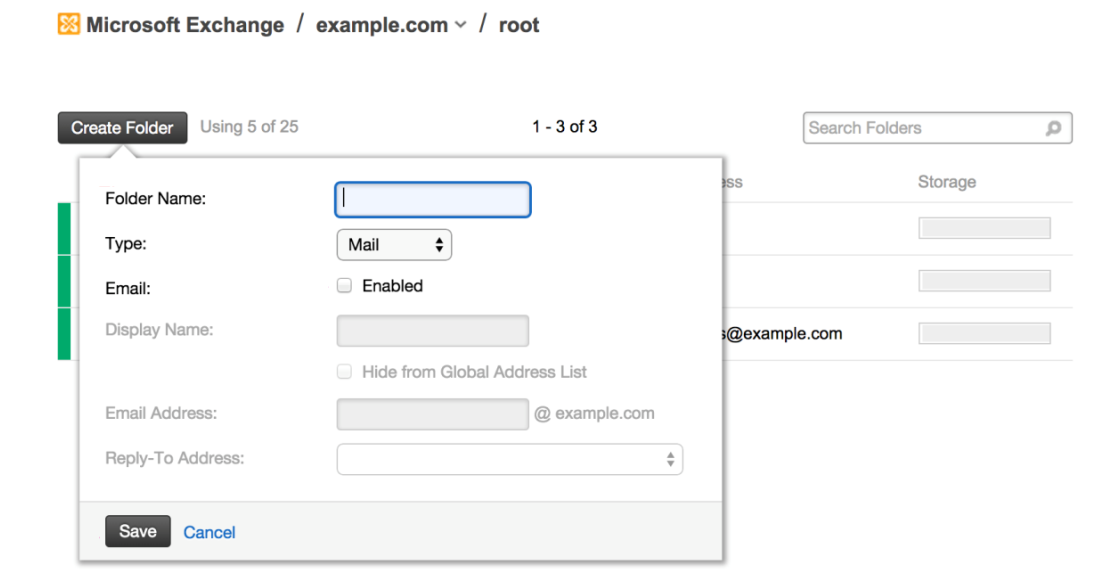
Create a public folder
As an admin, you can create a new folder by performing the following
steps:
-
Click Create Folder. A pop-up dialog box displays.
-
Name the folder. This name appears in the list of folders.
-
Select the type of folder.
-
To mail-enabled the folder, select the Enabled check box.
-
Specify or edit the display name.
-
Specify or edit the email address for the folder.
-
Specify or edit the reply-to address.
-
Click Save to create the folder.
Delete public folder
-
In the list on the Folders page, click the gear icon next to the folder you want to delete.

-
From the menu, select Delete.
-
In the confirmation pop-up box, click Delete Folder to delete the folder permanently.
Bulk-delete public folders
From the list of public folders, you can bulk delete multiple folders at once.
-
Select the check box to the left of each folder that you want
to delete. If you want to delete all the folders in the list, select
the check box next to the Folder Name label at the top of the list. -
Click the gear icon next to the Folder Name label at the top of
the list and select Delete.
The delete dialog displays to confirm that you are about to delete
the selected folders.
-
In the confirmation popup box, click Delete Folders to
delete the selected folders permanently.
Rename public folder
- In the list of folders on the Folders page, click the gear icon next
to the folder that you want to rename. - Select Rename, and then enter a new name for the folder.
- Click Rename.

View and create subfolders (child folders)
To view the subfolders created under a folder, click the name of the parent folder in the list.
All of the subfolders nested under the parent folder display. The
folder path displays as a breadcrumb trail along the top of the Folders
page. The path shows as domain > root > parentFolder,
and the page you are on is the subfolder list, as shown in the following
example:

You can create a subfolder in several ways:
Create a subfolder from the parent folder's page
- Click the gear icon next to the folder for which you want to
create subfolders. - Click Create Subfolder.
- In the Folder Name field, specify a name for the subfolder.
- Select the type of folder.
- To mail-enable the folder, select the Enabled check box.
- Specify or edit the display name.
- Specify or edit the email address for the folder.
- Select or edit the reply-to address.
- Click Save to create the folder.
Create a subfolder from the public folder listing page
- Click the gear icon.
- Click Create Subfolder.
- In the Folder Name field, specify a name for the subfolder.
- Select the type of folder.
- Select if this is a mail-enabled folder.
- Click Save to create the folder.
Create a subfolder from the subfolder listing page
- In the folder list, click the name of the folder for which you want
to create a subfolder. The subfolder view displays. - Click Create Subfolder.
- In the Folder Name field, specify a name for the subfolder.
- Select the type of folder.
- To mail-enable the folder, select the Enabled check box.
- Click Save to create the folder.

Search for a specific folder or subfolder
You can find a specific folder in the following ways:
- Follow the folder path to the folder.
- If you know all or part of the folder's name but do not know its
path (for example, the parent folder's name), you can search for it
by using the Search Folders box. For example, if you have a
subfolder called Sales Force but can recall only that it has
the word sales in it, you can search for the term sales. The
application returns all folders with the word sales.

Edit mail settings
You can edit the mail settings for a folder by performing the following
steps.
- Click the gear icon next to the folder name.
- From the menu, select Edit Email Settings.
- If you want to mail-enable the folder, select
the Enabled check box. - Specify or edit the display name.
- Specify or edit the email address for the folder
- Select or edit the reply-to address.
- Click Save.
Updated 4 months ago