FAWS - Legacy Service Offerings
This guide provides a detailed look on Rackspace Technologies Legacy Offerings that deliver Fanatical Support for AWS and are still being used by some of our clients.
For a list of current offerings, visit Elastic Engineering and Optimizer.
To sign up, visit Contact us.
Service Levels
For a list of current offerings, refer to Elastic Engineering and Optimizer.
Fanatical Support for AWS combines tooling and automation with human experts to deliver a world-class experience. We offer two service levels, Navigator and Aviator, which are selected for each AWS account we support.
- Navigator: “I want to do most things myself, but I want access to Rackspace’s AWS experts and tools.”
- Aviator: “I want Rackspace to operate and manage my AWS environments for me or with me.”
Navigator and Aviator are now legacy service levels that existing customers can maintain on their accounts.
Starting in July 2019, Service Blocks are the standard support offers. Please see the Service Blocks section of the Product Guide for further information about these offers.
Features: Tooling and Automation
A curated set of Rackspace developed and best of breed AWS ecosystem tools:
- AWS Account Generation Pre-Configured with Account defaults.
- Service Levels: Navigator and Aviator.
- Features:
- AWS root account credentials encrypted and locked away.
- MFA enabled on root account and secret configuration key encrypted and locked away.
- No named IAM users; all AWS access via single, dynamically scoped IAM role and temporary STS credentials.
- CloudTrail and AWS Config enabled with centralized logging.
- Separate AWS accounts per environment (e.g. development, staging, production).
- Access to AWS Trusted Advisor.
- Service Levels: Navigator, Aviator, Platform Essentials.
- Features:
- Access to all Trusted Advisor checks.
- Cloudhealth.
- Service Levels: Navigator, Aviator, Platform Essentials
- Features:
- Cost and usage visualizations.
- Savings recommendations.
- Governance through policies and actions.
- Passport v2.
- Service Levels: Aviator, Manage & Operate (customer and Rackspace use).
- Features:
- On-demand provisioning of bastions for secure network access to VPC resources.
- Automatic, temporary credential management via the In-Instance Credential Management Service.
- Full logging.
- In-Instance Credential Management Service.
- Service Levels: Aviator, Manage & Operate (customer and Rackspace use).
- Features:
- Automatic certificate authority and SSH key rotation across your fleet of EC2 instances.
- Temporary, fast expiring keys with silent renewal.
- AWS Instance Scheduler.
- Service Levels: Aviator, Manage & Operate.
- Features:
- Deployment, configuration and management of AWS Instance Scheduler.
- Allows configuration of custom start and stop schedules for EC2 and RDS instances.
- Provides cost saving on environments that aren’t used 24/7.
Features: Human Experts
Tap into an army of certified AWS architects and engineers ready to deliver Fanatical Support to your business 24x7x365. Available via ticket and phone.
- AWS best practice and architecture consultation from 100% AWS certified experts.
- Service Levels: Navigator, Platform Essentials (standard use cases) and Aviator, Manage & Operate (customized to your specific application).
- Hands-on management and assistance for all supported AWS services.
- Service Levels: Aviator, Manage & Operate.
- EC2 operating system management.
- Service Levels: Aviator, Manage & Operate.
- Features:
- Supported operating systems are listed in the Supported Operating Systems section.
- Configuration, Optimization, Patching, Upgrades.
- Prerequisites: The following agents must be installed and working on your EC2 instances in order to be supported by Rackspace.
- Passport - The server agent allows Rackspace support team to access your instances via SSH (Linux®) or RDP (Windows®).
- SSM - The AWS Systems Manager agent allows Rackspace to manage your EC2 instances remotely (instance configuration, maintenance of agent versions and updates, OS patching, software inventory monitoring).
- IAM role “RackspaceMinimumSSMRole” with attached IAM policy “AmazonSSMManagedInstanceCore” will be attached to EC2 instances that are provisioned without a role/instance profile attached.
- IAM policy “AmazonSSMManagedInstanceCore” will be applied to EC2-attached instance roles in which the policy is absent.
- Security group and network policies must allow access to SSM endpoints.
- Rackspace Watchman.
- Service Levels: Aviator, Manage & Operate.
- Features:
- Rackspace AWS certified engineer response to CloudWatch alarms 24x7x365
- Set up CloudWatch alarms to a pre-configured SNS topic or let us do it for you.
- Custom CloudFormation template creation.
- Service Levels: Aviator, Architect & Deploy.
- Data restoration support (for EC2 and RDS exclusively).
- Service Levels: Aviator, Manage & Operate.
Response Time SLAs
Rackspace will respond to your support requests submitted to us via ticket in the following timeframes. All requests should be made directly to Rackspace and we will escalate to AWS directly, if needed.
- Emergency (Business-Critical System Outage / Extreme Business Impact): If Rackspace Infrastructure monitoring and alerting services determines your AWS Services are inaccessible from the public internet, which may result in the inability to complete business transactions, our initial response to emergency monitoring alarms will occur within fifteen minutes (Aviator service level only; monitoring response is not included in the Navigator service level).
- Urgent (Production System Outage / Significant Business Impact): If your AWS Services are functioning improperly or at less than optimal performance and the failure is impacting business transactions, our initial response is 60 minutes. Customers must call Rackspace immediately after creating the Urgent ticket to trigger the one hour response guarantee. This severity is only available for the Aviator service level.
- High (Production System Impaired / Moderate Business Impact): If your AWS Services are functioning improperly or at less than optimal performance, but the failure is not impacting business transactions, our initial response to your support request submitted to us via a ticket will occur within four hours at the Aviator or Navigator service levels.
- Normal (Issues and Requests / Minimal Business Impact): If your AWS Services are functioning normally but you have a time sensitive request, question, or issue that needs addressed, our initial response to your support request submitted to us via a ticket will occur within 12 hours at the Aviator and Navigator service levels.
- Low (General Information, Questions, and Guidance): If your AWS Services are functioning normally but you require information or assistance, wish to schedule maintenance, or require the completion of any other non-immediate tasks, our initial response to your support request submitted to us via a ticket will occur within 24 hours at the Aviator and Navigator service levels.
Supported Operating Systems
Fanatical Support for AWS supports the following operating systems (OS’s):
| Operating System | Supported Until |
|---|---|
| Amazon Linux 2 | June 30, 2023 |
| Red Hat® Enterprise Linux® (RHEL) and CentOS® 7 | June 30, 2024 |
| RHEL and CentOS 8 | May 2029 |
| Ubuntu® 16.04 LTS | April 30, 2021 |
| Ubuntu 18.04 LTS | April 30, 2023 |
| Ubuntu 20.04 LTS | April 30, 2025 |
| Windows Server® 2012 R2 | October 2023 |
| Windows Server 2016 | January 2027 |
| Windows Server 2019 | January 2029 |
The following OSs are approaching End of Life (EOL) as determined by the OS vendor:
| Operating System | EOL Date |
|---|---|
| RHEL and CentOS 6 | November 2020 |
| Amazon Linux (legacy) | December 2020 |
| Ubuntu 16.04 LTS |
Infrastructure Management
For a list of current offerings, visit Elastic Engineering and Optimizer.
Based on your desired infrastructure management preference, some AWS environments built under the Fanatical Support for AWS Aviator service level are managed directly via the AWS console, while others are managed through a process known as Infrastructure as Code (IaC), specifically using an AWS service named CloudFormation.
Management via the AWS console
Organizations that are not used to Infrastructure as Code (IaC) practices can benefit from a simplified management of their AWS environment via the AWS console. With this type of management, small changes can be implemented quicker. If your environment is managed via the AWS console, you have the added flexibility to make changes by yourselves, if you wish to do so. However, new resources need to be deployed by Rackspace.
Management via IaC using CloudFormation
Organizations that are comfortable with IaC practices can have their AWS environments managed using CloudFormation. With this method of management, all changes must be requested via tickets and deployed by Rackspace. Changes via the AWS console are not allowed because they can conflict with CloudFormation management, resulting in downtime, data loss, or delays to reconcile these manual changes. It is important that all changes to your environment are managed with CloudFormation.
Why use CloudFormation?
If you are comfortable working with a strict change management process and giving up the ability to make changes via the AWS console, managing your environment using CloudFormation can provide the following benefits:
- Ability to automatically and consistently rebuild or duplicate environments.
- Version-controlled and quality checked infrastructure changes.
- Automated testing of the interconnected parts of an environment.
- Inherent Disaster Recovery plans for your infrastructure.
What resources are managed with CloudFormation?
If your environment is managed via IaC, you should consider all of it under the control of CloudFormation, unless the Rackspace Support team instructs you otherwise.
The following resources are never maintained with CloudFormation, however we still recommend engaging the Rackspace Support team for any changes!
- IAM User Console Passwords
- IAM User Access Keys
- Elastic Beanstalk Environments
- Route 53 External Zones
Resources in the list above can be modified using the AWS console without the risk of creating configuration drift. If you’re unsure, contact the Rackspace Support team.
What if I make changes outside of CloudFormation?
If your environment is managed via IaC, making changes outside of CloudFormation creates configuration drift, meaning that the code we use to maintain your environment is no longer in sync with what actually exists within your AWS account. This may result in:
- Downtime or data loss, as manual infrastructure changes are overwritten (configuration changed, resources recreated or deleted) by a CloudFormation stack update.
- Delays implementing changes you request, as the CloudFormation templates and parameters must be reconciled with manual infrastructure changes before proceeding.
The impact to the infrastructure may be wider than just the directly modified resources, and in some circumstances may require downtime or a rebuild of much of the environment. Even the smallest change can have wide reaching consequences!
If you have been forced to make manual infrastructure changes in an emergency, contact the Rackspace Support team as soon as possible to document the changes that were applied.
I don’t want to use CloudFormation, can I opt out?
Yes, Rackspace allows your environment to be managed via the AWS console. If you wish to discuss the strategy for ongoing management of your environments, don’t hesitate to contact your Account Manager, who will be happy to discuss the options with you!
Terraform and GitHub Support (Limited Availability)
Fanatical Support for AWS offers, in limited availability, support for Terraform and GitHub as an alternative to having your infrastructure managed by CloudFormation. If you’re interested in learning more about this future option, reach out to your Account Manager.
Service Blocks
For a list of current offerings, refer to Elastic Engineering and Optimizer.
Rackspace knows that our customers have varying needs at different stages of their cloud journey. That’s why we provide a set of support offers that address your needs at any stage of your cloud lifecycle. Our services include architecture help, access to experts to solve your problems, security assistance, 24x7 management, cost governance, and other value-added services–all backed by AWS certified engineers and architects.
The following offers enable you to customize your experience and choose the service options that match your needs:
Platform Essentials
Platform Essentials is the entry ticket for Rackspace services with all other services added on to it. Platform Essentials includes:
- AWS Support powered by AWS Certified Rackers and backed by AWS Enterprise Support.
- Named Account Manager for ongoing business needs.
- Unified billing for all your Rackspace platforms and other Managed Public Cloud accounts.
- Access to the Rackspace Technology Customer Portal to manage your AWS accounts, your users, and their permissions.
- Industry-leading tooling that provides you better insight into your AWS environment:
- Cloudhealth: AWS inventory, best practice checks, cost analytics, and cost optimization.
- Waypoint: Rackspace account summary to track spend and critical information regarding your AWS accounts.
- Logbook: Aggregation of your control plane logs across all AWS accounts.
Platform Essentials customers receive 24x7 guidance and support on their AWS accounts. Rackspace responds to support requests submitted in tickets with the following timeframes:
- Urgent: Production system outage or significant business impact [60 minute response time]
- High: Production system impaired or moderate business impact [4 hour response time]
- Normal: Issues and requests or minimal business impact [12 hour response time]
- Low: General information, questions, and guidance [24 hour response time]
Make all requests directly to Rackspace, and we can escalate to AWS if needed.
Architect & Deploy
With the Rackspace Architect & Deploy service block, our experts apply best practices to design and deploy public cloud infrastructure that meets your business needs. It minimizes costs, maximizes availability, security, and performance, enabling you to outsource ongoing management activities to Rackspace. The Architect & Deploy offer includes:
- An Onboarding Manager to coordinate end-to-end activities and project manage your AWS deployment.
- A Solutions Architect to understand your requirements and create a high-level proposal document for your approval.
- A Build Engineer to build and deploy the environment according to the design document.
- A Design document to describes the detailed solution design. We share this document and require your approval of the design before deploying the solution.
- An AWS Environment in which the deployed solution runs on AWS.
- Configuration of Rackspace standard monitoring that is integrated with the Rackspace ticketing system.
Discover & Enhance
With the Rackspace Discover & Enhance service block, our experts assess your existing AWS environment to identify areas for enhancement. Based on your input, our engineers apply best practices to update your public cloud infrastructure so that you can be confident that it continues to meet your business needs while minimizing costs and maximizing availability, security, and performance.
The Discover & Enhance service block is available for any AWS environment that the Rackspace Platform Essentials service block already supports. When you purchase this service block, you also have the option to add on the Manage & Operate service block to upgrade to a higher level of ongoing management for your AWS environment.
Manage & Operate
With tooling, automation, monitoring, and 24x7 access to certified cloud specialists for day-to-day operational support and management, Manage & Operate allows you and your team to rest easy knowing Rackspace has your back. Manage & Operate includes access to additional tooling like Passport (an instance-access request control tool), Watchman (turns monitoring alerts to tickets for Rackers to address), and Instance Scheduler (configuration of custom start and stop schedules for EC2 and RDS instances). Your Rackspace technical support professionals help you resolve issues quickly and effectively at any time. Manage & Operate includes:
- Named Account Manager to coordinate escalations, follow AWS technical issues through to resolution, and help focus on the AWS technical operations of the account.
- Access to 24x7x365 Technical Operations staffed around the clock and around the globe to help when you experience an issue with your AWS infrastructure.
- 24x7x365 management of your environment
- Operating system management
- Set up of AWS Infrastructure monitoring by using AWS CloudWatch and response to your monitoring alerts through the Rackspace Watchman tool with response time SLAs up to 15 minutes.
- Passport, providing secured bastion access to your virtual instances.
- Watchman for creation of monitoring your account alarm tickets.
- Instance Scheduler for configuring custom start and stop schedules for EC2 and RDS instances.
In addition to the response time SLAs for Cloud Foundation, Manage & Operate customers have access to:
- Emergency: Business-critical system outage or extreme business impact [15 minute response time]
Architect & Deploy or Discover & Enhance is a pre-requisite for any customers entering in to Manage & Operate.
Complex Cloud Operations
As a business matures or their cloud spend increases, operating AWS can become more complex. Complex Cloud Operations helps you manage this complexity with Rackspace experts that have worked with other similarly complex cloud deployments. Whether you want a deeper technical relationship to drive outcomes or need assistance handling your architecture’s complexity, Complex Cloud Operations can assist.
Complex Cloud Operations has the following tiers of support:
- Bronze: Lead Cloud Engineer shared with ten customers
- Silver: Lead Cloud Engineer shared with four customers
- Gold: Lead Cloud Engineer shared with two customers
- Platinum: Dedicated Lead Cloud Engineer
Rackspace recommends a tier of support (Bronze, Silver, Gold, or Platinum) based on customer complexity and requirements. Quarterly, customers work with their resources to scope what available capabilities we deliver based on the commitment level and customer requirements. Potential activities include:
- ITIL problem management of recurring incidents.
- Architecture diagrams of existing infrastructure.
- Creation or maintenance of basic post-deployment infrastructure configuration management scripts.
- Recommendations review regarding security, availability, performance, and AWS Trusted Advisor with a remediation plan.
- Cost-saving recommendation implementation by terminating idle or unused resources, right-sizing resources, updating previous generation resources.
- Participation in Customer Change Advisory Boards and Stand-Ups.
- Training sessions on relevant public cloud topics.
- Well-Architected reviews on different parts of your deployment.
- In-Depth Roadmap reviews for Rackspace Offers and Cloud Products.
- Big Data, Serverless, and Container experts.
Additional Rackspace service blocks
Rackspace offers additional services that you can layer on top of your Fanatical Support for AWS Service Blocks to create a fully managed cloud solution for your business needs.
Managed Security–Proactive Detection and Response
With Rackspace Managed Security–Proactive Detection and Response, our security experts defend your business against advanced cyber threats with 24x7x365 support from our Security Operations Center (SOC). Proactive Detection and Response includes:
- 24x7x365 monitoring and detection from security analysts using best-of-breed curated technology (host-based detection, network detection, and a security analytics platform).
- Proactive cyber hunting to scan for anomalous activity.
- Real-time response and remediation of threats with pre-approved actions.
- Auto-Discovery and agent deployment of new compute instances with real-time agent health status and an environment coverage map.
- Weekly and monthly reporting to communicate observations, alerts, and actions.
- Access to the Rackspace security dashboard that shows top vulnerabilities, hunt missions, events, and the environment coverage map.
Managed Security–Compliance Assistance
With Compliance Assistance, our Managed Security compliance experts help customers define, manage, and validate selected Governance Risk and Compliance (GRC) requirements. Compliance Assistance includes:
- Configuration Hardening Monitoring
- Patch Monitoring
- File Integrity Monitoring
- User Access Monitoring
- Monthly and ad hoc compliance reports
Application Managed Services
Your business success depends on the applications you rely on–from servicing customers, to managing supply chains, to getting new products to market. Application Managed Services from Rackspace helps optimize your application environment so you can deliver on your service level agreements, free up resources, and reduce costs. Services include:
- Advanced configuration and optimization: System engineers custom-tailor your applications to fit your individual environment and optimize performance and cost.
- Administration, monitoring, and maintenance: Application specialists reduce the burden on your staff by administering, maintaining, and continuously monitoring your applications.
- Data Services: Data specialists apply best practices and automated technology to modernize your database footprint and maximize data utility.
Talk to your Account Manager if you are interested in learning more about the service block offers.
Advanced Monitoring and Resolution
Built for customers’ critical workloads and always vigilant 24x7x365, our team of operations engineers monitors and responds to alerts in customer environments. Advanced Monitoring and Resolution (AMR) is an optionated deployment of cloud services monitors that act as an extension of customer operational teams by providing automation where possible and human actions for activities beyond automation.
With Rackspace Technology acting as an extension of your 24x7 operational team, you can focus on what matters most to your business.
AMR services
AMR provides real-time monitoring and alerting for your cloud environment. An expert team of operations engineers monitors and responds to any alerts in your environment. Rackspace Technology has the breadth of knowledge required to operate the most complex cloud deployments on a global scale. By combining with the Rackspace Elastic Engineering service, you gain the peace of mind that comes with having an environment cared for by a team of cloud-certified operations engineers who help drive continuous innovation.
AMR includes:
- Optionated deployment of cloud services monitoring using known best-practices
- 24x7x365 monitoring coverage backed by cloud experts
- Improved resolution timelines by leveraging Rackspace Technology automation
- Guidance for a default list of alerts and thresholds, which we can customize to meet customer needs
- Ongoing support to adjust monitoring as the customer environment grows
VM Management
VM Management (VMM) is a simple, full-featured tool that makes your most critical and time-consuming server tasks easy to complete. Built to be multi-cloud, VMM manages your VMs wherever they are located through a simple interface and billed on a consolidated invoice. Set up your cloud the way you want and then proceed with your migrations, transformations, and new development activities. VMM complements Rackspace Elastic Engineering by removing critical but distracting workloads so you can focus your resources on building your next-generation infrastructure.
Services
VMM is currently in Limited Availability (LA). Descriptions of all services are subject to change. In LA, VMM provides patching, and in subsequent releases, it might include backup services for multi-cloud infrastructures. VMM also provides the following services:
- Reporting
- Support
- API and UI access through the Rackspace Technology Control Panel
Patching
VMM provides standard baseline patching. Customers can create custom patch baselines, patch groups, and maintenance windows to adhere to their own patching strategy. The API makes all of these services available for customization.
Best practices for each Operating System (OS) define the patch baselines, but we customize them to fit customer needs.
In addition, customers can inject their own customization for patching to enable process interruptions like reboots, non-standard package downloads, and so on.
Optimizer
Optimizer is a lightweight support option that provides world-class operational tooling, support, and expert guidance needed to get the most out of public cloud infrastructure. With Optimizer, a team of cost optimization experts provides detailed actions and recommendations to maximize workload performance while saving money and supplementing your IT staff.
The Optimizer service includes:
- Unified billing for all of customer Rackspace Technology platforms and other managed public cloud accounts
- Access to the Rackspace Technology Customer Portal for account and user management
Cost optimization
Rackspace Technology provides cost optimization guidance and assistance through cloud-native and third-party tooling. Customers can create tickets for cost optimization questions and request general guidance for infrastructure spend. After receiving a customer request, the Rackspace Technology Optimizer+ Team provides best practice guidance that maximizes workload performance and saves money. Depending on customer spend, cost optimization efforts can include the following activities:
- Access to CloudHealth, which is the leading multi-cloud management platform designed to drive increased business value at every stage of your cloud journey
- Initial cost optimization review
- Cost guidance
- Tagging strategy reviews
- Saving recommendations
- VM supervision and licensing reviews
- Regular cost reviews
Managed Infrastructure as Code
Deployment through infrastructure-as-code (IaC) helps you build and manage cloud infrastructure through code, utilizing software development best practices and industry-standard DevOps tools and techniques. Using an industry-standard tool called Terraform, your infrastructure code is peer reviewed through pull requests, and committed to version control, all while being tested and deployed through automation steps called continuous integration (CI) and continuous delivery (CD).
This means that changes to your environment are managed through this specialized Terraform workflow, and not through the AWS Console directly. Changes in the AWS Console can conflict with Terraform management, resulting in downtime, data loss, or delays to reconcile these manual changes. It is important that all changes to your environment are managed with Terraform. If you need assistance applying a change, the Rackspace Support team will be happy to help.
Change Workflow
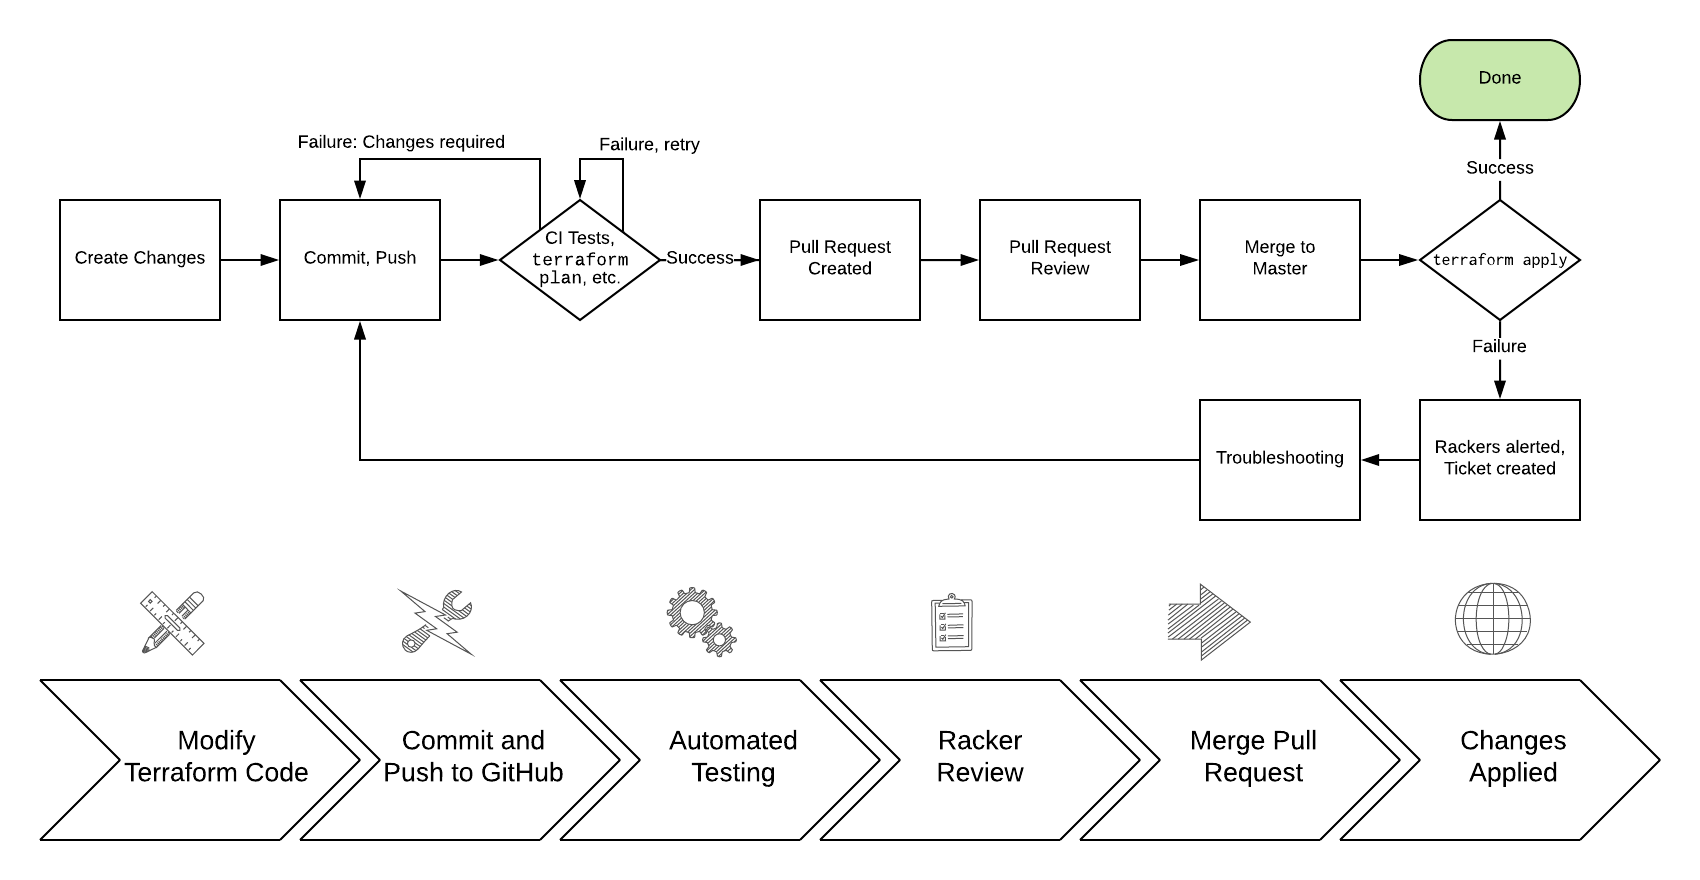
Initiating a change
You may begin the change process via a new pull request or by creating ticket; if you choose to make a pull request, Rackers will be alerted to your pull request and may comment or make additional comments within the pull request. Even if you request a change by creating a ticket, a pull request will be created with your changes, which you may review. You must have a GitHub account if you would like to participate in pull requests.
After you’ve made your Terraform changes, committed them using git, and pushed them up to GitHub.com, your repository will automatically begin building the changes. Specifically, changes will be checked against style rules (also known as linting), and a terraform plan will be run for each layer that contains changes. You may create a pull request at any time while these steps are running.
Pull requests are at the heart of making a change in an infrastructure as code world. A GitHub concept, pull requests, “is how you tell others about changes you’ve pushed to a branch in a repository on GitHub. Once a pull request is opened, you can discuss and review the potential changes with collaborators and add follow-up commits before your changes are merged into the base branch.” Detailed review and conversation about changes is encouraged in GitHub.
You can also open a draft pull request for work that is in Progress. A draft PR (pull request) will not create a notification to Rackspace. Once you are ready to merge, mark the pull request as ready for review and it will generate a notification for a Racker to review your changes.
There are two required checks that must pass for your pull request to be merged:
- Approval (
rackspace/approval): The pull request must be approved by at least one Racker, using the GitHub PR review mechanism. Approvals by the committer will not count towards this requirement. - Plan (
ci/circleci: plan): The branch must successfully passterraform fmtand successfully run terraform plan. If either of these steps fail, you may push additional commits to address them.
Approving a change
Rackers must approve pull requests, before any changes are merged to the master branch. If you would prefer to approve any changes or pull requests as well, please explicitly state this in a ticket or pull request. If you would also like to have a change deployed on a specific schedule, please note that, too.
When Rackers review a pull request, they are looking to understand:
- Did all automated tests and checks pass? Are the code changes technically correct?
- Does this change do what was requested, in an appropriate and well-designed way?
- Can Rackspace proceed with making the change (now or at a specific time)?
- Does this change require any additional, explicit approval from the requestor?
Deploying a change
Changes are deployed when a pull request is merged by you or by Rackspace (adding new commits to the master branch). Using the layers concept described in the Terraform standards in this site, each layer’s terraform plan is repeated, and then terraform apply is run to finish that layer. If Terraform encounters any problems during this process, the entire build of the master branch will be marked failed, and an emergency Rackspace ticket will be created for Rackers to investigate.
Additionally, please consider the following when deploying a change or performing actions on a pull request:
- Any approvals will be dismissed if additional commits are added to the scope of the pull request.
- Only one pull request will be merged to master, and changes applied, at any given time. Attempts to do more than one may fail.
- Any changes that may be staged far in advance may require re-planning or branch updates at the time of the change. Please be sure to inform Rackspace, in a Support ticket, to schedule for a specific change window or maintenance window. Rackspace may require additional time to update an older pull request as part of a scheduled change.
- Rackspace will not automatically deploy changes without Racker interaction or Racker approval, even if two reviewers approve the pull request. Rackspace doesn’t have a default list of changes that can bypass Racker approval.
To raise issues, questions, and changes that aren’t already represented as pull requests, Customers should open a new ticket with Rackspace Support. GitHub’s Issues feature is disabled on all Rackspace-managed repositories.
Using GitHub
Rackspace-wide projects containing documentation and reusable code to build your infrastructure are public and available in the rackspace-infrastructure-automation organization on GitHub.com. These repositories generally start with a rackspace- or aws- prefix to let you know that they are public, shared, and maintained by Rackspace.
If you want access to the repositories that house your infrastructure code, send a request to your Support team and provide your GitHub.com username and the level of access you need (read or read-write). Note that all members of the rackspace-infrastructure-automation organization must have enabled multifactor authentication for their GitHub.com account. After your Support team receives the request, they create an invitation that you need to accept to finish the process of getting access. You can accept this invitation through a link sent to you by email or by going to the repository URL provided by our internal team.
If we need to revoke a user’s GitHub.com access, send a request to your Support team so they can remove this user from the organization. One such example would be when an employee leaves your company.
My Repositories
After you have access, you can find two main types of repositories in GitHub.com under the rackspace-infrastructure-automation organization:
-
Shared Repository: We share these are repositories across all of your accounts in AWS. These are typically reusable Terraform modules that we can apply to more than one AWS account. These start with your customer number, mention the specific cloud provider, and contain a human-readable ending. They are unique to you as a customer, and other customers can’t see them.
Unless you have managed services across multiple clouds with Rackspace, you normally have only one shared repository.
Example:
12345-aws-LargeCorp -
Account Repository: These repositories map directly to an AWS account. They house Terraform files that we use to test and deploy infrastructure directly in that specific account. These start with your customer number, mention the specific AWS account, and contain a human-readable ending. They map directly to the Infrastructure as Code accounts we manage for you.
Examples:
12345-aws-9876541-Production1,12345-aws-9876541-Test1,12345-aws-9876541-Dev1
Branches, forks, and pull requests
Rackspace employs continuous integration and delivery (CI/CD) to deploy your infrastructure based on the master branch of your repository. Therefore, the master branch should always reflect a consistent, deployable, and current expected state of your infrastructure. Because the master branch is also protected from unreviewed changes, we only use the pull request process to modify it.
Other branches should be short-lived, so we use them to propose changes by using a pull request into master. The process does not build branches from forks (tested or deployed), so we recommend you push to a branch inside the main repository. When the shared repository contains code or files needed by an account repository, Rackspace employs tags by using the GitHub release mechanism.
Repository layout
The following list of files shows what you can expect to find in your repository, but some types of repositories might not have all directories and files:
- README.md
- .circleci/config.yml
- .terraform-version
- docs
- layers/_main/main.tf
- modules/example/main.tf
Following is an explanation of each item:
- README.md and docs/: All repositories start with a default readme file and documentation directory, which we use for any documentation or reference material. Rackers working on your requests can refer to this material as needed.
- .circleci/config.yml: This file configures the CI/CD system with specific workflow steps to execute and a defines a container in which to run them. You should not modify this file unless you coordinate with Rackspace.
- .terraform-version: Our tooling and automation uses this file to call Terraform Version Manager (tfenv). This process ensures that we use only a specific, intended version of the Terraform CLI when building and deploying your infrastructure.
- layers/: Account Repositories have this directory, which contains different groupings of Terraform files that make up one state. When we deploy your infrastructure, we test and deploy only layers that contain changes. You can find a more detailed explanation of this design in the Terraform section of this guide.
- modules/: Your Shared Repository has this directory, which contains Terraform modules intended for reuse.
If you run Terraform locally, you might also see a .terraform directory. This contains configuration and data that you should not commit to the repository. This ensures our build process always fetches the latest providers, modules, and state configuration needed to build your environment.
Using Terraform
What is Terraform?
“Terraform is a tool for building, changing, and versioning infrastructure safely and efficiently. Terraform can manage existing and popular service providers as well as custom in-house solutions.” – [Introduction to Terraform](https://www.terraform.io/intro/index.html)
Making changes with Terraform
Rackspace strongly recommends that all changes be made through CI/CD tooling and Terraform should not be run locally except in extreme cases, especially terraform apply. Because all repositories have a .terraform-version file, and are named appropriately for a specific AWS account, our tooling will ensure that the correct version of Terraform is executed against the correct account.
As mentioned in the Using GitHub section of this documentation, there is also a shared repository for Terraform modules you may wish to reuse across multiple accounts. Rackspace will create “GitHub release” objects in this repository, which automatically makes tags that we can use to reference specific modules at specific points in time.
Please see the later part of this document for specific standards Rackspace recommends when creating Terraform modules and Terraform configuration.
Where is Terraform state stored?
Rackspace maintains a separate S3 bucket for storing the Terraform state of each AWS account. Access to this bucket and its contents is restricted to the Rackspace role that Rackspace maintains on every AWS account. By default, temporary credentials retrieved from your control panel will use the Rackspace role and automatically have access to this bucket, should you need it. You can read more about the Rackspace role in the AWS account defaults section of this documentation.
In addition, Rackspace stores these buckets in an entirely isolated AWS account, and implements best practices such as requiring bucket encryption, access logging, versioning, and preventing accidental public access. Because S3 bucket names are globally unique, and as part of a defense-in-depth strategy, we choose an arbitrary, opaque name for this bucket that cannot be mapped back to an AWS account. We provide the bucket name in the logged output from each CI/CD job, as well as the full terraform commands we run, should you want to inspect it or use it to run Terraform locally.
Grouping state into layers
There are a few different designs employed in the Terraform community for how to structure your Terraform files, modules, and directories. The community around Terraform has written blog posts and spoken at HashiConf about how these patterns evolve over time; many of the recommendations focus on how to best group Terraform state. At Rackspace, we’ve built upon the existing best practices (e.g., ‘module-per-environment’) and created a concept we call layers in order to isolate Terraform state.
What is a layer?
Put simply, a layer is a directory that is treated as a single Terraform configuration. It is a logical grouping of related resources that should be managed together by Terraform. Layers are placed in the layers/ directory inside an Account Repository. Our automation will perform all of the usual Terraform workflow steps (init, plan, apply) on each layer, alphabetically.
In collaboration with experienced Rackers, you should carefully consider how to logically group the state of your AWS resources into layers; layers could represent environments like production or test, regions your application may be hosted in, application tiers like “database” or “web servers,” or even applications that share availability requirements.
Here are some considerations that Rackers will discuss with you when planning out your environment:
- ensure resources frequently modified together are also grouped together in the same layer
- keep layers small, to limit blast radius and ensure refreshing state is quick/safe
- keep dependencies between layers simple, as changes must take dependencies into consideration manually
- consider reading state from another layer, using a data source; never write to another layer’s state
- for small environments, consider that a single layer may acceptable, but moving resources between layers is hard
Writing and organizing Terraform with modules
Generally, Rackspace maintains modules for most common use cases, and uses these modules to build out your account. If we do not have a pre-existing module, the next best choice is to use the built-in aws_* resources offered by the AWS provider for Terraform. Please let us know if we don’t have a module or best practice for building out a specific resource or AWS product.
A common recommendation in the Terraform community is to think of modules as functions that take an input and provide an output. Modules can be built in your shared repository or in your account repositories. If you find yourself writing the same set of resources or functionality over and over again, consider building a module instead.
When to consider writing a module:
- When multiple resources should always be used together (e.g. a CloudWatch Alarm and EC2 instance, for autorecovery)
- When Rackspace has a strong opinion that overrides default values for a resource
- When module re-use remains shallow (don’t nest modules if at all possible)
General Terraform Style Guide
Terraform files should obey the syntax rules for the HashiCorp Configuration Language (HCL) and the general formatting guidelines provided by the Terraform Project through the fmt command.
In addition, Rackspace follows the following standards when writing Terraform:
- Use Snake Case for all resource names
- Declare all variables in variables.tf, including a description and type
- Declare all outputs in outputs.tf, including a description
- Pin all modules and providers to a specific version or tag
- Always use relative paths and the file() helper
- Prefer separate resources over inline blocks (e.g. aws_security_group_rule over aws_security_group)
- Always define AWS region as a variable when building modules
- Prefer variables.tf over terraform.tfvars to provide sensible defaults
- Terraform versions and provider versions should be pinned, as it’s not possible to safely downgrade a state file once it has been used with a newer version of Terraform
Rackspace Terraform Module Standards
Rackspace maintains a number of Terraform modules available at https://github.com/rackspace-infrastructure-automation. Contributions should follow these guidelines.
- use semantic versioning for shared code and modules
- always point to GitHub releases (over a binary or master) when referencing external modules
- always extend, don’t re-create resources manually
- parameters control counts, for non-standard numbers of subnets/AZs/etc.
- use overrides to implement Rackspace best practices
- use variables with good defaults for things Rackspace expects to configure
- Modules should use semantic versioning light (Major.minor.0) for AWS account repositories
- Modules should be built using the standard files:
main.tf, variables.tf, output.tf - Consider writing tests and examples, and shipping them in directories of the same name
- Readme files at should contain a description of the module as well as documentation of variables. An example of documentation can be found here.
- The files in
.circleciare managed by Rackspace and should not be changed. If you would like to submit a module, please do so without this folder. - The files in
examplecan be named anything as long as they have.tfas the extension. - The
testsdirectory must be calledtestsand each test must betest#. Inside each test# folder should be exactly one file calledmain.tf` - Use Github’s .gitignore contents for Terraform.
variables.tf
This file must include the following code block at the beginning or end of the file.
variable "environment" {
  description = "Application environment for which this network is being created. one of: ('Development', 'Integration', 'PreProduction', 'Production', 'QA', 'Staging', 'Test')"
  type        = "string"
  default     = "Development"
}
 variable "tags" {
  description = "Custom tags to apply to all resources."
  type        = "map"
  default     = {}
}
main.tf
This file must include the following code block at the top of the file. Other variables can be added to this block.
locals {
  tags {
    Name            = "${var.name}"
    ServiceProvider = "Rackspace"
    Environment     = "${var.environment}"
  }
}
In any resource block that supports tags the following code should be used:
tags = "${merge(var.tags, local.tags)}"
This takes the tag values that are in variable.tf and combines them with any values defined in main.tf in the locals block.
Secrets storage using Terraform
Rackspace recommends storing secrets for Terraform using AWS KMS; embed ciphertext values as data sources in Terraform configurations. Here’s some of the specifics and considerations:
- Use
aws_kms_keyto create a KMS key for use by Terraform; you should apply a key policy that allows IAM roles and users to use the key, because federated accounts can’t access KMS keys using the default policy statements (e.g. most Rackers and Customers):
resource "aws_kms_key" "terraform_config" {
  description = "terraform_config"
  is_enabled  = true

  policy = <<EOF
  {
    "Version": "2012-10-17",
    "Id": "key-default-1",
    "Statement": [
      {
        "Sid": "Default IAM policy for KMS keys",
        "Effect": "Allow",
        "Principal": {
          "AWS": "arn:aws:iam::123456789012:root"
        },
        "Action": "kms:*",
        "Resource": "*"
      },
      {
        "Sid": "Enable IAM user to perform kms actions as well",
        "Effect": "Allow",
        "Principal": {
          "AWS": "${module.terraform_circleci_iam.circleci_user_arn}"
        },
        "Action": "kms:*",
        "Resource": "*"
      }
    ]
  }
EOF
}
You will need to manually use the AWS CLI (and the key-id for the key you created in the previous step) to encrypt your secrets (mind any line endings if you use file:// to encrypt):
- Equipped with the ciphertext from the previous command, you can now use aws_kms_secrets to expose the secret as a data source for further use in Terraform:
data "aws_kms_secrets" "example" {
  secret {
    # ... potentially other configuration ...
    name    = "master_password"
    payload = "base64secret=="

    context {
      resource = "db01"
      key      = "password"
    }
  }

  secret {
    # ... potentially other configuration ...
    name    = "master_username"
    payload = "base64secret=="

     context {
       resource = "db01"
       key      = "username"
     }
  }
}

resource "aws_rds_cluster" "my_database" {
  # ... other configuration ...
  master_password = "${data.aws_kms_secrets.example.plaintext["master_password"]}"
  master_username = "${data.aws_kms_secrets.example.plaintext["master_username"]}"
}
Note the use of context values; these are used as encryption context key pairs in KMS. These context values can be used by KMS to ensure a specific secret is always accompanied by the same context values (integrity), and may be emitted in CloudTrail logs or included in error messages (debugging).
Terraform Style Conventions
Key Concepts
Account Environment
A collection of one or more layers defined within a single account repository. An account environment describes the complete infrastructure deployed for a single customer account.
Layer
A layer is a logical grouping of related resources, data sources, and modules that should be managed together by Terraform. Layers are used to break complex environments into multiple logical subsets. Each layer should independently define configurations for all needed providers. Layers can represent different environments within an account, such as “production” and “test”, different regions a customer application is hosted, or application tiers, like “database”, “web server”, or “network”. When designing layers, the following considerations should be taken:
- Resources that are frequently modified together should be in the same layer, for example an EC2 instance, and its related IAM Role and policies should remain in a single layer.
- Smaller layers will limit blast radius and make Terraform state refreshes and updates quicker and safer.
- Dependencies between layers should always flow one way, taking 000base, 100data, and 200compute layers as an example, 000base should not reference anything in 100data or 200compute, and 100data should not reference anything in 200compute.
- Use a data source (Code Structure) to read another layer’s state. Never write to another layer’s state directly.
Module
Module is a collection of connected resources which together perform the common action (for example, aws-terraform-vpc_basenetwork module creates VPC, subnets, NAT gateway, etc). It depends on provider configuration(s), which should normally be defined at a higher level. Rackspace maintains a number of modules, and customer specific modules can be created as needed.
Resource
Resource is aws_vpc, aws_db_instance, and so on. Resource belongs to provider, accepts arguments, outputs attributes and has lifecycles. Resource can be created, retrieved, updated, and deleted.
Data Source
Data source performs read-only operation and is dependent on provider configuration, it can be used in modules and layers to lookup information about the Account Environment.
Data source terraform_remote_state can be used to output from one layer to another (Code Structure).
The HTTP data source makes an HTTP GET request to the given URL and exports information about the response which is often useful to get information from endpoints where native Terraform provider does not exist.

General Terraform Style Guide
Terraform files should obey the syntax rules for the HashiCorp Configuration Language (HCL) and the general formatting guidelines provided by the Terraform Project through the fmt command.
In addition, Rackspace follows the following standards when writing Terraform:
-
Use snake_case (lowercase with underscore character) for all Terraform resource or object names.
-
Variable defaults and arguments:
- Declare all variable blocks for a module in variables.tf, including a description and type.
- When working within a layer: provide no defaults defined in variables.tf with all variable arguments being provided in
terraform.tfvars - When working within a module: provide sensible defaults where appropriate; defaults can be empty string/list/map where variable is optional and being empty is handled gracefully.
-
Declare all outputs in outputs.tf, including a description.
-
Pin all modules to a specific tag.
-
Pin all providers to major version. (for example,
~> 1.2: any non-beta version >= 1.2.0 and < 2.0.0, e.g. 1.X.Y). -
Always use relative paths and the file () helper.
-
Prefer separate resources over inline blocks (for example,
aws_security_group_ruleoveraws_security_group). -
Always define AWS region in the provider block.
-
Terraform versions and provider versions should be pinned, as it’s not possible to safely downgrade a state file once it has been used with a newer version of Terraform.
Code Structure
Terraform Environment Standards
Customer account repositories should follow the layered style represented in the sample repository https://github.com/rackspace-infrastructure-automation/terraform-standards-examples/tree/master/example_3.1
Here are some considerations for building a new customer environment:
-
_mainshould be used only for initialisation. Resources should be added to newly created layers. -
Unless there is a logical reason to deviate, the following default layers should be used. The idea behind the numbered prefixes is to deploy lower numbered layers first.
000base: VPC, Endpoints, Route53 Internal Zone, SSM Service Role, SNS, Peering, VPN, Transit Gateway, Custom IAM, Directory Service100data: RDS, DynamoDB, Elasticache, S3, EFS, Elasticsearch200compute: EC2, LBs, SQS
-
Be sure to update the backend s3 key value in main.tf for each layer.
-
Security Groups should be defined within the layer in which the resource it is to be attached to resides. Take the following into consideration when defining security group rules:
- If the
source_security_group_idis in a previous layer, import via remote state. - If the
source_security_group_idis in the same layer, proceed as normal. - If the
source_security_group_idis in a following layer, the rule should be moved into the following layer alongside the source group once it is created.
- If the
-
Leverage data source outputs to reference required information in another layer. For example, see Terraform Standards Examples.
-
README.md files must exist and describe the contents of each layer. An example of documentation can be found here for layer modules.
terraform-docsis a tool to help create the documentation and can found here.
Terraform Module Standards
Rackspace maintains a number of Terraform modules available at https://github.com/rackspace-infrastructure-automation . Contributions should follow these guidelines.
-
When a count is required, use of a variable is strongly recommended due to Terraform limitations.
-
When a variable value must be determined during execution, no default argument should be set, in all other cases a good default value should be included.
- eg. ref required.
-
Modules should use “semantic versioning” (major.minor.revision) for customer shared module repositories. Good release notes should be included.
-
Modules must include the following files, even if empty: main.tf, variables.tf, and outputs.tf.
- Additional Terraform files can be included in order to logically separate resources into multiple files.
-
Modules must include an examples directory. If CICD testing is available, modules should contain a tests directory. Each distinct test or example should be placed in a descriptively named subdirectory. Subdirectory contents should meet all defined standards.
For example, see the Terraform Standards Examples.
-
README.md files must exist and contain a description of the module as well as documentation of variables and outputs. An example of documentation can be found here for layer modules.
terraform-docs is a tool to help create the documentation, and can found here. Version v0.6.0 of terraform-docs is used to generate documentation for all Rackspace managed modules.
-
The files in .circleci are managed by Rackspace and *should not* be changed. There is no requirement to modify files found in .circleci when adding an additional module.
Getting started with structuring Terraform configurations
Refer back to the Key Concepts section if you are unsure what each Terraform structure is for.
Layout
The following diagram shows how the layer should be structured:
| layers/
| ├── _main
| │   ├── main.tf
| │   └── variables.tf
| ├── 000base
| │   ├── README.md
| │   ├── main.tf
| │   ├── outputs.tf
| │   ├── terraform.tfvars
| │   └── variables.tf
| └── 100data
| |   ├── README.md
| |   ├── main.tf
| |   ├── outputs.tf
| |   ├── terraform.tfvars
| |   └── variables.tf
| └── 200compute
|    ├── README.md
|    ├── main.tf
|    ├── outputs.tf
|    ├── terraform.tfvars
|    └── variables.tf
The following diagram shows how the modules should be structured:
| modules/
| ├── example
| │   └── main.tf
| ├── globals
| │   ├── main.tf
| │   └── outputs.tf
| └── s3_cf_website
|     ├── README.md
|     ├── examples
|     │   ├── main.tf
|     │   └── variables.tf
|     ├── main.tf
|     ├── outputs.tf
|     └── variables.tf
Resource and data source arguments
-
Resource names should be descriptive and avoid duplication of the resource type, where possible. Shorter resource names should be preferred over longer names, if both are descriptive. Duplication of resource type in part or whole is preferred over the use of non-descriptive names, such as this, that, or thing.
- Bad: resource
aws_cloudwatch_log_group“this” { - Non-descriptive resource name - Good: resource
aws_cloudwatch_log_group“log_group” { - Descriptive resource name - Best: resource
aws_cloudwatch_log_group“apache” { - Descriptive resource name without duplication of resource type.
- Bad: resource
-
Using singular nouns for names is preferred. If an individual resource is commonly referred to in the plural (eg, logs when referring to a CloudWatch Log Group), then a plural noun is acceptable.
- Good: file
- Good: bucket
- Good: logs
- Bad: files
-
Include count argument inside resource blocks as the first argument at the top and separate by newline after it.
-
Any resource property that requires multiple lines should fall below all properties that can be defined on a single line. Each resource property that requires multiple lines should have blank lines between itself and any other property.
-
When present,
depends_onandlifecycleshould be the last two resource properties defined respectively. Each should be separated by a single blank line. -
Boolean values should not be used to directly set the value in count. Instead, a condition should be used.
- Bad:
count = "${var.create_public_subnets}" - Good:
count = "${var.create_public_subnets ? 1 : 0}" - Good:
count = "${var.disable_nat_gateway ? 0 : 1}"
- Bad:
Example Terraform Files
- main.tf: call modules, locals and data-sources to create all resources.
- variables.tf: contains declarations of variables used in main.tf
- outputs.tf: contains outputs from the resources and modules created in main.tf
- terraform.tfvars: should only be used in layers.
- README.md: description of layer or module, including variables and outputs.
Secret storage using Terraform
Irrelevant of the strategy used to manage the creation and/or usage of passwords in Terraform it is important to understand how these are stored once they are used. Whether you hard code a secret (never to be done), create it with the Random provider, or decrypt a KMS encrypted string, the result is that this secret will always be visible in plaintext in the state file. It is therefore the state file that needs protecting. It is for this reason that we use remote state backends within our MIAC models where the storage location can ensure that the state files are encrypted, and the storage mechanism locked down to only those that should have access. When working with console managed customers (AWS primarily) the working practice is to create an AWS S3 bucket to still use an encrypted remote state backend, but with a lifecycle policy of 30 days so after this time the state will no longer exist.
It is the state containing these passwords in plaintext - as well as generally being a very poor, unmanageable, and non-scalable option - that makes storing the state files along with the code a very bad idea.
Guidance
Secrets are typically going to fall into one of two categories: they exist, and we need to use them, or they do not exist, and we need to create and use them.
AWS has services built into the fabric that aid us in this endeavor. There is the AWS Systems Manager Parameter Store which has options to use KMS encrypted Secure Strings, and there is the AWS Secrets Manager. By storing the secrets in one of these services we can access them programmatically in code without needing to hard code them (big tick for clean code), the customer can add them to the console ahead of us using them if they already exist, or if we create them via Terraform, we can store them in the console so we need never know them, and the customer can retrieve them post deployment. In the case of AWS Secrets Manager, it also opens the option of using automatic credential rotation.
If you are needing to create a password/secret (RDS password, AD password, token for CloudFront header, etc.) you can use the Terraform random provider: https://www.terraform.io/docs/providers/random/index.html
This is a basic use of the random provider to create a random string:
Secrets - Random String:
provider "random" {
  version = "~> 2.1"
}

resource "random_string" "rds_password" {
  length = 20
  lower = true
  upper = true
  number = true
  special = false
}
This example will give us a 20 character string containing upper- and lowercase alphanumerical characters. You can then use the output of this in other resources including the password argument of a RDS module call, or the value of an AWS SSM Parameter Store parameter. The next example shows creating, storing, and using the password (shortened for brevity).
Secrets - Random String Store and Use:
provider "aws" {
  version = "~> 2.20"
}

provider "random" {
  version = "~> 2.1"
}

resource "random_string" "rds_password" {
  length = 20
  lower = true
  upper = true
  number = true
  special = false
}

resource "aws_ssm_parameter" "rds_password" {
  name = "${lower(var.environment)}-rds-password"
  type = "SecureString"
  value = "${random_string.rds_password.result}"
  tags = "${local.tags}"
}

module "rds" {
  source = "[email protected]:rackspace-infrastructure-automation/aws-terraform-rds//?ref=v0.0.11"

[..]
password = "${random_string.rds_password.result}"
[..]

}
This example takes our random string and adds it to an AWS SSM parameter as a Secure String and then uses it as the input to the password argument in the RDS module. The same pattern would work for a password for Active Directory. The same pattern would work for adding a header to a CloudFront distribution that must be injected to allow traffic to a backend website bucket. It is flexible and secure and does not require you to work outside of Terraform code to implement.
This is a clean method for creating random strings and you could check the provider documentation if you wanted to make the strings more secure by changing length, adding symbols, etc.
Some in the security community would recommend using random words rather than more traditional patterns; for completeness here is an example of that:
Secrets - Random Pet:
$ cat example.tf

provider "random" {
  version = "~> 2.1"
}

resource "random_pet" "pet" {
  count = 5

  length = "${count.index + 1}"
  separator = ""
}

output "pets" {
  value = "${random_pet.pet.*.id}"
}

$ terraform output
pets = [
katydid,
summaryliger,
mainlyexcitinggrubworm,
merelygentlysteadycub,
openlypresumablylikelyblessedpeacock
]
There could be occurrences where a customer wants to provide a password or wants a specific pattern that we can’t capture in code (because, as we have said, that’s bad code).
As well as creating resources in AWS SSM Parameter Store, we can also pull values from the store as well. Using our RDS example, here we can pull the password value and pass this into our RDS module:
Secrets - Data SSM Parameter:
provider "aws" {
  version = "~> 2.20"
}

data "aws_ssm_parameter" "rds_password" {
  name = "customer-provided-rds-password"
}
module "rds" {
  source = "[email protected]:rackspace-infrastructure-automation/aws-terraform-rds//?ref=v0.0.11"

[..]
password = "${data.aws_ssm_parameter.rds_password.value}"
[..]
}
The examples so far have focused on AWS SSM Parameter store, but we can also use AWS Secrets Manager. In the next two examples we use an existing secret, and we store a new secret. In the first example we are using the current version of the person and we look up the password by the name which works where the secret is in the same account and region, otherwise you need to use the arn argument as documented here: https://www.terraform.io/docs/providers/aws/d/secretsmanager_secret.html .
Secrets - Data Secrets Manager:
provider "aws" {
  version = "~> 2.20"
}

data "aws_secretsmanager_secret" "rds_password" {
  name = "customer-provided-rds-password"
}

data "aws_secretsmanager_secret_version" "rds_password" {
  secret_id = "${data.aws_secretsmanager_secret.rds_password.id}"
}

module "rds" {
  source = "[email protected]:rackspace-infrastructure-automation/aws-terraform-rds//?ref=v0.0.11"

[..]
password = "${data.aws_secretsmanager_secret_version.rds_password.secret_string}"
[..]
}
Secrets - Secrets Manager Store and Use:
provider "aws" {
  version = "~> 2.20"
}

provider "random" {
  version = "~> 2.1"
}

resource "random_string" "rds_password" {
  length = 20
  lower = true
  upper = true
  number = true
  special = false
}

resource "aws_secretsmanager_secret" "rds_password" {
  name                    = "${lower(var.environment)}-rds-password"
  recovery_window_in_days = 7

  tags = "${local.tags}"
}

resource "aws_secretsmanager_secret_version" "rds_password" {
  secret_id = "${aws_secretsmanager_secret.rds_password.id}"
  secret_string = "${random_string.rds_password.result}"
}

module "rds" {
  source = "[email protected]:rackspace-infrastructure-automation/aws-terraform-rds//?ref=v0.0.11"

  [..]
  password = "${random_string.rds_password.result}"
  [..]
}
Deprecated Guidance
Note
The following information was the guidance given to customers and Rackers in the original Phoenix documentation. While this is still a valid solution it is cumbersome for all involved. The information in the above subsection should be considered the preferred route to take when dealing with secrets.
Rackspace recommends storing secrets for Terraform using AWS KMS; embed ciphertext values as data sources in Terraform configurations. Here’s some of the specifics and considerations:
- Use *aws_kms_key* to create a KMS key for use by Terraform; you should apply a key policy that allows IAM roles and users to use the key, because federated accounts can’t access KMS keys using the default policy statements (e.g. most Rackers and Customers):
Example aws_kms_key:
resource "aws_kms_key" "terraform_config" {
  description = "terraform_config"
  is_enabled = true

  policy = <<EOF
  {
    "Version": "2012-10-17",
    "Id": "key-default-1",
    "Statement": [
      {
        "Sid": "Default IAM policy for KMS keys",
        "Effect": "Allow",
        "Principal": {
          "AWS": "arn:aws:iam::123456789012:root"
        },
        "Action": "kms:"*",
        "Resource": "*"
      },
      {
        "Sid": "Enable IAM user to perform kms actions as well",
        "Effect": "Allow",
        "Principal": {
          "AWS": "${module.terraform_circleci_iam.circleci_user_arn}"
        },
        "Action": "kms:*",
        "Resource": "*"
      }
    ]
  }
EOF
}
You must manually use the AWS CLI (and the key-id for the key you created in the previous step) to encrypt your secrets (mind any line endings if you use file:// to encrypt):
Example aws kms encrypt:
$ aws kms encrypt \
    --key-id 438290482-e36a-4803-a7d0-db436278 \
    --plaintext "super_secret" \
    --encryption-context resource=my_database,key=password \
    --output text --query CiphertextBlob
Equipped with the ciphertext from the previous command, you can now use aws_kms_secrets to expose the secret as a data source for further use in Terraform.
Example aws_kms_secrets
data "aws_kms_secrets" "example" {
secret {
# ... potentially other configuration ... name = "master_password" payload = "base64secret=="

context {
resource = "db01" key = "password"
}

}

secret {
# ... potentially other configuration ... name = "master_username" payload = "base64secret=="

context {
resource = "db01" key = "username"
}

}

}

resource "aws_rds_cluster" "my_database" {
# ... other configuration ... master_password = "${data.aws_kms_secrets.example.plaintext["master_password"]}" master_username = "${data.aws_kms_secrets.example.plaintext["master_username"]}"
}
Note the use of context values; these are used as encryption context key pairs in KMS. These context values can be used by KMS to ensure a specific secret is always accompanied by the same context values (integrity), and may be emitted in CloudTrail logs or included in error messages (debugging).
Reference Resources
| Source | URL |
|---|---|
| Fanatical Support for AWS Product Guide | https://manage.rackspace.com/aws/docs/product-guide/miac/using-terraform.html#general-terraform-style-guide |
| Terraform Best Practices | https://www.terraform-best-practices.com/ |
Using CircleCI
Rackspace employs continuous integration and delivery (CI/CD) to deploy your infrastructure based on the master branch of your repository. Therefore, the master branch should always reflect a consistent, deployable, and current expected state of your infrastructure. The master branch is also protected from unreviewed changes and should only be modified through a pull request process.
Any user with GitHub repository access (see: ref:’using_github’) has the same access to CircleCI projects configured to build that repository, using the, “Log In with GitHub” button. These projects, as well as logs, artifacts, and configuration, can be found by directly visiting the rackspace-infrastructure-automation organization in CircleCI. You may also navigate to individual jobs and workflow steps by following the links from the CircleCI status checks on a pull request in GitHub.
Build Environment
Rackspace maintains a standard Docker container, rackspace-toolbox, that is used in every CircleCI job when building, testing, and deploying your repository. This container includes standard tools like tfenv, awscli, python, jq. It also contains our open source Terraform linting tool tuvok and our tooling that wraps Terraform commands, analyzes layers, and retrieves temporary credentials. All changes to this container and scripts are heavily tested before release. This container also gives us a mechanism to release product improvements and security fixes without impacting your repository or workflow. While we don’t publish the source Dockerfile for this container, the container itself is available from rackautomation/rackspace-toolbox to use locally. The container is versioned semantically, and your build configuration references the container with a tag like rackautomation/rackspace-toolbox:1.
Running Locally
Combined with your repository’s .circleci/config.yml file, that calls the various scripts in the toolbox, you are able to run the same builds locally, as long as the container contains AWS credentials (try running aws configure list to confirm), and you’ve defined the following environment variables:
TF\_STATE\_REGION='us-west-2',
TF\_STATE\_BUCKET='your-bucket-name'
TF\_VAR\_aws\_account\_id='your-aws-account-number'
As mentioned in Using Terraform, we recommend using an existing build’s output to find out your state bucket name. You can find the state bucket name in the terraform_all_outputs.log file under the Artifacts tab of the plan stage under the most recent build.
You may also copy and paste the final commands from those builds, bypassing the need to set some environment variables.
Workflow Execution
This section refers to the CircleCI concepts of workflows, jobs, and steps. These should not be confused with the more general usage of terms like “workflow” or other services where these terms exist, like GitHub.
Job Steps and Configuration
On every branch, your builds run standard commands like terraform fmt and terraform init, as well as our custom linting tool, tuvok. We also calculate what layers have changed using a detailed comparison between the current branch and the most recent successful master build.
- On branch
master, your builds run bothterraform planandterraform applyfor any changed or removed layers. - On any other branch, your builds will only run
terraform planfor any changed or removed layers.
Your CircleCI configuration is stored in your repository at .circleci/config.yml. This file configures the CI/CD system with specific workflow steps to execute, and a defines a container in which to run them. This file should not be modified except through coordination with Rackspace.
In your CircleCI configuration, these two main steps are organized as two steps in the workflow, called “plan” and “apply”, and we use the branch filtering functionality to ensure the “apply” step only runs on master, and depends on the plan step. If you’re running terraform locally, it’s important to use the same steps used in CI/CD, and also to never apply a change before it’s been merged into master.
Failed Builds
From time to time, either due to code changes or Terraform/AWS internals, build steps may fail. For branches other than master, this is a totally normal part of writing and testing code. We also enforce that branches are up to date with the latest commits from master before merging, which can cause failures or plans that show unexpected changes. Most failed builds can be resolved through re-running the build or pushing additional commits or pulling in the latest changes from master.
In the event that a master build fails, on the plan or apply steps, Rackspace will automatically create an urgent, public ticket and investigate. We believe that these events could indicate larger problems with your infrastructure, partially applied changes to your infrastructure, or other impactful situations that require immediate attention.
Artifacts and Storage
Each build step writes logs in order to help record what is happening, make troubleshooting easier, and shed light on unexpected failures. These log files are made available in the CircleCI UI for a given build, in an “Artifacts” tab. Over time, we plan to make more artifacts available, with additional helpful output, to make it easier to troubleshoot problems or understand what’s happening in a build. Please note that these artifacts eventually do expire.
AWS Credentials
Temporary credentials are issued to each build, at the start of the build, after our automation confirms that the build is associated with the correct GitHub repository, AWS account, and Rackspace customer. This confirmation relies on the same RSA keys used by GitHub to authorize access to the repository itself.
CircleCI builds now use temporary credentials rather than requiring an IAM user to be assigned to each AWS account. This is based on the same AWS STS-based temporary credentials mechanism used when you access your AWS account via the Fanatical Support for AWS control panel “Console” button.
There are several advantages to using temporary, short-lived credentials over static credentials, given how permissive and powerful Terraform’s credentials need to be when building and managing AWS services on your account:
- Credentials are not stored permanently in the account or in Terraform state (an S3 bucket)
- Temporary credentials will be valid for a short period of time from the start of a build and expire safely
- Static credentials require a terraform change, slowing down the provisioning process for new accounts.
Deploying Code
From time to time, you will be faced with a decision about how to deploy a file, instance configuration, agents, or even entire applications into an AWS environment (we refer to these collectively as ‘artifacts’ below). This page is intended to be our Fanatical AWS “best practices” and opinions around each option.
Many of these options provide an initial bootstrapping step that can then be used to perform additional work or copy additional files from other locations.
Bake files into AMI
Copy needed artifacts to an EC2 image, create an Amazon machine image (AMI), and rotate instances using the new AMI.
Variations:
- Create an instance manually and create an AMI
- Use tools like Packer to automatically build AMIs
Benefits:
- No dependence on external sources
- Fastest instance boot time
- Guaranteed state
- Strongly version controlled
- Can release updates to multiple files simultaneously
- Allows for testing before deployment
- Encryption possible
Drawbacks:
- Updates require a new AMI be built
- Storage cost of AMIs
- May have many AMIs with duplicate artifacts (e.g. one AMI per region)
- Requires additional management to clean up old AMIs
- Some artifacts need to be staged before AMI taken (i.e. sysprep style)
- Some artifacts (e.g. agents) may conflict with user-data/cloud-init
AWS CodeDeploy
Install CodeDeploy agent using one of the methods in this table, then use APIs to drive deployment from GitHub, S3, or another supported Git hosting provider. Embed additional artifacts in the deployment artifact or fetch them during CodeDeploy lifecycle hook execution.
Variations:
- Store artifacts in git and deploy them as part of application
- Fetch artifacts in S3 or another location
Benefits:
- CodeDeploy offers blue-green and canary deployment options
- Allows for live deployments of configuration files without rotating AMIs
- Config files can be tied to application deployments
- Encryption possible with S3
Drawbacks:
- Another agent to maintain and update
- Secrets should not be stored in git repositories
- Requires a deploy of application to update configuration files
User Data
Embed scripts in user-data or in cloud-init (called by user data). These scripts can fetch artifacts from S3, embed smaller artifacts directly, or even add package repositories and install packages.
Variations:
- Fetch files in S3 on boot
- Write files directly on boot
Benefits:
- Fastest ability to update files (just build more instances)
- Ability to always download the latest versions (e.g. for agents)
- Customer can deploy secrets without Rackspace needing to be involved
- S3 can be secured and accessible only from a VPC Endpoint
- Encryption possible
Drawbacks:
- Slows down provisioning of new instances
- Dependence on external source to boot instance
- Difficult / slow to debug, as autoscaling may terminate unhealthy instances
- No guarantee that instances will have same artifact versions
- Security controls must be managed appropriately, with 3rd party code without review on new versions
Native AWS APIs
Write your application to utilize native EC2 SSM Parameter Store or other AWS storage services to directly retrieve artifacts at runtime.
Variations:
- EC2 SSM Parameter Store
- S3, DynamoDB, etc
Benefits:
- No need to manage config file deployment
- Applications can be dynamically updated
Drawbacks:
- Significantly more opaque than a file-based method
- Requires a very good knowledge of the AWS APIs
- May require a re-architecture of the application
Terraform Module
Terraform offers a template provider that can be used to embed artifacts inline or as separate files. You can then use these artifacts via data sources when building a cloud-init configuration.
Variations:
- Keep files in git
- Embed scripts directly in Terraform file
Benefits:
- Terraform native functionality to deploy files with dynamic values
- Allows for collaboration on artifacts in Git
- Uses cloud-init for cross-platform functionality
- Less files strewn around various places
- Easier to pull in dynamic values from other APIs
- Single place to manage instance configuration
Drawbacks:
- Requires co-locating configuration files and Terraform files
- Inline artifacts make Terraform harder to read; painful escaping of strings
- Not in the spirit of Terraform or Infrastructure as Code
- Cannot dynamically update artifacts without applying Terraform again
Frequently Asked Questions
Should I have a backup of my GitHub repositories? Does Rackspace keep a backup of them as well?
GitHub keeps three copies of all data; we believe that these assurances about data reliability are adequate. Beyond that, we also have a copy of the Terraform files for every build that runs through CircleCI, as well as local copies of all revisions anywhere that someone has checked out a local copy recently. We are confident this is enough redundancy to keep your infrastructure safe, however GitHub does offer some tooling suggestions if you would like to create an additional backup of your data on your own.
Why am I seeing Terraform plans with EC2 instances that have one security group removed?
This is most likely from Passport. You should close the Passport request before making infrastructure changes, or restore the removed security group once the change has been applied.
I’ve submitted a pull request to my repository. Why isn’t it being tested and checked by the continuous automation?
This most commonly occurs if you’ve created a fork of your repository and you’re submitting a pull request from that fork instead of a branch on the same repository. In order to protect against the exfiltration of build data, our CI system won’t build from a fork. Please push your forked branch to a branch on the original repository.
I’m seeing authentication failures in CloudTrail when Terraform runs. What are these and what can I do about them?
Unfortunately, the DescribeVpcClassicLinkDnsSupport API call, used by the Terraform provider for AWS to determine EC2 capabilities, is recorded as an authentication failure when an AWS account does not have “EC2 Classic” enabled (a previous generation of the EC2 service). When this occurs, CloudTrail records an error message "This request has been administratively disabled".
How do you handle multiple, concurrent changes? Won’t they break on each other?
Pull requests are designed to fail testing when the branch is out of date with master. This ensures we’ll only apply one set of Terraform changes at a time. We believe this provides adequate concurrency limits to prevent problems.
How can I share modules across repositories but still develop them quickly, without multiple pull requests for every change?
We recommend developing a module in the repository that will be first using it, to limit the amount of review and pull requests while you’re in the development phase and iterating quickly. Once a module has become relatively stable, it can be relocated to your Shared Repository and used in multiple accounts.
How do I protect resources from accidental deletion?
Some Terraform-created resources should be protected from deletion, either due to external dependencies or because they contain data that shouldn’t ever be destroyed. Likewise, sometimes a new resource should be created before the older one is removed, so that there’s always a resource available to serve requests. For these use cases, we recommend using lifecycle blocks on resources to ensure they are never deleted or are re-created in a specific order.
How do I tell Terraform to ignore my application deployment pipeline’s changes? Other types of third-party changes?
For various reasons, you may want to ignore certain attributes on a resource. You may be updating a version attribute as part of a separate application deployment pipeline, or using a third-party service that manages a specific resource in AWS. For these use cases, we recommend using the ignore_changes attribute on specific resources. This should be used sparingly, as it has associated risks and makes your infrastructure harder to rebuild in a repeatable way.
Why don’t you use Terraform’s workspaces feature?
According to the Terraform project developers, workspaces are intended to be, “temporary copies of an infrastructure during development,” modeled after git branches. “Most teams should not use workspaces and should instead use the module-per-environment pattern.” The developers intend to revise the When To Use Workspaces section to be a lot more explicit about what workspaces are suited for and what they are less suited for. In the mean time, they recommend users should instead adopt the module-per-environment pattern. This is what we’ve done with the layers concept.
How do I reapply the master branch on my account, without making infrastructure changes?
The most straightforward way to do this is by making a simple whitespace/comment change to any layers you’d like to have re-applied. Please reach out to your Support team if you need further assistance. At the current time, Rackspace does not monitor for outstanding/unapplied changes between your Terraform configuration and your infrastructure.
Can I take my Terraform files and scripts with me if I leave Rackspace?
All Terraform files used to build your infrastructure can be downloaded and taken with you at any time. Your Terraform module files are located in the GitHub repository connected to your AWS account. The Rackspace developed and managed Terraform module files, which are referenced by your Terraform module(s), are publicly available on a Rackspace owned GitHub repository and are licensed under the MIT license. If you would like assistance in cloning your GitHub repository or downloading your Terraform files, please open a ticket with us.
What is the IAM user on my account being used for? How can I be sure it is secure?
We’re allocating an IAM user on every AWS account strictly to be used by Terraform when running through the CI system. This user’s access keys are known only to the CI system. We will eventually remove this user and use a new process that relies on API keys, scoped only to your AW account, that can be used by the CI system to get temporary, short-lived credentials that have access to build and manage resources in your AWS account.
How many users can I add to GitHub? How do I add them?
By default, we limit the number of users we can add to your GitHub repositories to fifteen (15). Please contact us if you need additional users added or need to exceed that limit.
How can I request a pull request review from Rackspace?
Our tooling and automation automatically track pull requests that you create and prioritizes their review to our Support Teams. Please give us a call if you have something you need urgent review on, and we’ll review immediately with you.
How do I give feedback on the infrastructure-as-code product?
Please open a normal Rackspace support ticket and submit your feedback. Support Rackers will pass your feedback along to our product teams. Your feedback means a lot to us. Thank you.
Updated 5 months ago