Autoscale concepts#
To use the Autoscale API effectively, you should understand several key concepts, discussed in this chapter.
How Autoscale works#
Rackspace Autoscale is an API-based tool that automatically scales resources in response to an increase or decrease in overall workload based on user-defined thresholds.
Autoscale calls the Rackspace Cloud Servers, Rackspace Cloud Load Balancers, and Rackspace RackConnect v3 APIs. All Rackspace Cloud Server create server configuration parameters can be used with Autoscale. For more information, see the following documentation:
Autoscale functions by linking these services:
Rackspace Cloud Servers. Learn more at Cloud Servers Getting Started Guide
Load-balanced Cloud Servers. Learn more at Load Balancers Getting Started Guide.
You can set up a schedule for launching Autoscale or define an event that triggers a webhook. You can also specify a minimum and maximum number of cloud servers for your scaling group, the amount of resources you want to increase or decrease, and policies based on percentage or real numbers.
Note
Autoscale does not configure any information within a server. You must configure your services to function when each server is started. We recommend automating your servers’ startup processes with Chef or a similar tool.
Autoscale can use all Rackspace Cloud Server create server API parameters. For more details, see the Create servers documentation.
Scaling groups#
The scaling group is at the heart of an Autoscale deployment. The scaling group specifies the basic elements of the Autoscale configuration. It manages how many servers can participate in the scaling group. It also specifies information related to load balancers if your configuration uses a load balancer.
When you create a scaling group, you specify the details for group configurations and launch configurations.
Configuration |
Description |
|---|---|
Group Configuration |
Outlines the basic elements of the Autoscale configuration. The group configuration manages how many servers can participate in the scaling group. It sets a minimum and maximum limit for the number of entities that can be used in the scaling process. It also specifies information related to load balancers. |
Launch Configuration |
Creates a blueprint for how new servers will be created. The launch configuration specifies what type of server image will be started on launch, what flavor the new server is, and which cloud load balancer or RackConnect v3 load balancer pool the new server connects to. Note: The launchConfiguration uses the admin user to scale up, usually the first admin user found on the tenant. Only that particular admin user’s SSH key pair names can be used in the launchConfiguration. Note: The launchConfiguration update operation overwrites all launchConfiguration settings. |
The launch configuration specifies the launch type along with server and load balancer configuration for the components to start. Most launch configurations have both a server and a load balancer (can be RackConnect v3) configured as shown in the Launch configuration examples .
typeSet the type parameter to this value:
launch_server.argsSpecifies the configuration for server and load balancers. Most launch configurations have both a server and a load balancer (can be RackConnect v3) configured. The following items can be configured:
serverSpecifies configuration information for the Cloud server image that will be created during the scaling process. If you are using Boot From Volume, the
serverargs are where you specify your create server template. See Server parameters.loadbalancersSpecifies the configuration information for the load balancer(s) used in the cloud server deployment, including a RackConnect v3 load balancer pool. For background information and an example configuration, see Cloud Bursting with RackConnect v3.
Note
You must include the
ServiceNetnetwork in your configuration if you use a load balancer so the load balancer can retrieve the IP address of new servers. See Load balancer parameters.draining_timeoutSpecifies the number of seconds Autoscale will put the CLB node in DRAINING mode before deleting the node and eventually the server. This is used when scaling down. Not used when there is no
loadbalancersconfiguration. Please note that this feature only works with a cloud load balancer.
Each scaling group has an associated status that represents the health of the
group. When the group is successfully able to launch servers and optionally add
them to load balancers then the status is ACTIVE. If the scaling group cannot
launch servers because of an error that requires user attention,
the status changes to ERROR. In this case, the group state
contains a list of human-readable messages that explain the conditions that caused the error.
After you fix the errors, you can restore the group to ACTIVE state by submitting a
converge or execute policy
API request.
Server parameters#
Specifies configuration information for the Cloud server image that will
be created during the scaling process. If you are using Boot From
Volume, the server args are where you specify your create server template.
The server group parameter specifies details about the server as
described in the following table. Note the server arguments are
directly passed to nova when creating a server.
Parameter name and description
nameSpecifies a prefix to the name for created servers. The name of new servers will be automatically generated using the following formula:
[serverName]-AS[uniqueHash], and will look similar to the following:[serverName]-AS12fabe. The name of new servers may be truncated to fit within the limit of 255 characters.flavorRefSpecifies the flavor id for the server,
performance1-4for example. A flavor is a resource configuration for a server. For details, see Server flavors.imageRefSpecifies the ID of the Cloud Server image to start,
0d589460-f177-4b0f-81c1-8ab8903ac7d8for example.OS-DCF:diskConfigSpecifies how the disk on new servers is partitioned. Valid values are
AUTOorMANUAL. For non-Rackspace server images, this value must always beMANUAL. A non-Rackspace server image would be one that you imported using a non-Rackspace server. For more information, see the Disk Configuration documentation for Rackspace Cloud Servers.metadataOptional. The maximum size of the metadata key and value is 255 bytes each. For details, see the Server Metadata documentation for Rackspace Cloud Servers. You use this attribute to configure RackConnect v2 with Autoscale Cloud Bursting Using Autoscale, RackConnect, and F5 Load Balancers.
Do not use this parameter to configure Autoscale and RackConnect v3, use the
loadBalancersparameter instead.networksSpecifies the networks to which you want to attach the server. This attribute enables you to attach to an isolated network for your tenant ID, the public Internet, and the private ServiceNet. If you do not specify any networks, your server is attached to the public Internet and private ServiceNet. The UUID for the private ServiceNet is
11111111-1111-1111-1111-111111111111. The UUID for the public Internet is00000000-0000-0000-0000-000000000000.personalitySpecifies the file path or the content to inject into a server image. See the Server Personality documentation for Rackspace Cloud Servers.
user_dataSpecifies the base64 encoded create server template that you use to Boot from Volume. For details, see the Config-Drive Extension section of the Next Generation Cloud Servers Developer Guide. For more information on Boot from Volume, see the developer blog Using Cloud Init with Rackspace Cloud.
Load balancer parameters#
Load balancer parameters specify the configuration information for the load balancer(s) used in
the cloud server deployment, including a RackConnect v3 load balancer
pool. For background information and an example configuration, see Cloud Bursting with RackConnect
v3. Please note that you must
include the ServiceNet network in your configuration if you use a
load balancer so the load balancer can retrieve the IP address of new
servers.
Parameter name and description
loadBalancerIdSpecifies the ID of the load balancer that is automatically generated when the load balancer is created.
portThe server port for receiving traffic from the load balancer, often poirt 80.
Note
You can get information about your load balancer from the Control Panel or by using List Load Balancer Details.
Launch configuration examples#
The following example shows a launch configuration of type “launch_server” for a cloud server and a load balancer:
Example: Launch configuration
{
    "args": {
        "loadBalancers": [
            {
                "loadBalancerId": 9099,
                "port": 8080
            }
        ],
        "server": {
            "OS-DCF:diskConfig": "AUTO",
            "flavorRef": "performance1-2",
            "imageRef": "0d589460-f177-4b0f-81c1-8ab8903ac7d8",
            "metadata": {
                "build_config": "core",
                "meta_key_1": "meta_value_1",
                "meta_key_2": "meta_value_2"
            },
            "name": "autoscale_server",
            "networks": [
                {
                    "uuid": "11111111-1111-1111-1111-111111111111"
                },
                {
                    "uuid": "00000000-0000-0000-0000-000000000000"
                }
            ],
            "personality": [
                {
                    "contents": "VGhpcyBpcyBhIHRlc3QgZmlsZS4=",
                    "path": "/root/.csivh"
                }
            ]
        }
    },
    "type": "launch_server"
}
Example: Launch configuration for boot from volume
{
    "args": {
        "server": {
            "imageRef": "",
            "block_device_mapping_v2": [
                {
                    "uuid": "09de0a66-3156-48b4-90a5-1cf25a905207",
                    "source_type": "image",
                    "boot_index": 0,
                    "delete_on_termination": true,
                    "destination_type": "volume",
                    "volume_size": "50"
                }
            ],
            "flavorRef": "compute1-4",
            "name": "bfvserver",
            "networks": [
                {
                    "uuid": "11111111-1111-1111-1111-111111111111"
                }
            ]
        }
    },
    "type": "launch_server"
}
Example: Create server template for RackConnect v3
{
    "args": {
        "loadBalancers": [
            {
                "loadBalancerId": "4fe1b258-f7c9-4688-a3ab-0c90e654b98",
                "type": "RackConnectV3"
            },
            {
                "loadBalancerId": "cf2c0cc4-7631-4863-ad22-fb8fc2b6b8d",
                "type": "RackConnectV3"
            }
        ],
        "server": {
            "flavorRef": "performance1-1",
            "imageRef": "3cb52e99-ccb8-490f-a482-9eba116bae9",
            "metadata": {},
            "name": "jp-as-sg-wosn",
            "networks": [
                {
                    "uuid": "07426958-1ebf-4c38-b032-d456820ca2a"
                }
            ]
        }
    },
    "type": "launch_server"
}
Learn more#
See the following topics for information about configuring Cloud Servers through an API.
See these topics for information about configuring Cloud Load Balancers through an API:
Webhooks and capability URLs#
Autoscale uses webhooks to initiate scaling events. A webhook is an industry-standard protocol for sending events between systems; for Auto Scale, they are used to execute policies. A webhook consists of an HTTP callback that is triggered by some user-defined event, such as an alarm that is set through Cloud Monitoring or another monitoring service. When that event occurs, the source site makes an HTTP request to the URI configured for the webhook.
A webhook contains a POST call to a defined URL, potentially with a payload in the POST body. You can send webhooks with a simple call in the library that you are using. You can also send them manually via cURL:
Example: POST request to execute a webhook
curl -v https://example.com/webhook -X POST -d "payload=payload"
Autoscale only supports anonymous webhooks. In regular webhooks, the {webhook_version}/{webhook_hash} is specified by URL. In anonymous webhooks, the URL is replaced with a hash that is known only to the issuer— because no authentication is needed, the webhook is considered “anonymous.”
Autoscale uses Capability URLs in conjunction with webhooks. Capability URLs are URLs that give authorization for a certain action or event. If you know the URL, you have access to it and you can use the URL to trigger a specific event. Capability URLs are usually long, and random, and cannot be guessed by a user.
When a webhook is created, Autoscale creates values for the
capabilityVersion and capabilityHash parameters. These values
are created per webhook, not per policy. When you create a webhook, you
associate it with a policy. The response to the webhook creation request
includes a single capability URL that is also, by inheritance,
associated with the policy.
The Autoscale webhook architecture allows Autoscale to be integrated with other systems, for example, monitoring systems. So, now you have this URL that will execute a specific policy and you can fire off that URL based on events happening outside of Autoscale.
To execute a capability URL, locate the URL in your webhook, and then submit a POST request against it, as shown in the following example:
Example: POST request to execute a capability URL
curl --include \
--request POST \
"https://ord.autoscale.api.rackspacecloud.com/v1.0/execute/1/be624bfb20f07baddc278cd978c1ddca56bdb29a1c7b70bbeb229fe0b862c134" -v
Executing a capability URL or an anon`ymous webhook will always return a
202, Accepted, response code, even if the request fails because of
an invalid configuration. This is done to prevent information leakage.
Note
To execute anonymous webhooks and capability URLs, no authentication is needed. You can use a capability URL to trigger multiple webhooks.
Scaling policies#
Autoscale uses policies to define the scaling activity that will take place, as well as when and how that scaling activity will take place. Scaling policies specify how to modify the scaling group and its behavior. You can specify multiple policies to manage a scaling group.
You can create two kinds of Autoscale policies:
Policies that trigger Autoscale activities through a webhook.
Policies that trigger Autoscale activities based on a schedule.
Webhook-based policies#
You can define a scaling policy that is invoked by a webhook when a predefined event occurs.
Note
The change, changePercent, and desiredCapacity parameters
are mutually exclusive. You can only set one of them per policy.
To configure a webhook-based policy, you set the type parameter to
webhook and then specify the parameter values.
Webhook-triggered Policies parameter descriptions
changeSpecifies the number of entities to add or remove, for example “1” implies that 1 server needs to be added. Use to change the number of servers to a specific number. If a positive number is used, servers are added; if a negative number is used, servers are removed.
changePercentSpecifies the change value in per cent. Use to change the percentage of servers relative to the current number of servers. If a positive number is used, servers are added; if a negative number is used, servers are removed. The absolute change in the number of servers is always rounded up. For example, if -X% of the current number of servers translates to -0.5 or -0.25 or -0.75 servers, the actual number of servers that will be shut down is 1.
desiredCapacitySpecifies the final capacity that is desired by the scale up event. Note that this value is always rounded up. Use to specify a number of servers for the policy to implement—by either adding or removing servers as needed.
The webhook object takes no args parameter.
Note
The change, changePercent, and desiredCapacity parameters
are mutually exclusive. You can only set one of them per policy.
Schedule-based policies#
You can define a scaling policy that is invoked by a preset schedule.
Note
The change, changePercent, and desiredCapacity parameters
are mutually exclusive. You can only set one of them per policy.
To configure a schedule-based policy, set the type parameter to
“schedule” and then specify the parameter values.
Scheduled-based Policy parameter descriptions
changeSpecifies the number of entities to add or remove, for example “1” implies that 1 server needs to be added. Use to change the number of servers to a specific number. If a positive number is used, servers are added; if a negative number is used, servers are removed.
changePercentSpecifies the change value, in incremental stages or per cent. Use to change the percentage of servers relative to the current number of servers. If a positive number is used, servers are added; if a negative number is used, servers are removed. The absolute change in the number of servers is always rounded up. For example, if -X% of the current number of servers translates to -0.5 or -0.25 or -0.75 servers, the actual number of servers that will be shut down is 1.
desiredCapacitySpecifies final capacity that is desired by the scale up event. Use to specify a number of servers for the policy to implement—by either adding or removing servers as needed.
argsProvide information related to the time when the policy is supposed to be invoked.
For example to use Cron, a time-based job scheduler, specify the time to invoke the policy in CRON format, as shown in the following example, which configures the policy to be invoked at 6 AM every day:
Example: Schedule-based policy using cron
[
  {
  "cooldown": 600,
   "args":
      {"cron": "0 6 * * *"
      },
   "type": "schedule",
   "name": "testscheduler_736835",
   "desiredCapacity": 2
  }
]
To set the time at which the policy will be invoked directly, without Cron, use the “at” argument and specify the time using the format that is shown in the following example:
Example: Schedule-based policy specifying direct time
[
    {
     "cooldown": 600,
     "args": {
        "at": "2013-11-06T22:28:21.684336Z"
        },
     "type": "schedule",
     "name": "testscheduler_497090",
     "desiredCapacity": 2
    }
]
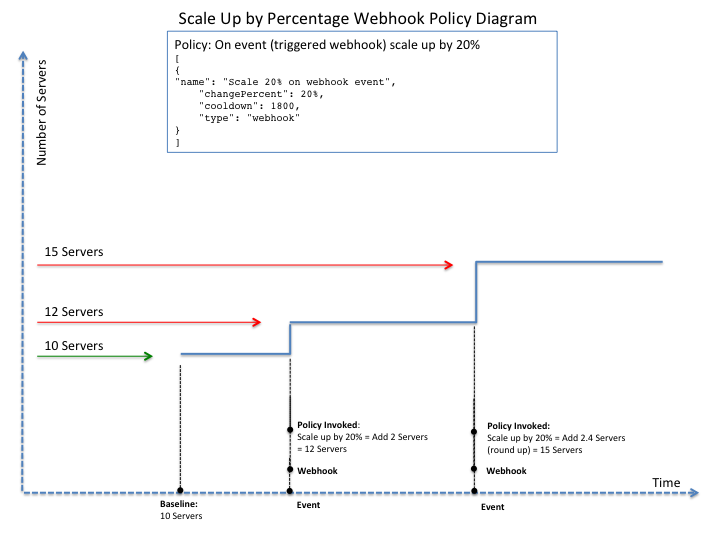
Scaling by percentage#
You can define a policy that scales your server resources up and down by a predefined percentage. For example, you can define a policy to increase your resources by 20% if a certain predefined event occurs as illustrated in the following figure.
Scale by percentage in response to an event that triggers a webhook
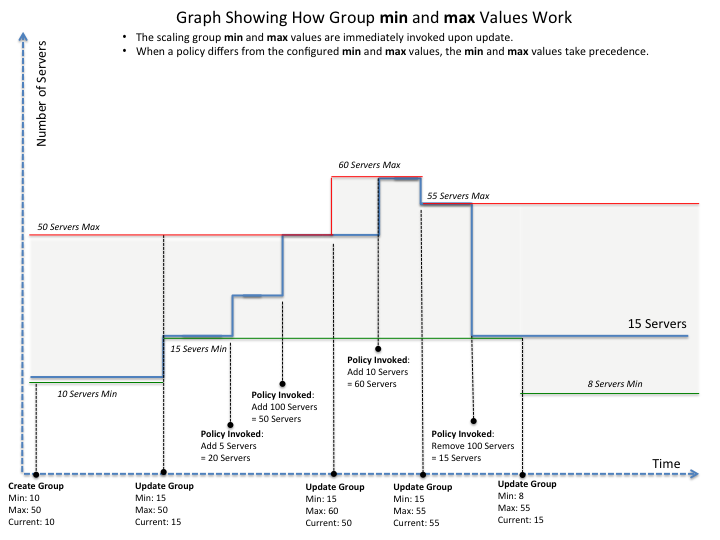
Using the min and max values with policies#
When setting up your scaling groups, you configure the minimum and
maximum number of resources that are allowed. These values are specified
in the minEntities and maxEntities parameters under group
configuration, and are invoked whenever you update your group
configuration.
Important
If the number of resources that is specified in a policy differs from the amount that is specified under group configuration, the preconfigured values take precedence.
Scale by percentage based on min and max values
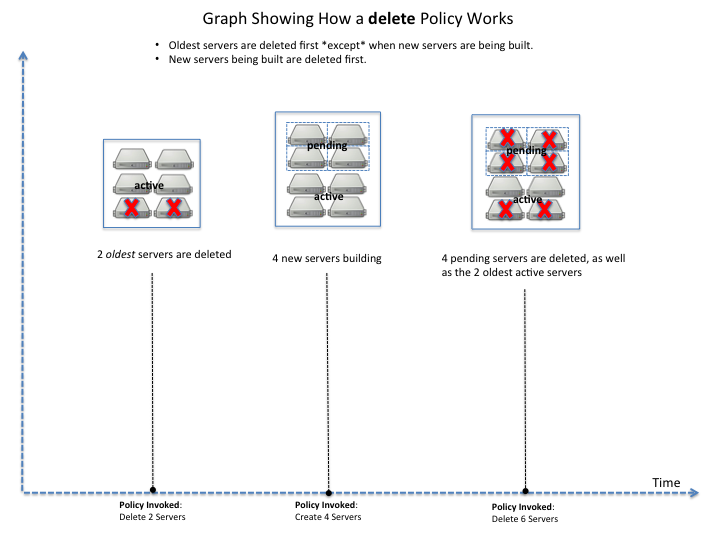
Deleting resources#
You can set a policy to specify when to delete resources, and how many resources to delete.
When deleting servers, Autoscale follows these rules:
If no new servers are in the process of being built, the oldest servers are chosen to be deleted first.
If new servers are in the process of being built and in a “pending” state, these servers are chosen to be deleted first.
After selecting servers for deletion, the Autoscale process deletes each server immediately, unless the server has an associated load balancer that has been configured with a draining timeout period. In these cases, Autoscale puts the load balancer node in DRAINING mode and waits for the draining_timeout period to end before deleting the server from the scaling group.
The following diagram illustrates how the deletion process works.
Delete policy for server resources
Cooldowns#
Autoscale supports a cooldown feature. A cooldown is a configured period of time that must pass between actions. Cooldowns only apply to webhook-based configurations. By configuring group cooldowns, you control how often a group can have a policy applied, which can help servers scaling up to complete the scale up before another policy is executed. By configuring policy cooldowns, you control how often a policy can be executed, which can help provide quick scale-ups and gradual scale-downs.
Cooldowns work the following way:
Group cooldowns control how often a group can be modified by denying all policy executions until the cooldown expires—even if conditions exist that would trigger one.
Policy cooldowns control how often a single, specific policy can be executed. For example, a policy cooldown can require at least six hours until any successive scale down policies are reactivated.
Note
Cooldown configuration is irrelevant for schedule-based configurations and the Group Cooldown and Policy Cooldown can both be set to 0 (null).
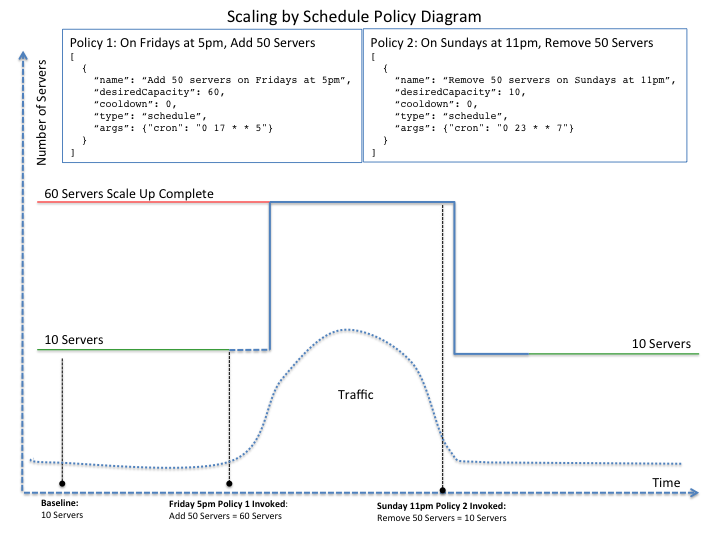
Schedule-based configurations#
You can configure Autoscale to be triggered based on a user-defined schedule that is specified in one or more policies.
This configuration option is helpful if you know that your Cloud Servers deployment will need additional resources during certain peak times. For example, if you need additional server resources during the weekend, you can define a policy that adds 50 servers on Friday evening and then removes these servers again on Sunday evening to return to a regular operational state.
Scale servers by schedule
Event-based configurations#
You can configure Autoscale to be triggered through a webhook, based on a predefined alarm or threshold that has been previously set up in a monitoring service. Event-based configuration works the following way:
In your monitoring service, you configure alarms that are triggered when a high utilization of resources occurs
In Autoscale, you configure a scaling group, scaling policies, and a webhook to be triggered when your monitoring service sets off an alarm for high utilization of resources.
The webhook launches the Autoscale service, which looks up the policy that has been defined in accordance with the webhook. This policy determines the amount of cloud servers that need to be added or removed.
Note
Servers added through a webhook triggered by an external monitoring service will not be automatically monitored by the external monitoring service.
Cloud bursting with RackConnect v3#
You can use Autoscale with a hybrid, dedicated and cloud, solution to “burst” into the cloud when extra servers are temporarily needed. To do this, you use RackConnect v3, a Rackspace solution that works with Rackspace cloud servers and creates a secure bridge between the Rackspace cloud and your dedicated hardware.
To get started with RackConnect v3 cloud bursting:
Contact your Rackspace Support team and tell them what you want to do. They will configure a load balancer pool for you and give you the UUID.
Configure your
launchConfiguration loadBalancersattributes with the load balancer pool UUID that was given to you as theloadBalancerIdand useRackConnect v3for thetype. Do not set a value forport.
Example: RackConnect v3 launchConfiguration with two load balancer pools
   {
    "type": "launch_server",
    "args": {
        "loadBalancers": [
            {
                "loadBalancerId": "4fe1b258-f7c9-4688-a3ab-0c90e654b98",
                "type": "RackConnectV3"
            },
            {
                "loadBalancerId": "cf2c0cc4-7631-4863-ad22-fb8fc2b6b8d",
                "type": "RackConnectV3"
            }
        ],
        "server": {
            "flavorRef": "performance1-1",
            "imageRef": "3cb52e99-ccb8-490f-a482-9eba116bae9",
            "name": "jp-as-sg-wosn",
            "metadata": {},
            "networks": [
                {
                    "uuid": "07426958-1ebf-4c38-b032-d456820ca2a"
                }
            ]
        }
    }
}
Related information
Convergence#
The convergence feature provides higher reliability for scaling by optimizing the use of the Cloud Servers API with retries until they are successful. Convergence ensures that the current server and load balancer configuration for a scaling group always matches the specification in the launch configuration of the group. It does this by continuously converging to the desired state of the scaling group, instead of manipulating servers only once.
Convergence also provides a self-healing capability by tracking all the servers
in an autoscaling group continuously and automatically replacing any servers that
have been deleted out-of-band or transitioned to an ERROR state.
Autoscale uses convergence internally to launch and delete servers.
You can trigger convergence explicitly by submitting a converge
request for a specified group. This operation is useful for fixing a scaling
group that is in an ERROR state. Typically, the ERROR state is caused
by an invalid launch configuration, for example a configuration that includes
a server image reference of a deleted image. After correcting the launch
configuration, you can submit a converge request
to restore the group to the desired state.